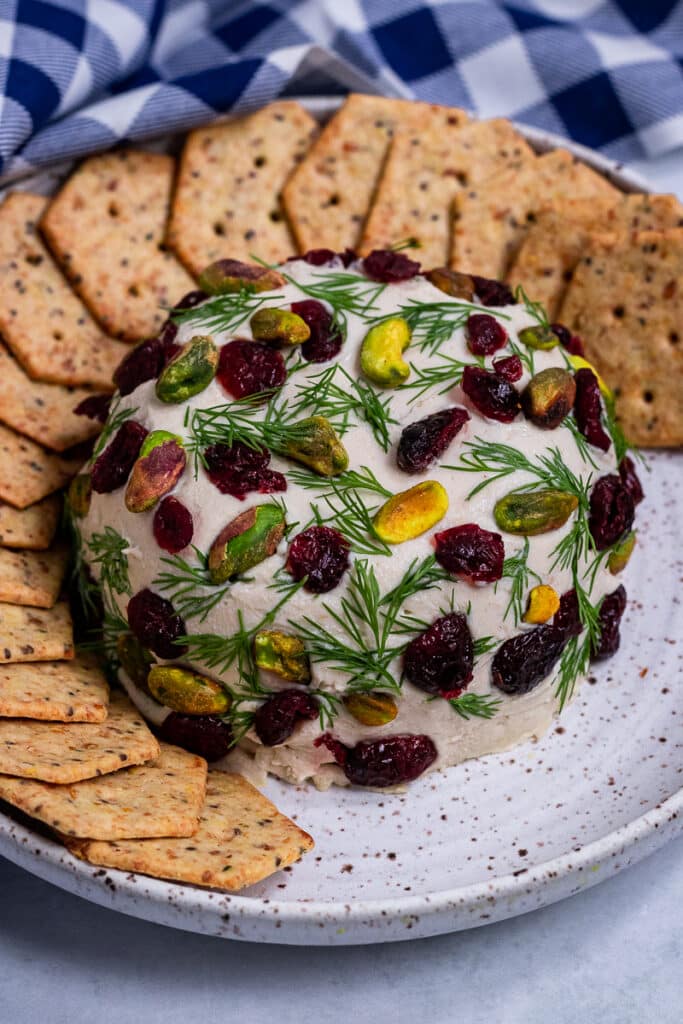
Creamy and loaded with flavor, this awesome Vegan Cheese Ball is easy to make, fun to decorate, and perfect for an appetizer or party snack. Highlight it on a vegan snack board or just dig in with some crackers and enjoy!
This post may contain affiliate links. See our disclosure policy for details.
Hey Internet, if you know Zardyplants, then you know I make a lot of vegan cheese, all without nuts for a variety of reasons, some financial, some allergy, some environmental.
I’ve made cheeses that are stretchy and saucy like vegan mozzarella, and I’ve made firmer cheeses like vegan cheddar.
But I haven’t made a cheese ball yet. The closest I’ve come is my vegan brie that is a spreadable cheese like this one, but I was specifically craving a cheese ball.
A cheese ball is typically very creamy, somewhat soft cheese, covered in decorations that vary, but usually a mixture of herbs, dried fruit, and nuts.
So while there are no nuts IN this vegan cheese ball, there are pistachio nuts decorating it--but feel free to substitute whatever you like as decoration (more on that later).
This cheese ball is actually very easy to make, and depending on looks and texture, I have two different methods for you. If you want a softer cheese ball less likely to hold its shape, the process and chill time will be quicker.
But the one I’m showing in my pictures is actually a bit longer of a process (a difference of about 5 minutes, haha) and a bit longer of a chill time (a difference of around 2 hours) but it does make it firmer.
However, both are easy and both are delicious, and I would be proud to serve either for my friends and family, or as is most often, just for myself and my partner.
Generally vegan cheeses are made with cashews, but I don’t typically use cashews because they’re very expensive and honestly a lot of people are allergic to tree nuts.
That’s why I started making nut-free vegan cheese using blended tofu, and sometimes sunflower seeds to add a little fatty texture. If you can’t have sunflower seeds you could use coconut milk instead, as I do in my vegan brie.
Serve up this vegan cheese ball with crackers of your choice, crostini, veggies, or fruit for a sweet and salty flavor. Apple slices would be especially good here.
What You’ll Need
So if you read the above paragraph or if you know me already, you’ll know the base of this recipe is firm tofu.
If you’re going the extra step and making this a firmer cheese ball, you could use a softer tofu, but if you’re not going to add the agar / tapioca mixture (more on that later) then you need to use firm or extra firm tofu, otherwise your cheese ball will be too wet to hold together. You could, however, still make a nice cheese dip this way.
But to make this vegan cheese ball taste nice, rich, and … cheesy… you’ll need a bit of fat. I recommend using raw sunflower seeds, as they are rich but neutral in flavor. I actually feel they’re even more neutral than cashews (less sweet), but you can totally substitute cashews if you like.
In fact, you could keep all the other ingredients the same and substitute both the tofu and sunflower seeds for all soaked cashews, if you want.
Next up, flavor. I highly highly highly recommend nutritional yeast. I know there are those of you who hate the flavor but bear with me for a sec.
Trust me that the finished product does not taste at all like nutritional yeast, it just tastes cheesy and rich so don’t skip it! You can always just buy the little bit you need from this recipe from bulk bins at a health food store if you don’t want a bunch of nutritional yeast hanging around your house. :)
Also keep in mind there are two different types of nutritional yeast -- fortified and unfortified. The fortified version is more common and bright yellow in color due to the b-vitamins it’s fortified with.
For light colored cheeses, I keep unfortified nutritional yeast around. It doesn’t matter at all for the flavor, though so you use whatever you like/have.
Moving on: spices. I kept the flavor profile of this vegan cheese ball pretty simple: garlic powder, onion powder, and sea salt.
You can add or experiment with other spices as you like. Try omitting the onion powder and adding dried herbs for a garlic and herb flavor, or add some smoked paprika or cayenne pepper.
Oh, and can’t forget lemon juice! It really brightens the flavors, though you could substitute any vinegar--apple cider vinegar would be nice here.
So, about those options.
Now, if you just want to make a softer cheese ball and not “cook” the cheese (easier then it sounds, trust me), move onto the next section.
If you want a fancy cheese ball that holds its shape, we’re gonna add three things: a bit of unsweetened non-dairy milk, agar POWDER (also known as agar agar), and tapioca starch.
These two things together help create a delightful, buttery smooth and creamy texture.
PLEASE NOTE THAT AGAR FLAKES ARE DIFFERENT FROM AGAR POWDER. IF YOU HAVE AGAR FLAKES YOU WILL NEED MUCH MORE THAN THE MEASUREMENT THAT IS WRITTEN FOR AGAR POWDER.
It looks like roughly 3 times the amount of flakes are needed if substituting, but they can also be rougher so you need to boil them before use.
Try to use the agar powder if you can instead. You only need a small amount, but you’ll be able to make SO MANY BATCHES, plus it can be used for other things like gelatin replacement.
Agar powder is the seaweed derivative that enables this cheese to firm up in the mould (the container we store it in).
Tips for Making a Vegan Cheese Ball
Like I mentioned above, there’s an extra step you can do to this recipe to make it firmer, but I’ll leave that for the end. Follow these instructions up until that point for your cheese ball, regardless of what you choose to do.
- So the first step is to drain the tofu. Cut open the package and pour out the liquid. Then wrap the tofu in a clean kitchen towel or paper towels and squeeze out as much of the liquid as you can. It’s OK if the tofu breaks. You don’t need to use a tofu press or anything like that, we’re just getting out the majority of the liquid.
- Crumble it into your food processor or blender, and add the lemon juice, nutritional yeast, and spices. Pulse until combined and smooth.
- If you don’t want to do the extra steps to make your cheese ball firmer, take it out now and place it in a small bowl or container. You could also wrap it in plastic wrap and form it into a ball shape -- if you find it too sticky for that, add a bit more sunflower seeds or nutritional yeast. Refrigerate 2 hours or until it’s chilled enough, then enjoy! It can be a bit tricky to get out of the bowl in this method (I’ve found personally), so use a butter knife to gently coax it out. You may need to smooth it with a spatula or your fingers, then decorate it as you wish and serve.
- If you are making it firmer, taste the cheese ball now and adjust accordingly. Then add the agar powder, tapioca starch, and unsweetened non-dairy milk and blend until smooth.
- Now pour the contents of the blender into a small to medium non-stick saucepan. Make sure to use a spatula to get all that cheesy goodness out of the blender!
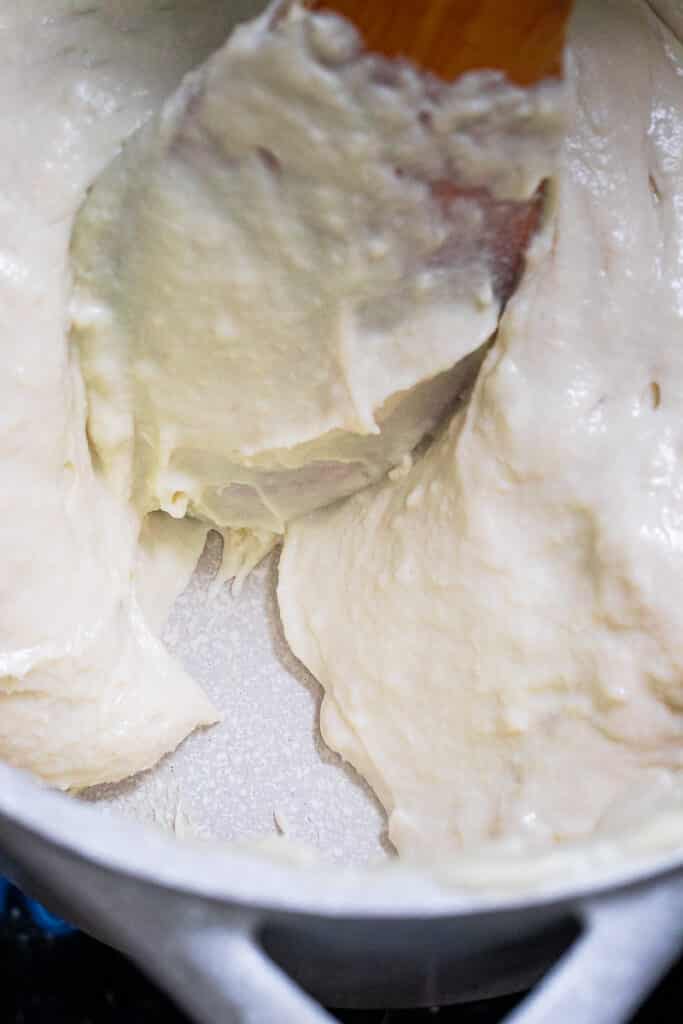
- To cook the cheese, heat the pan over medium high heat until it starts to curdle. This should take only a few minutes. Stir it constantly with a strong spatula or wooden spoon. Turn the heat down to medium for the last few minutes of cooking, which is now--once it starts to curdle it will only be a few minutes before the cheese is ready to go in the mould. As your stir, the curdled cheese will transform into a glossy, thick, playdough like consistency. It will start to pull away from the pan very noticeably.
- Transfer the cheese into the bowl you’re refrigerating it in. Keep in mind that the container you refrigerate it in will be the shape of your completed cheese. Don’t worry if it doesn’t look smooth on top--this is the BOTTOM of your cheese ball since we’re flipping it. You can always cut off that part later. And eat it--what a hardship.
- Chill for at least 3-4 hours, and then check it. It should be somewhat firm to the touch.
- When fully refrigerated, release it by running a butter knife around the inside of the bowl, turn the bowl upside down on the plate or board you’re serving it on, and give it a few taps. It should come out pretty easily.
- Decorate with whatever you like (see below), serve, and enjoy!
What to Decorate a Cheese Ball With
You don’t have to decorate your cheese ball at all if you don’t want to, but it’s pretty fun. I used dill, dried cranberries, and pistachios for festiveness and FLAVOR, but here’s a few ideas on other decorations:
- Seeds like hemp seeds, more sunflower seeds, poppy seeds or chia seeds for crunch
- Everything bagel seasoning - YUM
- Sun dried tomatoes, basil, oregano, and garlic flakes
- Nuts like pecans, walnuts, pistachios, pine nuts, cashews, almonds, etc.
- Chopped artichoke hearts and bits of spinach
- Dried fruit like the cranberries I used, raisins, chopped dried apples or cranberries or apricots, chopped dates, etc.
- Olives and capers
- Caramelized onions
More Vegan Cheese Recipes
Want more vegan cheese? I don’t blame you. Vegan cheese is awesome!
Did you know I have a whole section on nut-free vegan cheese on my site?!
I even made a whole list of my favorite nut-free vegan cheese recipes!
Here’s a few:
- Nut-Free Vegan Cheddar Cheese - This one’s a fan favorite as well!
- Vegan Brie - Pinterest folks seem to love this one!
- Vegan Feta
- Stretchy, Melty Mozzarella
- Stretchy, Melty Cheddar Sauce
- Vegan Goat Cheese Crumbles
- Nut-free Soy-free Vegan Cheese Sauce
- Queso (part of a nacho fries recipe, but you could just scroll down to the sauce section!)
I have a thing for vegan cheese and I come out with new recipes all the time. If you’d like to sign up for my free newsletter so you don’t miss any cheese recipes, please fill out the below form!
And if you're looking for more tofu dishes, check out this post I made with all my best tofu recipes.
Anything Else?
As always, I hope you love this recipe--I know I do, and Mr. Zardyplants does too. How do I know? I barely got any, lol.
This vegan cheese ball is:
- Creamy
- Cheesy
- Tangy
- Rich
- Salty
- Fancy
- Satisfying
- And great in any dish or just as a side to bring to a holiday or dinner party--even meat eaters will enjoy it! It makes the perfect addition to any cheese or charcuterie board, too.
Let me know in the comments below if you make this recipe or tag me @Zardyplants on Instagram so I can see your beautiful recreations! If you tag me on IG, I will share your post in my stories :)
Also, one quick request: if you love how this recipe looks or tastes, please leave me a 5-star rating and a nice comment–ratings help more people find my recipes which helps me keep providing them! Thank you!
<3 Liz
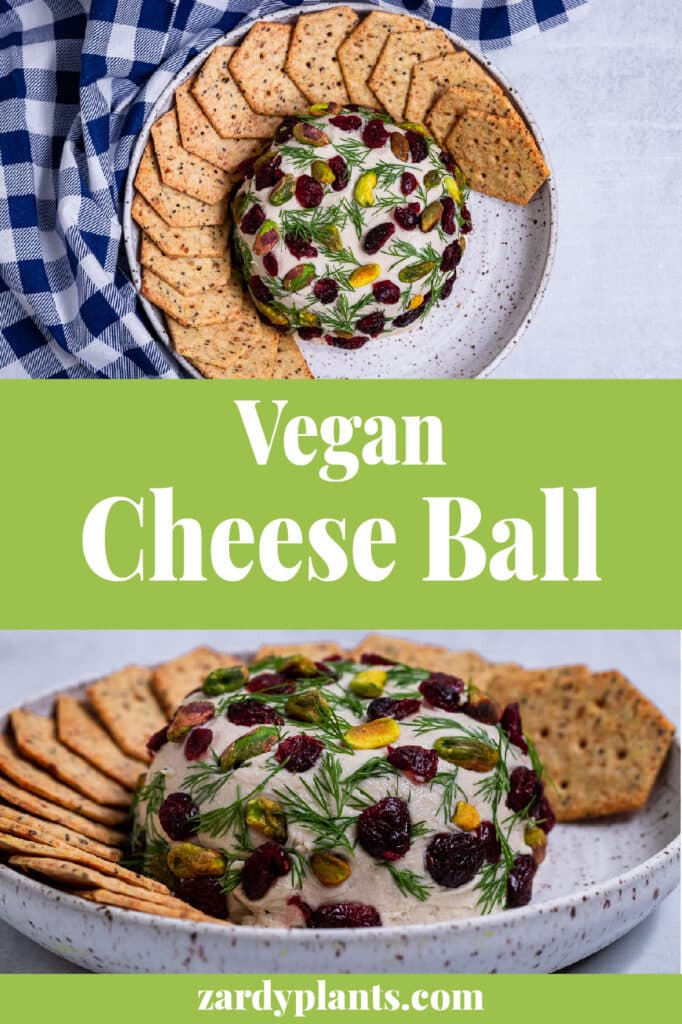
Save this for later on Pinterest!
Follow me on Social Media!
Follow my blog with Bloglovin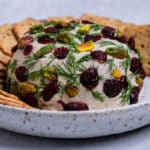
Vegan Cheese Ball (Nut-Free)
- Total Time: 15 minutes
- Yield: 2 cheese balls (about 1 cup each) 1x
- Diet: Vegan
Description
Creamy and loaded with flavor, this awesome Vegan Cheese Ball is easy to make, fun to decorate, and perfect for an appetizer or party snack.
Ingredients
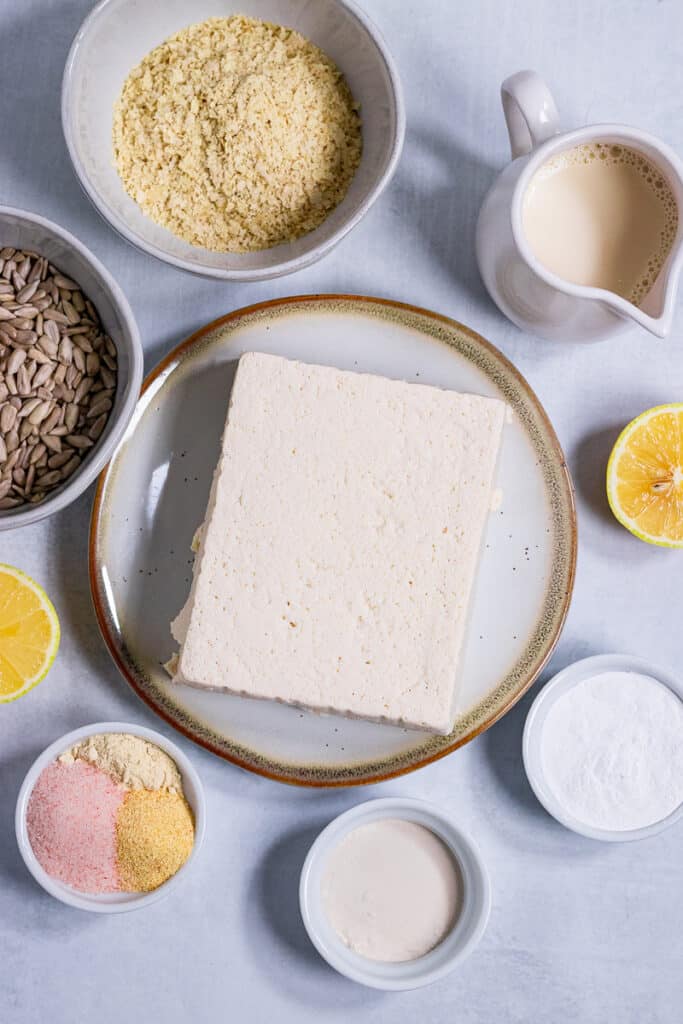
- 1 16-oz (396g) block firm tofu, drained (see note 2)
- ½ cup raw sunflower seeds (see note 3)
- Juice of 1 medium lemon
- ¼ cup unfortified nutritional yeast (see note 4)
- 2 tsp garlic powder
- 2 tsp onion powder
- 1 ½ tsp sea salt (to taste)
- 1.5 tsp agar POWDER, optional
- 2 tbsp tapioca starch or flour, optional
- ½ cup or more unsweetened non-dairy milk, optional
Instructions
- NOTE: Like I mentioned above, there’s an extra step you can do to this recipe to make it firmer, but I’ll leave that for the end. Follow these instructions up until that point for your cheese ball, regardless of what you choose to do.
- Prep tofu: So the first step is to drain the tofu. Cut open the package and pour out the liquid. Then wrap the tofu in a clean kitchen towel or paper towels and squeeze out as much of the liquid as you can. It’s OK if the tofu breaks. You don’t need to use a tofu press or anything like that, we’re just getting out the majority of the liquid.
- Blend: Crumble it into your food processor or blender, and add the sunflower seeds, lemon juice, nutritional yeast, and spices. Pulse until combined and smooth. If you are doing the more firm version, you may need to add the non-dairy milk first to get it to blend (depending on your blender/food processor).
- Less firm version: If you don’t want to do the extra steps to make your cheese ball firmer, take it out now and place it in a small bowl or container. You could also wrap it in plastic wrap and form it into a ball shape -- if you find it too sticky for that, add a bit more sunflower seeds or nutritional yeast. Refrigerate 2 hours or until it’s chilled enough, then enjoy! It can be a bit tricky to get out of the bowl in this method (I’ve found personally), so use a butter knife to gently coax it out. You may need to smooth it with a spatula or your fingers, then decorate it as you wish and serve.
- Firmer version, add things: If you are making it firmer, taste the cheese ball now and adjust accordingly. Then add the agar powder, tapioca starch, and unsweetened non-dairy milk and blend until smooth. Now pour the contents of the blender into a small to medium non-stick saucepan. Make sure to use a spatula to get all that cheesy goodness out of the blender!
- Cook the cheese: Heat the pan over medium high heat until it starts to curdle. This should take only a few minutes. Stir it constantly with a strong spatula or wooden spoon. Turn the heat down to medium for the last few minutes of cooking, which is now--once it starts to curdle it will only be a few minutes before the cheese is ready to go in the mould. As your stir, the curdled cheese will transform into a glossy, thick, playdough like consistency. It will start to pull away from the pan very noticeably.
- Transfer: Transfer the cheese into the bowl you’re refrigerating it in. Keep in mind that the container you refrigerate it in will be the shape of your completed cheese. Don’t worry if it doesn’t look smooth on top--this is the BOTTOM of your cheese ball since we’re flipping it. You can always cut off that part later. And eat it--what a hardship.
- Chill and release: Chill for at least 3-4 hours, and then check it. It should be somewhat firm to the touch. When fully refrigerated, release it by running a butter knife around the inside of the bowl, turn the bowl upside down on the plate or board you’re serving it on, and give it a few taps. It should come out pretty easily.
- Serve: Decorate with whatever you like (see below), serve with crackers or crostini or veggies or fruit, and enjoy!
- Store: Either cheese can be stored in the refrigerator in an airtight container for up to 5 days.
Notes
- Note 1: Prep and cook time estimates do not include chill time.
- Note 2: If you’re going the extra step and making this a firmer cheese ball, you could use a softer tofu, but if you’re not going to add the agar / tapioca mixture then you need to use firm or extra firm tofu, otherwise your cheese ball will be too wet to hold together. You could, however, still make a nice cheese dip this way. You could substitute soaked cashews or the tofu.
- Note 3: To make this vegan cheese ball taste nice, rich, and … cheesy… you’ll need a bit of fat. I recommend using raw sunflower seeds, as they are rich but neutral in flavor. I actually feel they’re even more neutral than cashews (less sweet), but you can totally substitute cashews if you like. If you’re cooking the cheese, you could use coconut milk instead (like in my vegan brie recipe).
- Note 4: I know there are those of you who hate the flavor but bear with me for a sec. Trust me that the finished product does not taste at all like nutritional yeast, it just tastes cheesy and rich so don’t skip it! You can always just buy the little bit you need from this recipe from bulk bins at a health food store if you don’t want a bunch of nutritional yeast hanging around your house. :) Also keep in mind there are two different types of nutritional yeast -- fortified and unfortified. The fortified version is more common and bright yellow in color due to the b-vitamins it’s fortified with. For light colored cheeses, I keep unfortified nutritional yeast around. It doesn’t matter at all for the flavor, though so you use whatever you like/have.
- Prep Time: 10 minutes
- Cook Time: 5 minutes
- Category: Snack, Vegan Cheese
- Method: Stove top
- Cuisine: American
Keywords: Vegan, Oil-Free, Gluten-Free, Nut-Free, Sugar-Free, Vegan Cheese Ball
Nicole
Turned out well but the recipe doesn’t say when to add sunflower seeds. I also needed to add the milk right away to my blender. Or else the tofu and spice mix was too dry.
★★★★★
💚 Liz
Hi Nicole. Thank you for letting us know! We've updated the above recipe card with more information.
Danielle
We have nut allergies, so there aren't really any commercial vegan cheeses that appeal to me. Most nut free cheese is based on oil and starch (gross). So I was excited to see that this was made from tofu and sunflower seeds! It is spreadable and delicious! and it feels good and satisfying.
After cooking, I split the batch in half and added "cheese ball seasoning" to one half. I loved having the variety. The original is mildly savory and we spread it on fresh whole grain bread. We liked the more heavily seasoned one with crackers. I'm looking forward to leftovers! And I would totally serve this to anyone (vegan or not).
★★★★★
Carol K. Howell
So pretty! The dill is an especially nice touch and gives the cheez a nice little bite. (Kind of like Luna's, lol?)
★★★★★