Sweet, fluffy, and full of flavor, this Vegan Pineapple Upside Down Cake is soft, buttery, and delightful any time of year. It’s easy to make, will impress your guests, and magically disappears because it’s so good.

This post may contain affiliate links. See our disclosure policy for details.
Hey Internet, as I write this, it’s a week before Thanksgiving. Vegan pineapple upside down cake is kind of a weird thing to be making right before Thanksgiving, right?
Wrong--I think it’s fabulous for Thanksgiving. First of all, I once had it at an early holiday party (that was celebrating both Chanukah and Christmas, so it was held in the last week of November) and that’s where I fell in love with it.
It also looks SUPER festive, right? Well, it does to me.
Second, this cake is fabulously easy to make and while you can use fresh fruit you can also use canned (which I did), and great to serve to your family or guests you might have for the holidays. Though this year looks a touch different during the holiday season, it won’t be like this forever.
Anyway, this retro cake is so fun, and I know it looks challenging but I promise, it’s easy.
Just a few tips and tricks along the way help to make this vegan upside down cake a success, including blotting the fruit dry with a kitchen towel and refrigerating the topping while you prep the cake.
The cake under the fruit is a delicious yellow cake with a subtle vanilla flavor, but also gets flavored by the cooking juices from the fruit! I already used vegan sour cream (which I include instructions for making yourself from 3 ingredients!) to moisten the cake, but the fruit juices just make it amazingly moist (sorry) without compromising the texture of the cake.
Speaking of the texture, the crumb of this cake is awesome, and the ingredients have been measured just right to get a soft but not mushy texture.
Oh and you might notice my cherries are not as bright as typical cherries in upside down cakes--that’s because I used canned dark cherries, as I just couldn’t justify using maraschino cherries with corn syrup, sugar, AND heavy corn syrup! This cake has enough sugar as it is.
Plus I just actually don’t like maraschino cherries. Never have.
But you could still use maraschino cherries for this recipe if you like them and it will work just fine. Speaking of ingredients and substitutions, let’s get into the ingredients.
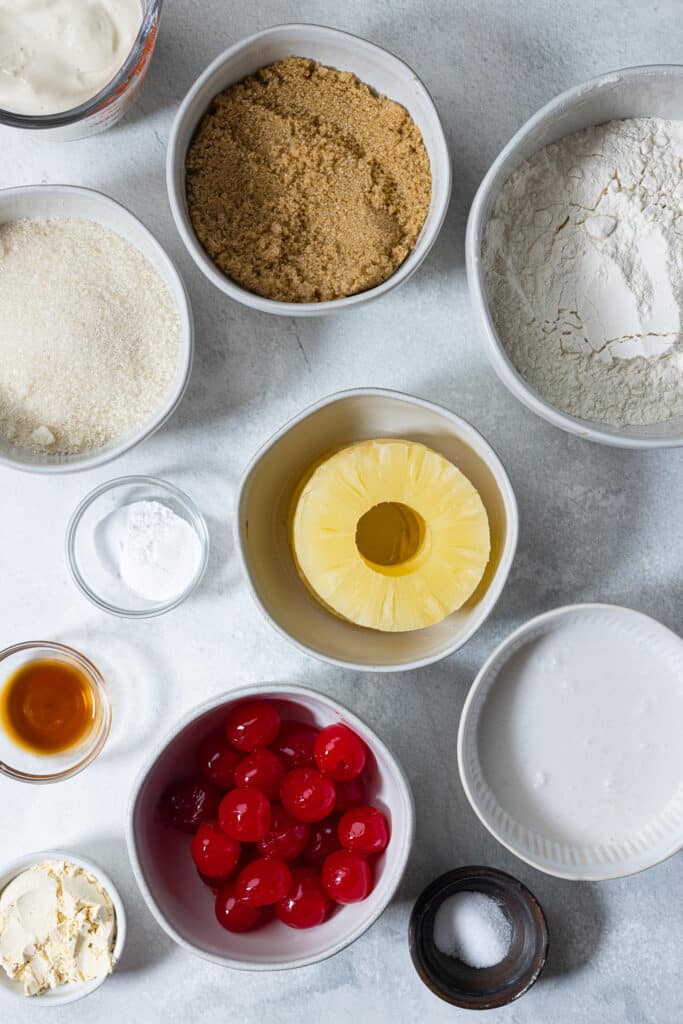
What You’ll Need
Since the fruit is on the top, let’s start with it. While you can use other fruit instead of pineapples and cherries, this is a recipe for vegan pineapple upside down cake, so that’s what I’m going to assume you’re using.
I mentioned above that I used canned pineapple (in fruit juice, not syrup) and canned dark cherries, but fresh fruit will work just fine, just make sure you slice it evenly so it cooks. And make sure to pit your cherries! :)
There’s also 2 ingredients that we put down BEFORE the cherries that help solidify them into a topping: organic brown sugar and coconut cream.
For the brown sugar, I highly recommend using organic brown sugar (organic sugar is vegan, some sugar can be filtered through animal bone char) as opposed to any other sugar since it caramelizes with the fruit at the bottom, making the delicious topping.
For the coconut cream, I LOVED the subtle flavor it gave to this cake, but you could use vegan butter if you want. The key texture is soft coconut cream or vegan butter but not melted.
Now, the rest of the cake is just a simple vegan yellow cake.
Flour, organic cane sugar, salt, baking powder, baking soda, vanilla extract and a vegan egg replacer are the base of what I used.
My favorite egg replacer is usually flax eggs (ground flaxseed mixed with water), but sometimes I want one that won’t leave brown flecks of seed in my food. Bob’s Red Mill Egg Replacer is fantastic for this. All you do is mix it with a little water and it gels in under a minute.
Oh, and to make the cake nice and moist, I used vegan sour cream. I like to use my own 3-ingredient sour cream which is just made of silken tofu, salt, and lemon juice, but store-bought should work as well.
In addition to the coconut cream in the mixture for the fruit topping, I also used it in my cake ingredients--but a small amount (¼) cup. The cake needs a little fat to be so luscious in taste and texture, but you could sub more of the low fat sour cream or applesauce if you’d like to try that.
What Substitutions Can I Make?
Keep in mind, I chose the ingredients I did to produce a certain color, flavor, and texture in my cake, so if you change them, I cannot guarantee results. However, here are a few suggestions that might work based on past baking success.
Flour
I used regular all purpose flour for this recipe, but you could try it with a healthier flour like whole wheat or spelt, just keep in mind those flours generally need a bit more moisture and are higher in gluten so your came might not be very tender.
For a gluten-free vegan pineapple upside down cake, I recommend using a quality cup for cup flour like King Arthur’s Measure for Measure Gluten-Free Flour or Bob’s Red Mill 1:1 Gluten-Free Flour.
Organic Cane Sugar
I chose organic cane sugar for this recipe because it works best in a vanilla yellow cake, however I’m sure you could use coconut sugar instead and it would work as a lower glycemic option.
I would not use brown sugar in the cake itself (though it works great as the topping on the bottom with the fruit) as it may be too heavy and wet.
Coconut Cream
Vegan butter should work well as a 1:1 coconut cream replacement, though I love the flavor of canned coconut cream in this recipe. If you do use coconut cream, you want it to be somewhat solid but not cold.
For a lower fat option, you could try applesauce (which may be a little wet and heavy--add a tablespoon or two of extra flour if you try this) or extra of my low fat sour cream.
Vegan Sour Cream
Speaking of which, I used my 3 ingredient low fat vegan sour cream in this recipe (included below in the recipe card), but if you want to use store-bought you can. If you don’t want to use it at all, I’d substitute it with half the amount of non-dairy milk, but you may have a cake that is a bit dryer and flatter.
How to Properly Measure Flour
We want to measure our flour by weight, not by volume. When you scoop flour out of a bag or tin with a measuring cup, you're packing it in there and not necessarily getting the same amount each time.
What's better is to use a food scale with a tare function (allowing you to zero out the scale after you've put the bowl on it so your bowl isn't playing a factor in your equation).
Working in grams, put your bowl on the scale and zero it out. Scoop the flour into the bowl until you reach the desired measurement.

Tips for Making Vegan Pineapple Upside Down Cake
- Start by preheating your oven to 350 degrees Fahrenheit (or 177 degrees Celsius) and drying out your fruit with a clean kitchen towel or paper towels.
- Dry your fruit as much as possible as wetter fruit may make your cake soggy at the bottom (and then the top, when you flip it). I layered my pineapple rings between two layers of cloth and pressed lightly. With the cherries, I added them to a bowl and very gently patted them dry with a paper towel. When liquid no longer pools at the bottom, the cherries are dry enough to use.
- I used a 9.5 inch standard glass pyrex pie dish for this recipe, though it would work great in a tall 8 or 9 inch cake tin -- round or square should work fine. You just want something deep enough so that the cake doesn’t overflow; my 9.5” dish is 2” and the filling came right up to the edge but did not overflow.
- In your pie dish, add a bit of room temperature coconut cream or vegan butter. I started with 2 tablespoons. Spread it out with a spatula or your fingers (I thought my hands ended up being easier to get everything even). It’s ok if some of it’s a little melty and some’s a little solid. You want even coverage, so add a little more if you need to.
- Sprinkle the brown sugar evenly over the coconut cream or vegan butter. Brown sugar tends to clump so I just did this part with my fingers.
- Now lay the pineapple slices down on the bottom of your dish. I used all 10 slices that came in my canned pineapple--I cut the last few slices in half and those pieces ended up going on the sides of my pie. See process picture for how I laid it out.
- Place cherries in between the gaps--I used the larger cherries in the pineapple holes and the smaller ones in the gaps between pineapple rings.
- Refrigerate the pie dish while you make the batter in a separate bowl, this will help “set” the topping.
- In a medium or large mixing bowl, mix or “cream” together your coconut cream or vegan butter and organic cane sugar until it looks fairly well combined. Add the rest of your wet ingredients--the set up vegan egg replacer, vegan sour cream and vanilla extract.
- Sprinkle the flour, baking powder, baking soda, and salt over the top of your wet ingredients and use a spatula to stir until just combined, scraping the bottom of the bowl as you mix to incorporate everything. Don’t overmix.
- Remove your pie dish from the refrigerator and use a spoon or your spatula to evenly add the thick batter to your cake, making sure to cover any fruit you see. Don’t be concerned about the way that it looks, because this is the BOTTOM of our cake! ;)
- Bake for 40 - 42 minutes total, tenting the cake with aluminum foil halfway through the baking process so the top doesn’t get too browned. To tent, just take a sheet of aluminum foil slightly longer than the diameter of your pie dish, fold the center and then lay it over the cake in the oven like a little tent. The cake is done when an inserted toothpick (or cake tester) comes out clean.
- Remove the cake from the oven and set on a cooling rack to cool in the pie dish for about 25 minutes.
- To release the cake easily, use a butter knife and carefully run it along the inside edge of the dish, being careful not to poke the cake. Place the cooling rack upside down on your right side up cake (get it? sorry.) and flip it in one smooth motion.
- There will be a little liquid dripping out--that’s OK. I like to place a baking tray underneath the cooling rack with the inverted cake to catch the drippings and keep my table clean.
- Let the cake cool completely. I know it’s tempting to take a slice while it’s still warm, but I find that the texture of the cake is best when it’s allowed to cool completely. Do NOT put it in the fridge or freezer to cool it--this will make it the cake denser. Ask me how I know. :/
- Store the cake covered on the countertop for up to 4 days or freeze in a freezer safe container for up to 3 months.

More Easy Vegan Desserts
- Mug Brownie
- Vegan Coffee and Walnut Cake
- Apple Cake
- Smores Cookie Bake
- Soft Chocolate Chip Cookies (no chill)
- Matcha Pound Cake
- Banana Bread
- Coconut Cake
- Coconut Almond Butter Cookies
Anything Else?
I really hope you like this recipe! I know I do and so does Mr. Zardyplants, who was happy to eat up all the extra cake we had from testing.
This vegan pineapple upside down cake is:
- Sweet but not too sweet
- Moist (sorry)
- Tender
- Fluffy
- Festive
- Impressive
- And really easy to make!
Let me know in the comments below if you make this recipe or tag me @Zardyplants on Instagram so I can see your beautiful recreations! If you tag me on IG, I will share your post in my stories :)
Also, one quick request: if you love how this recipe looks or tastes, please leave me a 5-star rating and a nice comment–ratings help more people find my recipes which helps me keep providing them! Thank you!
<3 Liz
Save this for later on Pinterest!

Follow me on Social Media!
Follow my blog with Bloglovin
Vegan Pineapple Upside Down Cake
- Total Time: 55 minutes
- Yield: 9.5 inch cake 1x
- Diet: Vegan
Description
Sweet, fluffy, and full of flavor, this Vegan Pineapple Upside Down Cake is soft, buttery, and delightful any time of year. It’s easy to make, will impress your guests, and magically disappears because it’s so good.
Ingredients
Topping
- 10 pineapple rings (a 20 oz can should work)(see note 1)
- 19 pitted cherries (see note 2)
- 2-3 tablespoon coconut cream or vegan butter (see note 3)
- ½ cup organic brown sugar
Cake
- ¼ cup coconut cream or vegan butter
- ⅔ cup organic cane sugar
- ⅔ cup + 1 tablespoon vegan sour cream
- 2 Bob’s Red Mill Egg Replacer eggs (see note 4)
- ¾ tsp vanilla extract
- 1-¾ cup (180g) all purpose flour (see note 5)
- 1 tsp baking powder
- ¼ tsp baking soda
- ½ tsp salt
Vegan Sour Cream (or use store bought)
- 8 oz silken tofu
- Juice of 1 lemon
- ½ tsp salt
Instructions
- NOTE: I used a 9.5 inch standard glass pyrex pie dish for this recipe, though it would work great in a tall 8 or 9 inch cake tin -- round or square should work fine. You just want something deep enough so that the cake doesn’t overflow; my 9.5” dish is 2” and the filling came right up to the edge but did not overflow.
- Prep: Start by preheating your oven to 350 degrees Fahrenheit (or 177 degrees Celsius) and drying out your fruit with a clean kitchen towel or paper towels. Dry your fruit as much as possible as wetter fruit may make your cake soggy at the bottom (and then the top, when you flip it). I layered my pineapple rings between two layers of cloth and pressed lightly. With the cherries, I added them to a bowl and very gently patted them dry with a paper towel. When liquid no longer pools at the bottom, the cherries are dry enough to use.
- Make the topping: In your pie dish, add a bit of room temperature coconut cream or vegan butter. I started with 2 tablespoons. Spread it out with a spatula or your fingers (I thought my hands ended up being easier to get everything even). It’s ok if some of it’s a little melty and some’s a little solid. You want even coverage, so add a little more if you need to. Sprinkle the brown sugar evenly over the coconut cream or vegan butter. Brown sugar tends to clump so I just did this part with my fingers.
- Place the fruit: Now lay the pineapple slices down on the bottom of your dish. I used all 10 slices that came in my canned pineapple--I cut the last few slices in half and those pieces ended up going on the sides of my pie. See process picture for how I laid it out. Place cherries in between the gaps--I used the larger cherries in the pineapple holes and the smaller ones in the gaps between pineapple rings. Refrigerate the pie dish while you make the batter in a separate bowl, this will help “set” the topping.
- Make the cake batter: In a medium or large mixing bowl, mix or “cream” together your coconut cream or vegan butter and organic cane sugar until it looks fairly well combined. Add the rest of your wet ingredients--the set up vegan egg replacer, vegan sour cream and vanilla extract. Sprinkle the flour, baking powder, baking soda, and salt over the top of your wet ingredients and use a spatula to stir until just combined, scraping the bottom of the bowl as you mix to incorporate everything. Don’t overmix.
- Assemble the cake: Remove your pie dish from the refrigerator and use a spoon or your spatula to evenly add the thick batter to your cake, making sure to cover any fruit you see. Don’t be concerned about the way that it looks, because this is the BOTTOM of our cake!
- Bake: Bake for 40 - 42 minutes total, tenting the cake with aluminum foil halfway through the baking process so the top doesn’t get too browned. To tent, just take a sheet of aluminum foil slightly longer than the diameter of your pie dish, fold the center and then lay it over the cake in the oven like a little tent. The cake is done when an inserted toothpick (or cake tester) comes out clean. Remove the cake from the oven and set on a cooling rack to cool in the pie dish for about 25 minutes.
- Release the Cake: To release the cake easily, use a butter knife and carefully run it along the inside edge of the dish, being careful not to poke the cake. Place the cooling rack upside down on your right side up cake (get it? sorry.) and flip it in one smooth motion. There will be a little liquid dripping out--that’s OK. I like to place a baking tray underneath the cooling rack with the inverted cake to catch the drippings and keep my table clean.
- Let it cool, not go: Let the cake cool completely. I know it’s tempting to take a slice while it’s still warm, but I find that the texture of the cake is best when it’s allowed to cool completely. Do NOT put it in the fridge or freezer to cool it--this will make it the cake denser. Ask me how I know.
- Store: Store the cake covered on the countertop for up to 4 days or freeze in a freezer safe container for up to 3 months.
Notes
- Note 1: I used canned pineapple (in fruit juice, not syrup) and canned Maraschino cherries without stems, but fresh fruit will work just fine, just make sure you slice it evenly.
- Note 2: You might notice my cherries are not as bright as typical cherries in upside down cakes--that’s because I used canned dark cherries, as I just couldn’t justify using maraschino cherries with corn syrup, sugar, AND heavy corn syrup! Plus I just actually don’t like maraschino cherries. Never have. But you could still use maraschino cherries for this recipe if you like them and it will work just fine.
- Note 3: In addition to the coconut cream in the mixture for the fruit topping, I also used it in my cake ingredients--but a small amount (¼) cup. The cake needs a little fat to be so luscious in taste and texture, but you could sub more of the low fat sour cream or applesauce if you’d like to try that. I wouldn’t mess with the topping outside of subbing vegan butter. I don’t know if it would work with a non-fatty substance.
- Note 4: My favorite egg replacer is usually flax eggs (ground flaxseed mixed with water), but sometimes I want one that won’t leave brown flecks of seed in my food. Bob’s Red Mill Egg Replacer is fantastic for this. All you do is mix it with a little water and it gels in under a minute.
- Note 5: I used regular all purpose flour for this recipe, but you could try it with a healthier flour like whole wheat or spelt, just keep in mind those flours generally need a bit more moisture and are higher in gluten so your came might not be very tender. For a gluten-free vegan pineapple upside down cake, I recommend using a quality cup for cup flour like King Arthur’s Measure for Measure Gluten-Free Flour or Bob’s Red Mill 1:1 Gluten-Free Flour.
- Prep Time: 15 minutes
- Cook Time: 40 minutes
- Category: Dessert
- Method: Baking
- Cuisine: American

Alicia
Absolutely loved this! I used flax instead of egg replacer, since thats what I had and it turned out great! Will definitely be making again!
Gaby
This is an amazing recipe! The cake was bouncy and fluffy. The only alteration I made was using monk fruit sweetener and a stevia based brown sugar, both sub in 1-1 with regular. I am on a weight loss journey and this was such a lovely treat after work and I did not feel guilty eating it- great macros! Bf who is not vegan or dieting (lol) very much enjoyed it too.