The Best Oil-free Vegan Pizza Dough is easy to make and not intimidating at all. This supple pizza dough made from just 5 ingredients produces delicious thick crust pizza. The cooked crust is still soft and delightful to bite into--if you weren't someone who eats the crust, this recipe may make you change your mind!

This post may contain affiliate links. See our disclosure policy for details.
Hey Internet, I gotta be honest and say I've always been a little bit afraid to try and make pizza. Everything I knew from pop culture said I needed to be able to throw my dough in the air like a pizza shop might.
While that's definitely a great technique and does produce awesome pizza, I needed a less terrifying method, and I wanted to make a truly delicious pizza.
Why a Pizza Pie, Liz?
My main motivation for this recipe is honestly my husband, Mr. Zardyplants, aka Paul. Paul LOVES pizza. I swear it's like two of his food groups. If you've ever watched Teenage Mutant Ninja Turtles, Paul is definitely Michelangelo (a slice of pizza in each hand)!
I kept this pizza simple and topped it with some tomato sauce and my 5 minute vegan mozzarella, but play around with the toppings!
Now a disclaimer, I am not a professional baker and I've really only been experimenting with bread for a month or two.
For my first few times, I decided to stick with making a regular flour pizza. I am definitely working on a gluten-free version now! But that will be a separate recipe.
My only other parameter was that I wanted to skip the oil but still have a soft texture. My FAVORITE oil replacement in baking continues to be coconut cream so that's what I used. If you can't find that, please check the substitutions section in this article for ideas on what you could use instead.
Alright, enough talk, let's get into it.

Ingredients for The Best Vegan Pizza Dough
You know how I said this pizza dough only contains 5 ingredients? This is going to be a super short section.
Flour
I used regular all purpose flour. I like to buy unbleached which is free of chemicals like peroxide.
Interesting tidbit: According to thekitchn.com, "Technically, all flours are bleached, but it's the process by which it happens that sets these two types of flour apart. Bleached flour is treated with chemical agents to speed up aging, while unbleached flour is bleached naturally as it ages."
Yeast
For our dough to rise, and a really good flavor, you'll need some yeast. You can use active dry yeast like I did, or you can use a rapid rising yeast.
The rapid yeast decreases the total time of this recipe. But I will say that the more time the yeast develops in your dough, the better the flavor. So choose whichever fits your needs best.
Salt
In baking, salt is for more than flavor. It controls the rate of yeast fermentation and enzyme activity. It also helps control the gluten in the flour, making it less sticky and more cohesive.
Sugar
This recipe does call for refined sugar, but it's 1 teaspoon for two pretty big pizzas. You're not going to taste it and it doesn't really impact the nutrition for this dish.
Sugar plays an important role in activating and feeding the yeast which gives you a faster rise and also helps make bread soft and supple by slowing down the formation of gluten strands.
Coconut Cream
To be supple and moist, most pizza dough contains oil. Since I don't use that in my kitchen, I looked for a substitute that would still have some of the those textures, but retain a little more fiber and nutrients than oil.
Coconut cream is one of my favorite baking replacements because it's so versatile. Honestly it doesn't taste particularly coconut-y and I PROMISE this dough doesn't taste like coconut (there's only 3 tablespoons in the whole recipe).
Water
Technically this recipe also includes warm water. Do NOT use hot water, it will kill your yeast.
You ideally want lukewarm water (between 105 and 115 degrees Fahrenheit or 41 and 46 degrees Celsius) that you can comfortably wash your hands in.
And that's it!
Substitutions
For flour, I recommend using unbleached or all purpose flour. Any brand will work, though some of my favorites include Bob's Red Mill, Trader Joe's, and King Arthur.
If all you have is bread flour, you can use that, but it will be more chewy. I would be careful not to over knead dough made from bread flour, and try to keep it moist.
Similarly, whole wheat flour is fine to use, but it will require a bit more water. Play around with it when mixing the dough. You want your dough to be moist but not sticky.
Instead of coconut cream to make the texture supple, you can use regular coconut milk (reduce the warm water by 2 tablespoons or add a little extra flour if you do this).
You could also use another fat like tahini, or you can absolutely use oil if you're cool with that.
You can also totally omit it, but your dough might be slighly less supple.

How do you make good pizza dough from scratch?
Making bread can feel overwhelming. There's so many terms to learn and so many different ways to make the same thing.
Don't ever let bread intimidate you! It's not scary. Especially not this recipe.
First, we're going to proof (or activate) our yeast. I know, I know, the package says active yeast, why do we need to activate it?
Well the first thing is that some yeast can be already inactive when you buy it. It's just like a bad batch. Or it could be too old.
Activating it first means you don't have to waste all your ingredients! All proofing the yeast means is we're putting it in a bowl or cup with the warm water and the sugar, mixing it up and letting it sit for 5-10 minutes.
If it starts to get foamy at the top, that means your yeast is active and ready to be dough!
So while the yeast proofs, measure out your flour.

How to Properly Measure Flour
We want to measure our flour by weight, not by volume. When you scoop flour out of a bag or tin with a measuring cup, you're packing it in there and not necessarily getting the same amount each time.
What's better is to use a food scale with a tare function (allowing you to zero out the scale after you've put the bowl on it so your bowl isn't playing a factor in your equation.
Working in grams, put your bowl on the scale and zero it out. Scoop the flour into the bowl until you reach the desired measurement.
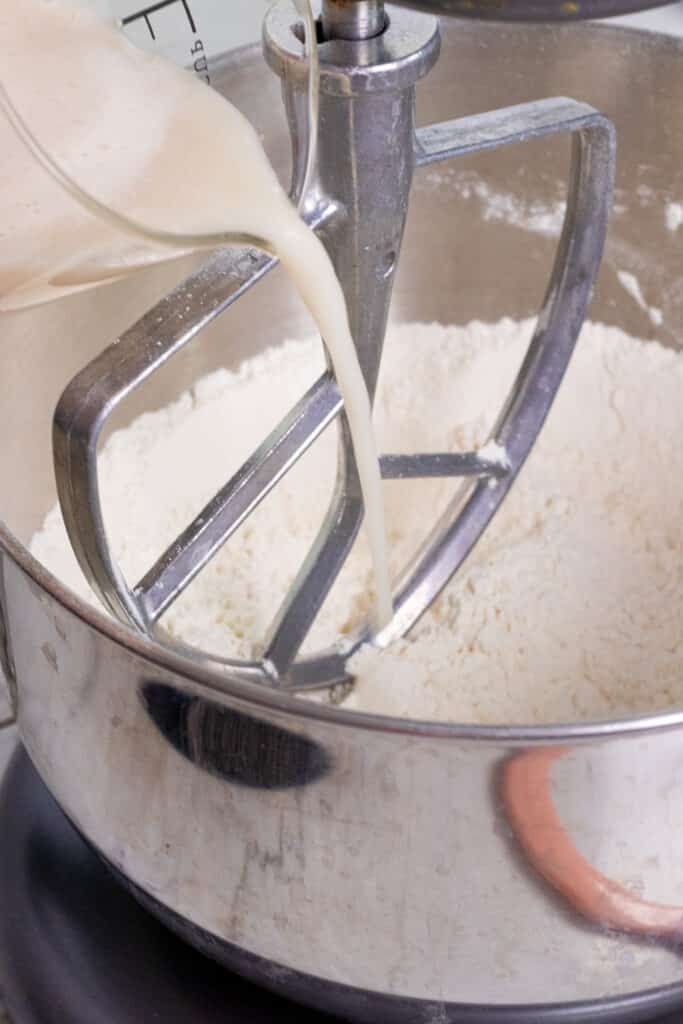
Mixing the Dough
So you'll want about 750g of flour for this recipe. This makes enough for 2 medium pizzas.
Add your salt to the bowl and mix.
If you have a stand mixer, go ahead and use that. If not, I recommend a strong wooden spoon.
Next, add your wet mixture and mix until well combined. Add in the extra flour a little at a time, until you get a thick slightly tacky (but not sticky) dough.

If you're using a stand mixer, you'll want to switch to the dough hook as soon as it becomes super thick. Mix your dough by hand if you don't have a mixer.
Knead the dough for about 5 minutes.

Let the Dough Rise
Now take another bowl and grease the inside of it with a little leftover coconut cream or oil if you're cool with that. (This step is not necessary but it does make for a softer dough and easier time getting it out of the bowl after rising.)
Scrape your dough into a large bowl. Turn the dough out into the greased bowl and flip it once so both sides have touched the coconut cream.
Cover the bowl with a clean kitchen towel and place it in a warm area to rise. I like to put it my oven with the oven light on (but no heat).
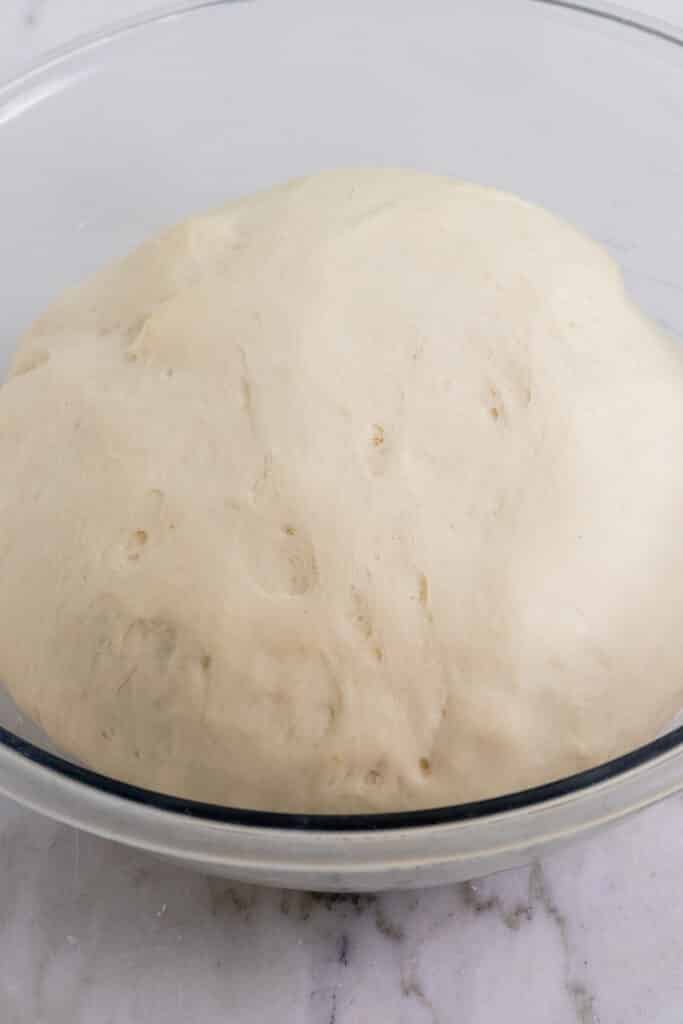
If you used regular active dry yeast, let it rise for 60 minutes. If you used rapid rise yeast, it should take 30-40 minutes to double in size.

Evenly Measuring your Dough Balls
Note: If you'd like to skip the kneading process, you'll need to refrigerate your dough for 24 hours (or up to 3 days), then let it come back to room temperature. The yeast and gluten will have developed enough at that point to shape your pizzas and bake.
But if you'd like to use the pizzas now, let's knead them a little bit. Turn on the TV or some fun music.

First, use your scale to weight out your dough. I like to do this in a bowl and use my tare function.
Now we're going to cut our dough roughly in half. You'll want to divide the total weight by 2 and each dough ball should weigh that amount.
Take a little from the larger and stick it on the smaller if needed.
Now work with one ball at a time and cover the other in the meantime so it doesn't dry out.
Kneading the Dough Balls
Gently knead each ball for about 7-10 minutes. Don't knead too hard--this is not a dough to work out your frustrations on.
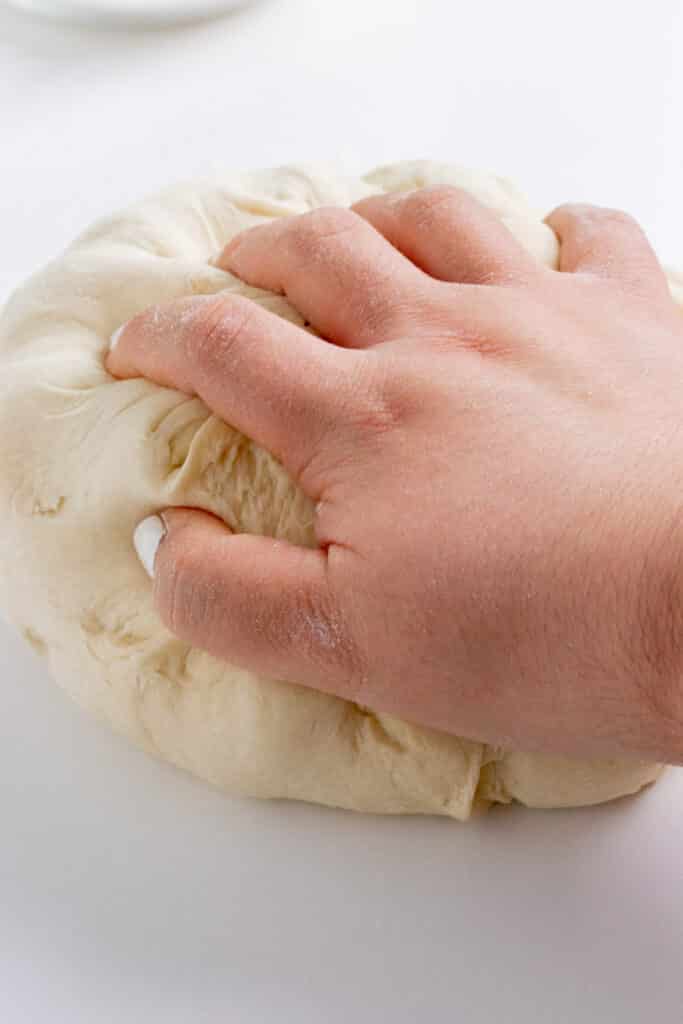
I like to use one hand. I flatten my hand and instead of pushing down into the dough, I'm applying some pressure and moving my hand across the top of it, gripping it lightly at the end with my fingers.
Continue to work the dough. You'll know you're doing it right when you feel an air pocket release.
Man, there's nothing more satisfying than that. It's like popping bubble wrap.
When you get to the 7 or 8 minute mark, we're going to test the gluten structure with a tension test.
Turn your ball over and fold in the edges and pinch them shut. Turn it over once more and cup your hands around the sides, creating a bit of tension in the ball.

Lightly press one finger into the top of the ball. If the dough springs back almost immediately, your dough is ready! If not, you'll need to knead it a bit more.
When the first ball is ready, switch it with your other ball. Make sure to cover the now kneaded one so it doesn't dry out.
Tools you'll need for Baking
So you do not NEED any fancy equipment to make pizza from scratch, but I highly recommend a few things.
You're going to need 2 large cutting boards or pans for the process.
The best homemade pizza utilizes a pizza stone. A pizza stone starts out cold in your oven and preheats with it.
It's easy to transfer the pizza to and from the stone, and don't worry I'll give you some tips for that.
The pizza stone also absorbs moisture from the dough, creating a crisper bottom to your crust.
Before you start shaping your pizzas, preheat your oven to at least 500 degrees Fahrenheit (260 degrees Celsius). If your oven supports it like mine does, I recommend 550 degrees Fahrenheit (288 degrees Celsius).
Turning your Oil-free Vegan Pizza Dough in a Pizza Pie
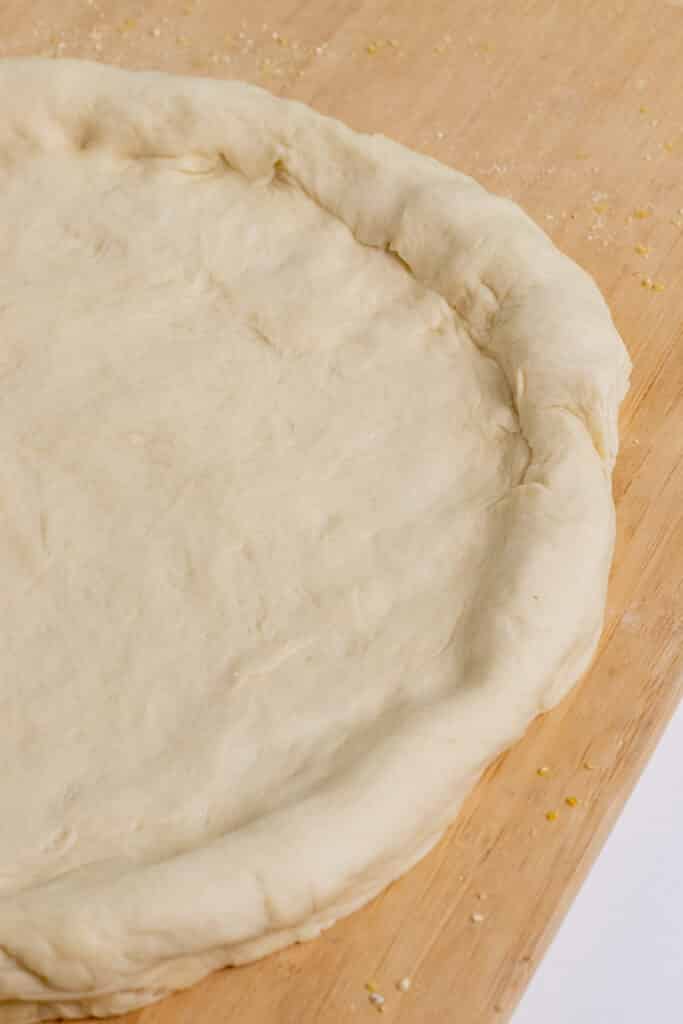
We want the kneaded dough to rise for about 20 minutes before baking. So take the first ball you kneaded and start to flatten it into a circle.
Do not use a rolling pin on your dough! This removes the elasticity and some moisture.
Take your first cutting board and sprinkle it with cornmeal (you can also use semolina flour--this is just to keep it from sticking).
Start to flatten the first ball of dough with a palm of your hand. Using 2-3 fingers, press out from the center toward the edges leaving a distinct lip for the crust.
Try to make this a flat even surface. Be mindful of any spots that get too thin.
Now I'm going to ask you to do something that might be a little scary. Pick up the crust and put your fist gently in the center of the dough.
Start to move your balled hands carefully around the inside of the crust. Gently work them around the inner edge of the crust, trying to stay away from those parts that may have gotten too thin.

If at any point the dough rips, place it back on the cutting board. Manipulate the dough so that you fold over any rip and seal it. You may use a tiny bit of water to seal the seam.
As you move around the inner edge of the crust, let gravity do the work. Stretch the crust gently.
It will have elasticity but it's not unlimited. You can pretty much go as wide as the crust will let you, and as you have wood for in your pan or on your stone.
Also, it will be infinitely easier for you if you do not make the crust wider than either your pan or your stone.
Baking your Pizza
Now pick up the cutting board and give it a gentle shake. We want to make sure that the crust is still going to come off the board easily. If it moves back and forth on the board, you're good.
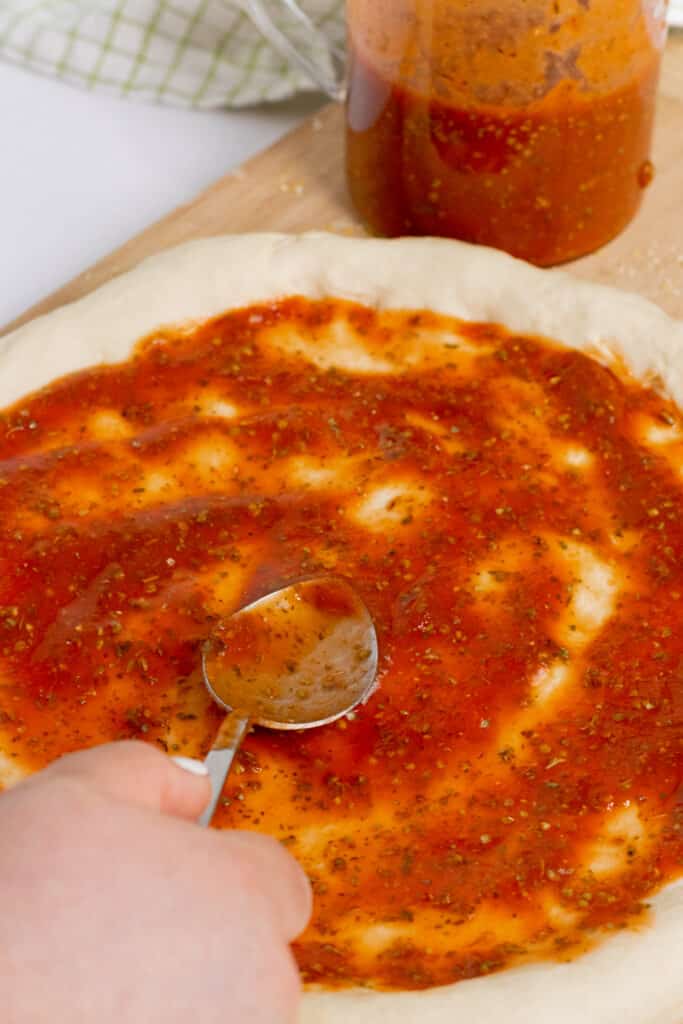
Now dress the pizza as you see fit. I just use a jarred marinara sauce but you can use anything you like. If you only have plain tomato sauce, you could always add some herbs and spices.

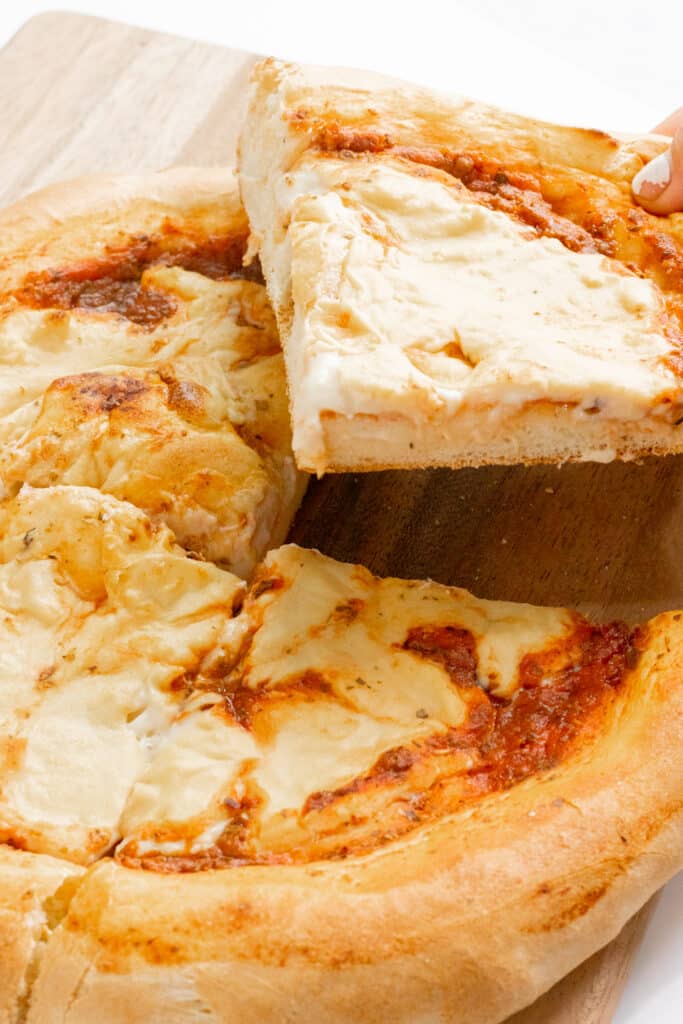
I added a thick layer of my vegan stretchy mozzarella, which is absolutely delicious on pizza apparently!!
If you'd like any other toppings add them now. And when adding vegetables that need to cook, you should cook them ahead of time because the pizza is only going to be in the oven for about 10 minutes.
If you're using a pizza stone
Now open the oven door and use an oven mitt to pull out the rack halfway. Position the cutting board halfway over the pizza stone.

GENTLY SHAKE OR SLIDE THE CRUST off the cutting board on to the pizza stone, angling so the crust gets onto the center of the stone.
Replace the rack in the oven and set a timer for 8 minutes.
I have found the sweet spot for me is about 10 minutes with my oven but your oven may be different.
While this pizza cooks you can start work on the other one. Repeat the process on a separate cutting board and set aside.
Once the timer dings and you feel the crust is adequately cooked (it should be lightly browned on the outside, but don't worry if the center still looks a little molten), remove it from the oven and let it rest for at least 10 minutes before cutting. This is crucial.

To remove it from the oven, use an oven mitt to pull the rack halfway out again and position the cutting board back over to the stone. use tongs to grab the cross gently and pull it onto your cutting board.
Transfer the other pizza to the oven and set the timer again.
Anything Else?
I know it's tough, but try to wait at least 10 minutes before cutting either pizza.
As always, I hope you love this recipe–I know I do!
Let me know in the comments below if you make it, tag me @Zardyplants on Instagram so I can see your beautiful recreations! If you tag me on IG, I will share your post in my stories :)
Also, one quick request: if you love how this recipe looks or tastes, please leave me a 5-star rating and a nice comment–ratings help more people find my recipes which helps me keep providing them! Thank you!
<3 Liz
Follow me on Social Media!
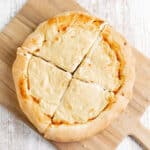
The Best Vegan Pizza Dough (Oil-free!)
- Total Time: 2 hours 20 minutes
- Yield: 2 pizzas 1x
- Diet: Vegan
Description
The Best Oil-free Vegan Pizza Dough is easy to make and not intimidating at all. This 5 ingredient pizza dough produces delicious thick crust pizza.
Vegan, Oil-free, Nut-free, Soy-free
Ingredients
Dry
- 750g flour (about 4 cups) (see note 1)
- 2 ¼ tsp or 1 packet active dry yeast (see note 2)
- 2 tsp salt
- 1 tsp sugar
Wet
- 1 ¼ cup warm water
- 3 tbsp + 1 teaspoon coconut cream, divided (see note 3)
Instructions
- Measure out 750g flour using the method in the above article. Reserving around a cup, add most of the flour to your mixing bowl. Add your salt to the bowl and mix. If you have a stand mixer, go ahead and use that. If not, I recommend a strong wooden spoon.
- Next, add your wet mixture and mix until well combined. Add in the extra flour a little at a time, until you get a thick slightly tacky (but not sticky) dough.
- If you're using a stand mixer, you'll want to switch to the dough hook as soon as it becomes super thick. Mix your dough by hand if you don't have a mixer. Knead the dough for about 5 minutes.
- Now take another bowl and grease the inside of it with a little leftover coconut cream or oil if you're cool with that. (This step is not necessary but it does make for a softer dough and easier time getting it out of the bowl after rising.)
- Scrape your dough into a large bowl. Turn the dough out into the greased bowl and flip it once so both sides have touched the coconut cream.
- Cover the bowl with a clean kitchen towel and place it in a warm area to rise. I like to put it my oven with the oven light on (but no heat). If you used regular active dry yeast, let it rise for 60 minutes. If you used rapid rise yeast, it should take 30-40 minutes to double in size. To skip the kneading process, see Note 4. If you'd like to use the pizzas now, let's knead them a little bit. Turn on the TV or some fun music.
- First, use your scale to weight out your dough. I like to do this in a bowl and use my tare function. Now we're going to cut our dough roughly in half. You'll want to divide the total weight by 2 and each dough ball should weigh that amount. Take a little from the larger and stick it on the smaller if needed.
- Now work with one ball at a time and cover the other in the meantime so it doesn't dry out. Gently knead each ball for about 7-10 minutes. Don't knead too hard--this is not a dough to work out your frustrations on. I like to use one hand. I flatten my hand and instead of pushing down into the dough, I'm applying some pressure and moving my hand across the top of it, gripping it lightly at the end with my fingers.Continue to work the dough. You'll know you're doing it right when you feel an air pocket release.
- When you get to the 7 or 8 minute mark, we're going to test the gluten structure with a tension test. Turn your ball over and fold in the edges and pinch them shut. Turn it over once more and cup your hands around the sides, creating a bit of tension in the ball. Lightly press one finger into the top of the ball. If the dough springs back almost immediately, your dough is ready! If not, you'll need to knead it a bit more. When the first ball is ready, switch it with your other ball. Make sure to cover the now kneaded one so it doesn't dry out.
- Before you start shaping your pizzas, preheat your oven to at least 500 degrees Fahrenheit (260 degrees Celsius). If your oven supports it like mine does, I recommend 550 degrees Fahrenheit (288 degrees Celsius).
- We want the kneaded dough to rise for about 20 minutes before baking. So take the first ball you kneaded and start to flatten it into a circle.
- Do not use a rolling pin on your dough! This removes the elasticity and some moisture. Take your first cutting board and sprinkle it with cornmeal (you can also use semolina flour--this is just to keep it from sticking). Start to flatten the first ball of dough with a palm of your hand. Using 2-3 fingers, press out from the center toward the edges leaving a distinct lip for the crust. Try to make this a flat even surface. Be mindful of any spots that get too thin.
- Now I'm going to ask you to do something that might be a little scary. Pick up the crust and put your fist gently in the center of the dough. Start to move your balled hands carefully around the inside of the crust. Gently work them around the inner edge of the crust, trying to stay away from those parts that may have gotten too thin.
- If at any point the dough rips, place it back on the cutting board. Manipulate the dough so that you fold over any rip and seal it. You may use a tiny bit of water to seal the seam. As you move around the inner edge of the crust, let gravity do the work. Stretch the crust gently. It will have elasticity but it's not unlimited. You can pretty much go as wide as the crust will let you, and as you have wood for in your pan or on your stone. It will be infinitely easier for you if you do not make the crust wider than either your pan or your stone.
- Now pick up the cutting board and give it a gentle shake. We want to make sure that the crust is still going to come off the board easily. If it moves back and forth on the board, you're good.
- Now dress the pizza as you see fit. I just use a jarred marinara sauce but you can use anything you like. If you only have plain tomato sauce, you could always add some herbs and spices.
- I added a thick layer of my vegan stretchy mozzarella, which is absolutely delicious on pizza apparently!!
- If you'd like any other toppings add them now. If you're going to add vegetables that need to cook, you should cook them ahead of time because the pizza is only going to be in the oven for about 10 minutes.
- Now open the oven door and use an oven mitt to pull out the rack halfway. Position the cutting board halfway over the pizza stone. GENTLY SHAKE OR SLIDE THE CRUST off the cutting board on to the pizza stone, angling so the crust gets onto the center of the stone. Replace the rack in the oven and set a timer for 8 minutes. I have found the sweet spot for me is about 10 minutes with my oven but your oven may be different.
- While this pizza cooks you can start work on the other one. Repeat the process on a separate cutting board and set aside.
- Once the timer dings and you feel the crust is adequately cooked (it should be lightly browned on the outside, but don't worry if the center still looks a little molten), remove it from the oven and let it rest for at least 10 minutes before cutting. This is crucial.
- To remove it from the oven, use an oven mitt to pull the rack halfway out again and position the cutting board back over to the stone. use tongs to grab the cross gently and pull it onto your cutting board. Transfer the other pizza to the oven and set the timer again.
- I know it's tough, but try to wait at least 10 minutes before cutting either pizza. Cut with a pizza cutter or kitchen scissors. Enjoy!
- Refrigerate leftovers in an airtight container up to 4 days. Reheat in microwave for soft crust or oven/toaster oven/airfryer for crisp crust.
Notes
- Note 1: For flour, I recommend using unbleached or all purpose flour. Any brand will work, though some of my favorites include Bob's Red Mill (link), Trader Joe's, and King Arthur (link). If all you have is bread flour, you can use that, but it will be more chewy. I would be careful not to over knead dough made from bread flour, and try to keep it moist. Similarly, whole wheat flour is fine to use, but it will require a bit more water. Play around with it when mixing the dough. You want your dough to be moist but not sticky.
- Note 2: For our dough to rise, and a really good flavor, you'll need some yeast. You can use active dry yeast like I did, or you can use a rapid rising yeast. The rapid yeast decreases the total time of this recipe. But I will say that the more time the yeast develops in your dough, the better the flavor. So choose whichever fits your needs best.
- Note 3: I love the coconut cream in this because it makes it the dough soft and supple, resulting in a divine crust. However if you can't find coconut cream, you can use tahini, oil, or even regular coconut milk (reduce the warm water by 2 tablespoons or add a little extra flour if you do this). You can also totally omit it, but your dough might be slighly less supple.
- Note 4: If you'd like to skip the kneading process, you'll need to refrigerate your dough for 24 hours (or up to 3 days), then let it come back to room temperature. The yeast and gluten will have developed enough at that point to shape your pizzas and bake.
- Prep Time: 2 hours 10 minutes
- Cook Time: 10 minutes
- Category: Entree, Party
- Method: Baking
- Cuisine: American, Italian, Vegan

Lanai
I used your recipe and my family loved it....
Thank you so much.