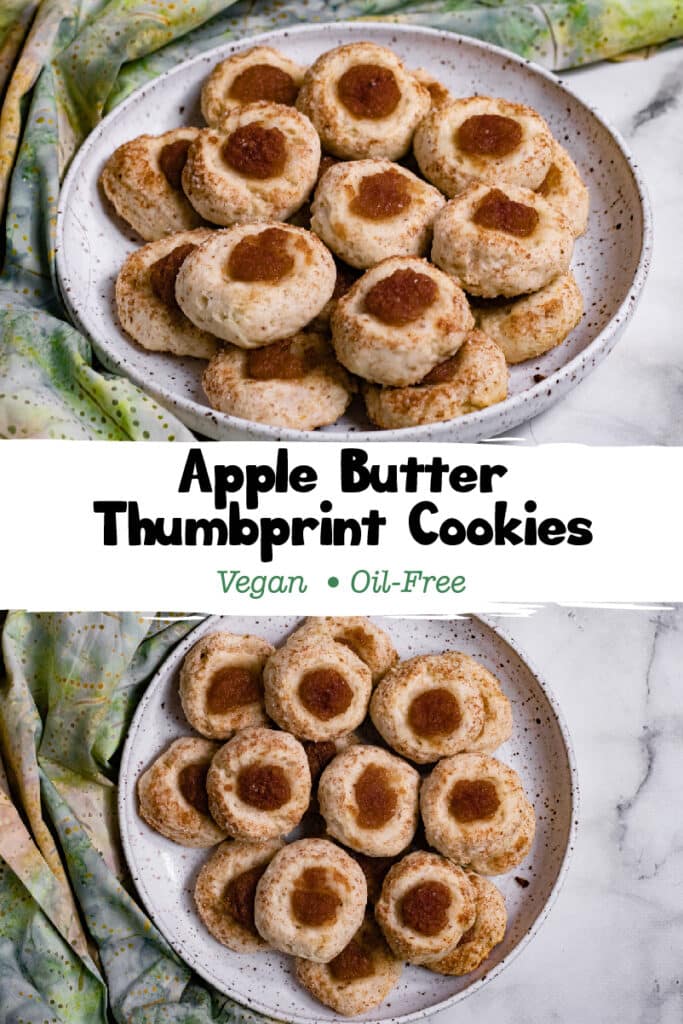
These slightly crispy, slightly soft Vegan Apple Butter Thumbprint Cookies are a quick and tasty dessert. This is a classic cookie made with a delicious fall twist, and they’re just as easy to make as any others. They’re fun for kids to help make, too!

This post may contain affiliate links. See our disclosure policy for details.
Hey Internet, soooo I just published an Instant Pot apple butter recipe (stovetop instructions provided) and naturally I had to do something else with it. Nothing can have just one use, right?
Anyway, I had the idea to put them in some thumbprint cookies! I’ve never actually made thumbprint cookies but I’ve always wanted to.
These cookies were RIDICULOUSLY easy to make and crazy good. The dough tastes like a cross between a shortbread and sugar cookie, and I am so here for it.
The process of making a thumbprint cookie is actually really simple. All you have to do is make the dough, chill it, scoop it, stick your thumb or another finger in there, fill it, and bake!
Does that sound like a lot of steps? They each go pretty quickly.
I’d say, overall, there’s only 15 minutes of prep, 30 minutes of chill-time, and 12-15 minutes of bake-time. Honestly, easy peasy.
This recipe also makes 30 little perfectly portioned cookies. And you’ll still have apple butter leftover for toast, pancakes, potatoes (what, I eat latkes with applesauce, how is this different?), and whatever else you like.
Let’s get baking!
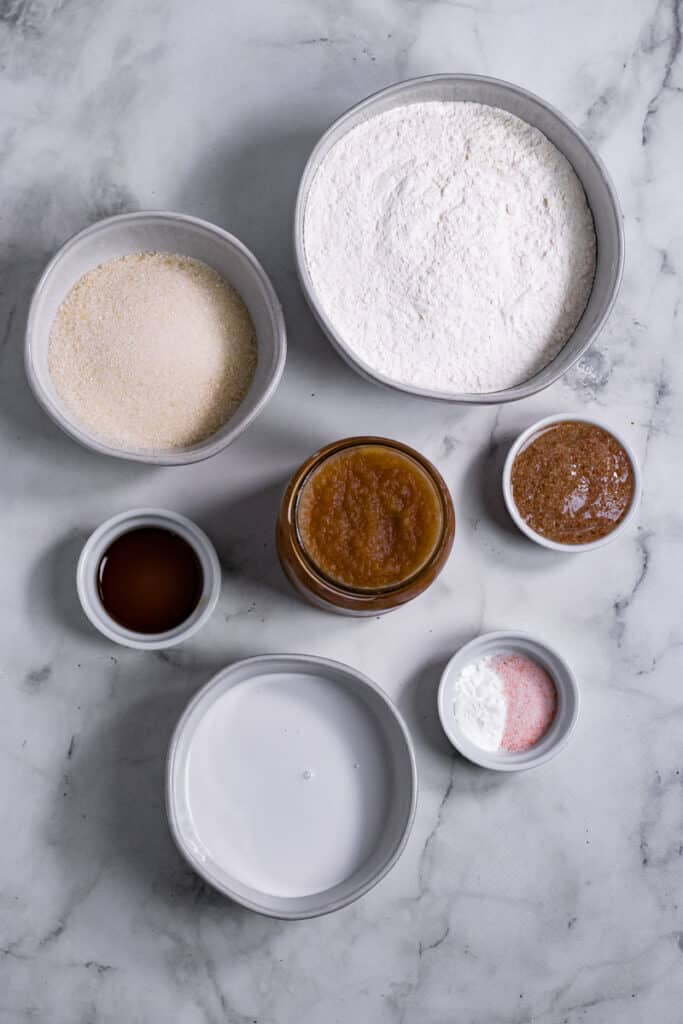
What You’ll Need
For substitutions for any of the below ingredients, check out my substitutions section below.
Like any cookie dough, you’ll need a few dry ingredients, a few wet ingredients, and any extras -- i.e., apple butter and an optional, fun topping!
For the dry ingredients: flour, baking powder, and salt!
For the wet ingredients: a flax egg, sugar, vanilla extract, and coconut cream (or vegan butter, see substitutions section).
And for extras--well of course you’ll need apple butter (store-bought will work too), but any jam or chocolate will work too.
Optionally, you can sprinkle cinnamon sugar on top of the cookies before baking them. You could also roll the dough in it before pressing and filling with apple butter, but I forgot to do that, put mine on after filling, and it was still super delicious.
What Substitutions Can I Make?
Flour
You can use whole wheat or spelt flour for this recipe, but it may require a touch more moisture. To make this recipe gluten-free, I recommend using a cup for cup GF flour like King Arthur Measure for Measure Gluten-Free Flour or Bob’s Red Mill 1:1 Gluten-Free Flour. I’ve baked with both of these before with good results.
Flax Egg
Other vegan egg substitutes should work in this recipe such as chia eggs or Bob’s Red Mill egg replacer.
Sugar
I used organic cane sugar in this recipe to achieve the somewhat crispy but chewy texture in the cookie. Other sugars may change the texture, but they should work. Try coconut sugar if looking for an unrefined version.
If you want to omit the sugar completely, I’d use a touch more flour until your dough is not sticky.
Coconut Cream
I like to bake with coconut cream (the thick part of canned coconut milk, but it’s also sold as canned coconut cream, and with that you get a bit more for your money) instead of vegan butter, but vegan butter will work.
If looking to make these lower fat, I’d try canned pumpkin (um, YUM pumpkin and apple!), mashed banana, or maybe applesauce, though you’ll need to play around with the amounts slightly to make sure you have a thick dough that’s not top sticky.
Apple Butter
If you don’t want to use my apple butter recipe, I’ll cry (just kidding), but store bought will also work. You could also use any other jam or chocolate--or even peanut butter for these vegan thumbprint cookies.
Tips for Making Vegan Apple Butter Thumbprint Cookies
- Make sure to prep your flax egg first, so it has time to gel nicely.
- If using coconut cream like I did, you want it to be room temperature. Don’t worry if it’s super liquidy instead of chunky. Just err on the side of not enough, and add more to the dough later if it’s crumbly.
- If using vegan butter, you want it to be room temperature. You can microwave some to soften it, just be careful not to melt it.
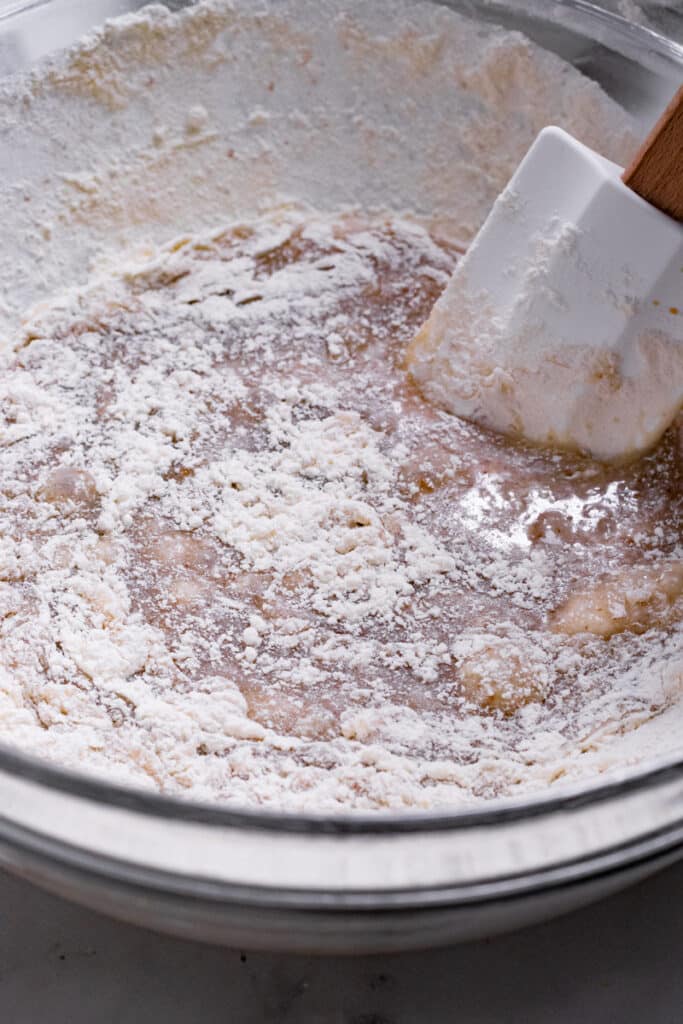
- Mix your sugar and coconut cream or vegan butter in a large bowl. I don’t bother using a mixer for this dough but you can if you want.
- Once those are combined, add your flax egg and vanilla and stir.
- Then add HALF of the flour and all of the baking powder and salt. I like to just sprinkle it over the top of the liquid in the bowl. Mix until most of it has been incorporated, then add the rest of the flour and mix until well combined. This method is best for evenly distributing the ingredients in the dough.
- Cover the dough and freeze for 20-30 minutes or refrigerate for around 40 minutes to an hour. It will firm up nicely and make it much easier to work with.
- Preheat your oven to 350 degrees Fahrenheit (or 177 degrees Celsius).
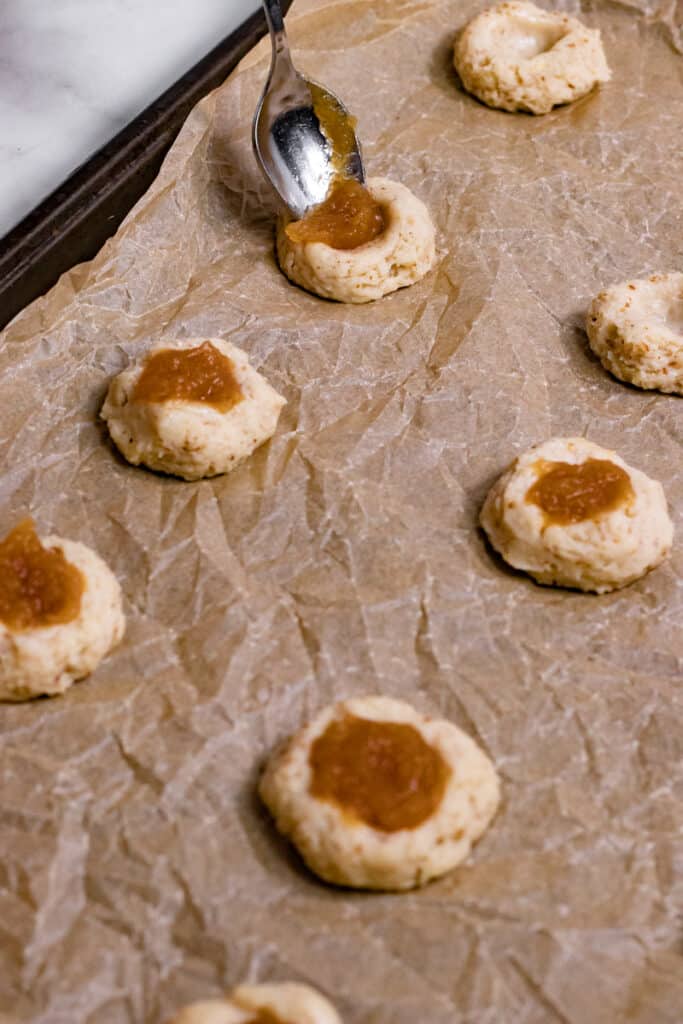
- Using a small cookie scoop (about 1.5 tablespoon), portion the dough out on parchment or silicone mat lined baking sheets. Keep a few inches between each dough ball--I was able to fit 15 per half-sheet sized baking pan.
- Roll each ball between your hands for a second to smooth it out.
- So when you’re pressing in your thumb--you can use any other finger, too--you might find it easier to dip your finger in a bowl of water first. Don’t worry about what it will do to the dough--mine wasn’t really affected by this.
- Before filling with the apple butter, I recommend prepping your other sheet of cookies to this point first, since the dough gets a little trickier to work with as it comes to room temperature.
- Use a small or narrow spoon (or a little ½ teaspoon measuring spoon) to scoop the filling into the center of each cookie. I use my finger to direct it off the spoon and into the cookie. Mine each required about ½ teaspoon of apple butter, give or take a touch. Don’t overload them.
- This part is optional, but I mixed together a little sugar and cinnamon and sprinkled it over each raw cookie. You could also do this before you fill them but I didn’t think of it till after I filled them, to be honest. It worked perfectly and gave the cookies a lovely flavor and texture.
- Bake for approximately 12 - 15 minutes. Mine took about 15 minutes, but I like mine a little crispy on the bottom. Note that they will not be perfectly firm to the touch when they’re still hot, but will firm up more as they cool.
- So let them cool before eating! You’ll only have to wait about 10 minutes since they’re so little anyway. Enjoy!
More Easy Vegan Desserts
Like easy desserts? Me too. A little too much. Check out some of my other easy vegan dessert recipes below.
- Smores Cookie Bake
- Apple Cake
- Soft Chocolate Chip Cookies (no chill)
- Banana Bread
- Coconut Almond Butter Cookies
- Chocolate Chip Scones
- Matcha Pound Cake
Anything Else?
I really hope you like this recipe! I know I do and so does Mr. Zardyplants, who was happy to eat up all the extra cookies we had from testing. The same night.
These Vegan Apple Butter Thumbprint Cookies:
- Sweet
- Crispy yet chewy and soft in the middle
- Tender
- Super Fall-y
- Warm
- Satisfying
- And really easy to make! Also super fun for kids to get involved!
Let me know in the comments below if you make this recipe or tag me @Zardyplants on Instagram so I can see your beautiful recreations! If you tag me on IG, I will share your post in my stories :)
Also, one quick request: if you love how this recipe looks or tastes, please leave me a 5-star rating and a nice comment–ratings help more people find my recipes which helps me keep providing them! Thank you!
<3 Liz
Save this for later on Pinterest!
Follow me on Social Media!
Follow my blog with Bloglovin
Vegan Apple Butter Thumbprint Cookies
- Total Time: 1 hour
- Yield: 30 cookies 1x
- Diet: Vegan
Description
These slightly crispy, slightly soft Vegan Apple Butter Thumbprint Cookies are a quick, tasty dessert. A classic with a delicious fall twist!
Ingredients
- 1+¾ cup all purpose flour (see note 1)
- ½ tsp baking powder
- ½ tsp salt
- ½ cup + ½ tablespoon coconut cream or vegan butter (see note 2)
- ½ cup sugar (see note 3)
- 1 flax egg (1 tbsp ground flaxseed + 3 tbsp water)
- 1+¼ teaspoon vanilla extract
- ¼ cup-ish apple butter or jam
Instructions
- Prep flax egg first.
- Mix wet then dry: Mix your sugar and room temp coconut cream or vegan butter in a large bowl. I don’t bother using a mixer for this dough but you can if you want. Add flax egg and vanilla and stir. Then add HALF of the flour and all of the baking powder and salt. Mix until most of it has been incorporated, then add the rest of the flour and mix until well combined.
- Chill: Cover the dough and freeze for 20-30 minutes or refrigerate for around 40 minutes to an hour. It will firm up nicely and make it much easier to work with.
- Preheat: Preheat your oven to 350 degrees Fahrenheit (or 177 degrees Celsius).
- Scoop: Using a small cookie scoop (about 1.5 tablespoon), portion the dough out on parchment or silicone mat lined baking sheets. Keep a few inches between each dough ball--I was able to fit 15 per half-sheet sized baking pan.
- Roll: Roll each ball between your hands for a second to smooth it out.
- Press: Press a thumb or other finger into each ball, creating a well in the center. If dough is sticking to your fingers, wet your finger between every few cookies. Don’t worry about what it will do to the dough--mine wasn’t really affected by this. Before filling with the apple butter, prep the other sheet of cookies to this point first, since the dough gets a little trickier to work with as it comes to room temperature.
- Fill: Use a small or narrow spoon to scoop the filling into the center of each cookie, about half a teaspoon, give or take. Don’t overload them.
- Optional: Mix together a little sugar and cinnamon and sprinkle it over each raw cookie. You could also do this before you fill them but I didn’t think of it till after I filled them, to be honest. It worked perfectly and gave the cookies a lovely flavor and texture.
- Bake: Bake for approximately 14 - 16 minutes. Mine took about 15 minutes, but I like mine a little crispy on the bottom. Note that they will not be perfectly firm to the touch when they’re still hot, but will firm up more as they cool.You’ll only have to wait about 10 minutes since they’re so little anyway. Enjoy!
- Store: Store in an airtight container up to 5 days or freeze in a freezer safe container up to 3 months.
Notes
- Note 1: You can use whole wheat or spelt flour for this recipe, but it may require a touch more moisture. To make this recipe gluten-free, I recommend using a cup for cup GF flour like King Arthur Measure for Measure Gluten-Free Flour or Bob’s Red Mill 1:1 Gluten-Free Flour. I’ve baked with both of these before with good results.
- Note 2: I bake with coconut cream (thick part of canned coconut milk, but it’s also sold as canned coconut cream) instead of vegan butter, but vegan butter will work. If looking to make these lower fat, I’d try canned pumpkin (um, YUM pumpkin and apple!), mashed banana, or maybe applesauce, though you’ll need to play around with the amounts slightly to make sure you have a thick dough that’s not top sticky.
- Note 3: I used organic cane sugar in this recipe to achieve the somewhat crispy but chewy texture in the cookie. Other sugars may change the texture, but they should work. Try coconut sugar if looking for an unrefined version. If you want to omit the sugar completely, I’d use a touch more flour until your dough is not sticky.
- Prep Time: 15 minutes
- Cook Time: 15 minutes
- Category: Dessert, Snack
- Method: Baking
- Cuisine: American

Nicole
So good!!! I made these with some homemade apple butter (I had a ton and had no idea what to do with it all) and these were perfect.
MIsty
This was a good way to use some of the apple butter I bought from our local apple orchard. I used Miyoko's vegan butter. They turned out great!