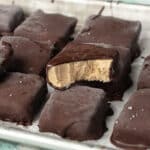
Creamy, chocolate-covered Coconut Ice Cream Bars are a delicious and easy-to-make sweet treat. These homemade dairy-free ice cream bars only use 6 or 7 ingredients and are perfect for hot summer days or any time you want a tasty wholesome treat.

This post may contain affiliate links. See our disclosure policy for details.
Hey Internet, it's been a while since we made a frozen treat. These dairy-free coconut ice cream bars are so easy and incredibly delicious so we really hope you'll make them.
We really love no-bake vegan desserts on this blog (so much that we made a whole list of our favorite No-Bake Vegan Desserts. But our favorites (that are perfect for summer) include our Vegan Ice Cream Cake, Vegan Smores, Chocolate Bliss Balls, Cherry Nice Cream, Chocolate Tofu Mousse, Vegan Chocolate Covered Pretzels, and Vegan Snickers Bites.
There's definitely a theme there: chocolate! We really like chocolate and needed a cool sweet treat. We've been keeping a batch of these homemade chocolate coconut ice cream bars in our freezer at all times this summer and it's been absolutely lovely! They're delicious and really satisfy a sweet tooth.
This recipe is surprisingly easy! All you have to do is blend some stuff up, pour it in a tray, freeze until solid, cut, dip in melted chocolate, and freeze until set again. Maybe that sounds like a lot of steps but you're only doing a few steps at a time and it never takes more than 5-10 minutes. Maybe the dunking in chocolate takes 15 minutes if you're doing it by yourself (it goes faster with a helper!) but it's a pretty quick recipe.
Forget the ice cream machine and forget paying a premium for a box of three dairy-free ice cream bars from the grocery store (if your local grocery stores even carry them, ours usually don't) when you can easily (and less expensively) make your own!
This recipe makes 12-16 servings (depending on what size you want your bars) for honestly the same or less what you'd pay for three. Plus, you can control the ingredients, add your favorite toppings, control the sweetness, and you get the satisfaction of making it yourself!
Anyway, the hardest part of our new favorite recipe? Not eating them all! Luckily they're pretty rich and very satisfying.
And if you prefer, put the ice cream in a silicone popsicle mold or you can pour the mixture in little silicone or paper cups and stick popsicle sticks in them (and then freeze and dip in chocolate) if you want them on a stick. But we liked the simplicity of doing it this way.
Anyway, this recipe does not have a huge coconut flavor. For coconut lovers, you'll definitely want to sprinkle on some (maybe toasted) coconut flakes before the chocolate sets.
Why You'll Love These Coconut Ice Cream Bars
- Simple Ingredients: With awesome ingredients like creamy coconut milk, Medjool dates, and dark chocolate, this recipe has only 7 ingredients that are pretty easy to find (for us in our small town anyway).
- Easy and Quick: This recipe doesn't require any fancy equipment or baking and we're not even sure you could call it cooking. Plus, it takes less than a half hour of total active time and the rest of the time is just freezer time so you can go about your life.
- Dessert Stash: The best part about this recipe is that it makes a bunch of servings so you can build up a dessert stash in the freezer. After these are fully done setting, you can wrap them individually in freezer paper and place them in a freezer bag and they'll stay good for 6-12 months. We don't know how we'd possibly go that long without eating them all, but hey, if you've got more self-restraint, go for it.

Ingredients
Pick up the following basic ingredients for these delicious homemade frozen coconut bars (vegan ice cream bars) the next time you're at your local grocery store. See the recipe card at the bottom of this post for full ingredients, instructions, and accurate nutrition information (to the best of our ability; please consult your physician, registered dietitian, or healthcare professional if you have specific dietary needs or need to meet certain daily values of any nutrient). we give substitutions for the ingredients in the section below this one, so most people can still make this recipe!
- 1 Can (13.66 Ounces) Full Fat Coconut Milk (NOT Lite): We buy organic Thai Kitchen canned coconut milk from Costco in a 6-pack and find it very economical. Most canned coconut milk should work, but do NOT use refrigerated carton coconut milk as it is very watered down. We have not tested this recipe with the canned Lite coconut milk, but we don't think the texture would be nice. The fat is what makes it really luscious and delicious. Remember that this recipe is being cut into 12 or 16 portions, so you're only getting a small amount of the fat if you're worried about it.
- ½ Cup Unsweetened Almond Milk: Or non-dairy milk of choice, this just allows for easier blending and the coconut ice cream bars turn out great with this.
- 1 Cup (Packed) Pitted Medjool Dates: This was about 12-14 dates for us. Stickier dates are easier to blend, so if you need to soak these in very hot water for a 30-60 minutes (and then drain well before blending), it will make the blending easier (especially if you don't have a high powered blender).
- 1 Teaspoon Vanilla Extract, for flavor
- ¼ Teaspoon Salt
- About 10.5 Ounces Dark Chocolate or Semi Sweet Chocolate Chips: Use whatever dairy free chocolate you like! We used 70% dark chocolate bars broken into small pieces and find this makes a really nice thin chocolate (with the next ingredient of course) and great flavor.
- 1 Tablespoon Coconut Oil: This both thins the melted chocolate and makes a really nice shell that breaks less (in fact, dark chocolate and coconut oil ARE the ingredients that make a magic shell for ice cream!). It's a small amount and it really makes the chocolate much nicer.
- Flaky Salt for Topping, Optional: Or use any other topping you like such as shredded coconut / coconut flakes, chopped nuts, seeds, or sprinkles.

Substitutions
- Canned Coconut Milk: Coconut cream should also work but you may or may not need a splash more of plant based milk to get it to blend. We HAVE tested this recipe with raw cashews instead of coconut milk and it works great! We will include a note below with modifications to the recipe for the cashew version.
- Medjool Dates: Other dates should work (though Medjool dates are usually the sweetest) but if they are hard or dry we do recommend soaking them (and draining the liquid before blending) in hot water for at least a half hour. We have NOT tested this recipe with any other sweetener instead of the medjool dates (you can add a little maple syrup though if it isn't sweet enough for you) so we cannot say if it will work with no dates.

How to Make Coconut Ice Cream Bars
- Prep the Pan: Line a 8-inch or 9-inch square cake pan with parchment paper. We like to cut 2 pieces and have them going opposite directions so that we have "tabs" to pull up the sheet of frozen coconut ice cream. You can alternatively use 2 loaf tins. We just recommend using a square or rectangular pan with deep walls. Any bigger than an 8 or 9-inch pan and you'll have VERY thin ice cream bars (if you only have a bigger pan, consider doubling the recipe).
- Check Your Dates: If you have a high powered blender like a Vitamix, feel free to skip this step. Are your pitted Medjool dates dry or hard? Boil some water and place the pitted dates in a heat safe bowl or pot. Pour the boiling water over them and let them sit for 30-60 minutes. When the time is up, drain the dates and lightly squeeze (or use the back of a spoon) to press out the excess water. Move on to the next step.
- Blend: Add the pitted dates, coconut milk, almond milk (or other non-dairy milk), vanilla extract, and the ¼ teaspoon salt to a blender (or use a food processor) and blend until completely smooth. Taste and adjust as needed. If it isn't sweet enough, feel free to add a tablespoon or two of maple syrup or agave syrup and blend again.
- Add to Pan and Freeze: Pour the mixture into your lined square pan. You can use a blender spatula to get every last bit out of the blender (we love ours and use it multiple times a day, it's also great for scraping out large mason jars). Spread it out evenly on the pan (you can use an offset spatula or just the back of a spoon, or even just bang the dish on the counter a few times to settle the date mixture). Place in the freezer on a level shelf with nothing else too close to it (you wouldn't want a bag of peas to fall into your coconut ice cream bars!). Freeze for at least 4-6 hours or overnight. We have had best results freezing overnight because it does take quite a while for the mixture to become hard. You don't want the ice cream melting when you're dipping it in the hot melted chocolate!
- Melt Chocolate: When the bars are frozen, you're ready to melt the chocolate. If your house is fairly warm like ours, we advise keeping the bars in the freezer until you're ready to dunk them. Anyway, to melt the chocolate, add the broken chocolate bars (or chocolate chips) and the coconut oil to a medium bowl and microwave in 30-second increments until it's melted, stirring with a fork every so often. (Alternatively, set up a double boiler with a glass bowl that fits the top pot perfectly and add water to the bottom pot. Melt over low heat, stirring very frequently.) Let the chocolate cool for 1-2 minutes.
- Set up: While the chocolate's cooling, set up a quarter sheet pan and a small plate (that's all that will fit in our side-by-side freezer, and we did need a supplemental plate to fit everything!) with parchment paper. You can alternatively use a couple dinner plates but don't skip the parchment paper (or wax paper), otherwise the coconut ice cream bars will stick.
- Cut the Bars: Use the parchment tabs to remove the sheet of coconut ice cream from the pan and place the whole thing on a cutting board. Cut in 12 or 16 even pieces (you can do squares or bars).
- Coat in Chocolate: Working quickly (a partner can help a lot with this process), add one of the bars to the melted chocolate and use a fork to gently flip it in the chocolate. Transfer it to the parchment lined baking tray. If desired, sprinkle on a little flaky salt or whatever toppings you like. Repeat with the remaining bars, leaving a little space between each one so they don't stick together.
- Freeze: Freeze until set and enjoy! You may wish to let one sit out for a minute or two before biting into it, but we really enjoy these.
- Storage: Once the coconut ice cream bars are frozen, they're good to go. If you think they're only going to last a week or two (they last less than two weeks in our house), you can just leave them on the tray in the freezer. If you need the room or think they will last longer, you can wrap them individually in freezer paper and place in a sealed freezer bag for 6-12 months.

Cashew Version
This vegan ice cream bar recipe also works with raw cashews instead of coconut milk. They definitely taste a bit different than the coconut ice cream bars, but also delicious, just delicious in a different way. Feel free to make both versions and compare!
Cashew Ice Cream Bars
- 1 + ¼ cups raw cashews, soaked in hot water for 20-30 minutes (or an hour if your blender isn't super powerful)
- 1 + ¼ cups almond milk
- 1 packed cup pitted medjool dates
- ¼ teaspoon salt
- 1 teaspoon vanilla extract
Follow the directions above pretty much!
More No Bake Vegan Desserts
- Vegan Ice Cream Cake
- Vegan Chocolate Bliss Balls
- Chocolate Tofu Mousse
- Vegan Coconut Balls
- Vegan Smores
- Cherry Nice Cream
- Vegan Snickers Stuffed Dates
- Vegan Chocolate Covered Pretzels
- Protein Nice Cream
- Vegan Banana Pudding
And if you want more recipes, check out our whole list of No-Bake Vegan Desserts!

Homemade Chocolate Coconut Ice Cream Bars (Dairy Free)
- Total Time: 4 hours, 25 minutes
- Yield: 12 servings 1x
- Diet: Dairy-Free, Gluten-Free, Vegan, Vegetarian
Description
Creamy, chocolate-covered Coconut Ice Cream Bars are a delicious and easy sweet treat. These dairy-free ice cream bars use 6 ingredients.
Ingredients
- 1 Can (13.66 Ounces) Full Fat Coconut Milk (NOT Lite, see Note 1)
- ½ cup Unsweetened Almond Milk (see Note 2)
- 1 cup (Packed) Pitted Medjool Dates (see Note 3)
- 1 Teaspoon Vanilla Extract, for flavor
- ¼ Teaspoon Salt
- About 10.5 ounces Dark Chocolate or Semi Sweet Chocolate Chips (see Note 4)
- 1 Tablespoon Coconut Oil (see Note 5)
- Flaky Salt for Topping, Optional (or other toppings)
Instructions
- Prep the Pan: Line a 8-inch or 9-inch square cake pan with parchment paper. We like to cut 2 pieces and have them going opposite directions so that we have "tabs" to pull up the sheet of frozen coconut ice cream. You can alternatively use 2 loaf tins. We just recommend using a square or rectangular pan with deep walls. Any bigger than an 8 or 9-inch pan and you'll have VERY thin ice cream bars (if you only have a bigger pan, consider doubling the recipe).
- Check Your Dates: If you have a high powered blender like a Vitamix, feel free to skip this step. Are your pitted Medjool dates dry or hard? Boil some water and place the pitted dates in a heat safe bowl or pot. Pour the boiling water over them and let them sit for 30-60 minutes. When the time is up, drain the dates and lightly squeeze (or use the back of a spoon) to press out the excess water. Move on to the next step.
- Blend: Add the pitted dates, coconut milk, almond milk (or other non-dairy milk), vanilla extract, and the ¼ teaspoon salt to a blender (or use a food processor) and blend until completely smooth. Taste and adjust as needed. If it isn't sweet enough, feel free to add a tablespoon or two of maple syrup or agave syrup and blend again.
- Add to Pan and Freeze: Pour the mixture into your lined square pan. You can use a blender spatula to get every last bit out of the blender (we love ours and use it multiple times a day, it's also great for scraping out large mason jars). Spread it out evenly on the pan (you can use an offset spatula or just the back of a spoon, or even just bang the dish on the counter a few times to settle the date mixture). Place in the freezer on a level shelf with nothing else too close to it (you wouldn't want a bag of peas to fall into your coconut ice cream bars!). Freeze for at least 4-6 hours or overnight. We have had best results freezing overnight because it does take quite a while for the mixture to become hard. You don't want the ice cream melting when you're dipping it in the hot melted chocolate!
- Melt Chocolate: When the bars are frozen, you're ready to melt the chocolate. If your house is fairly warm like ours, we advise keeping the bars in the freezer until you're ready to dunk them. Anyway, to melt the chocolate, add the broken chocolate bars (or chocolate chips) and the coconut oil to a medium bowl and microwave in 30-second increments until it's melted, stirring with a fork every so often. (Alternatively, set up a double boiler with a glass bowl that fits the top pot perfectly and add water to the bottom pot. Melt over low heat, stirring very frequently.) Let the chocolate cool for 1-2 minutes.
- Set up: While the chocolate's cooling, set up a quarter sheet pan and a small plate (that's all that will fit in our side-by-side freezer, and we did need a supplemental plate to fit everything!) with parchment paper. You can alternatively use a couple dinner plates but don't skip the parchment paper (or wax paper), otherwise the coconut ice cream bars will stick.
- Cut the Bars: Use the parchment tabs to remove the sheet of coconut ice cream from the pan and place the whole thing on a cutting board. Cut in 12 or 16 even pieces (you can do squares or bars).
- Coat in Chocolate: Working quickly (a partner can help a lot with this process), add one of the bars to the melted chocolate and use a fork to gently flip it in the chocolate. Transfer it to the parchment lined baking tray. If desired, sprinkle on a little flaky salt or whatever toppings you like. Repeat with the remaining bars, leaving a little space between each one so they don't stick together.
- Freeze: Freeze until set and enjoy! You may wish to let one sit out for a minute or two before biting into it, but we really enjoy these.
- Storage: Once the coconut ice cream bars are frozen, they're good to go. If you think they're only going to last a week or two (they last less than two weeks in our house), you can just leave them on the tray in the freezer. If you need the room or think they will last longer, you can wrap them individually in freezer paper and place in a sealed freezer bag for 6-12 months.
Notes
- Note 1: We buy organic Thai Kitchen canned coconut milk from Costco in a 6-pack and find it very economical. Most canned coconut milk should work, but do NOT use refrigerated carton coconut milk as it is very watered down. We have not tested this recipe with the canned Lite coconut milk, but we don't think the texture would be nice. The fat is what makes it really luscious and delicious. Remember that this recipe is being cut into 12 or 16 portions, so you're only getting a small amount of the fat if you're worried about it.
- Note 2: Or non-dairy milk of choice, this just allows for easier blending and the coconut ice cream bars turn out great with this.
- Note 3: This was about 12-14 dates for us. Stickier dates are easier to blend, so if you need to soak these in very hot water for a 30-60 minutes (and then drain well before blending), it will make the blending easier (especially if you don't have a high powered blender).
- Note 4: Use whatever dairy free chocolate you like! We used 70% dark chocolate bars broken into small pieces and find this makes a really nice thin chocolate and great flavor.
- Note 5: This both thins the melted chocolate and makes a really nice shell that breaks less (in fact, dark chocolate and coconut oil ARE the ingredients that make a magic shell for ice cream!). It's a small amount and it really makes the chocolate much nicer.
- Note 6: There's another version of this recipes with cashews instead of coconut milk and it's also delicious! Scroll up just a little to the "Cashew Version" section for the slightly modified recipe.
- Prep Time: 25 minutes
- Refrigeration Time: 4 hours
- Category: Dessert, Snack
- Method: Freezer, No Bake
- Cuisine: American, Ice Cream
Leave a Reply