Vegan Chocolate Covered Pretzels are a super fun and delicious dessert to make, gift, and eat! This easy no-bake vegan dessert is great any time of the year, and fun for kids or couples to create together.

This post may contain affiliate links. See our disclosure policy for details.
Hey Internet, I am not going to become one of those bloggers that tells you a super long story before the recipe. I’ll instead just tell you a two-sentence story.
Chocolate covered pretzels were one of the first things I bought for my husband when we first started dating, which I found at the craft fair I went to with him and his mom. Making them together brings back so many fun memories and nostalgia.
That’s it, I promise!
Now you know already, I LOVE no-bake vegan desserts! I’ve already made vegan snickers bites, vegan rice crispy treats, vegan chocolate pudding, vegan puppy chow (muddy buddies), vegan ice cream cake, and frankly a lot more, lol.
Anyway, if you’re one of those people who’s thinking, “Aren’t chocolate covered pretzels already vegan?”
Well, they can be, if one uses vegan chocolate and vegan sprinkles… so yeah, I’m here today to give you an easy way to make awesome vegan chocolate covered pretzels AND give you resources on places to find vegan sprinkles and chocolate chips.
Also this is a fantastic gift to give, which is incidentally why most recipes out there for chocolate covered pretzels are published in December.
I seem to be publishing mine in July but that’s just because I don’t like to bake in the summer so I’m always thinking about vegan no-bake desserts. And my husband always loves these when I make them.
Tip: Keep these in the freezer for a great cooling treat!
Why This Recipe Works
I mean, there’s not that much to dipping pretzels in chocolate. But I’ve got a few tips and tricks up my sleeve to make them the best vegan chocolate covered pretzels out there.
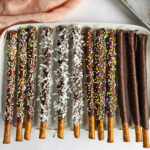
And what are they without toppings? I mean, the plain ones are great, but I like the ones with sprinkles or coconut even more. You could also experiment with other toppings like crushed nuts.
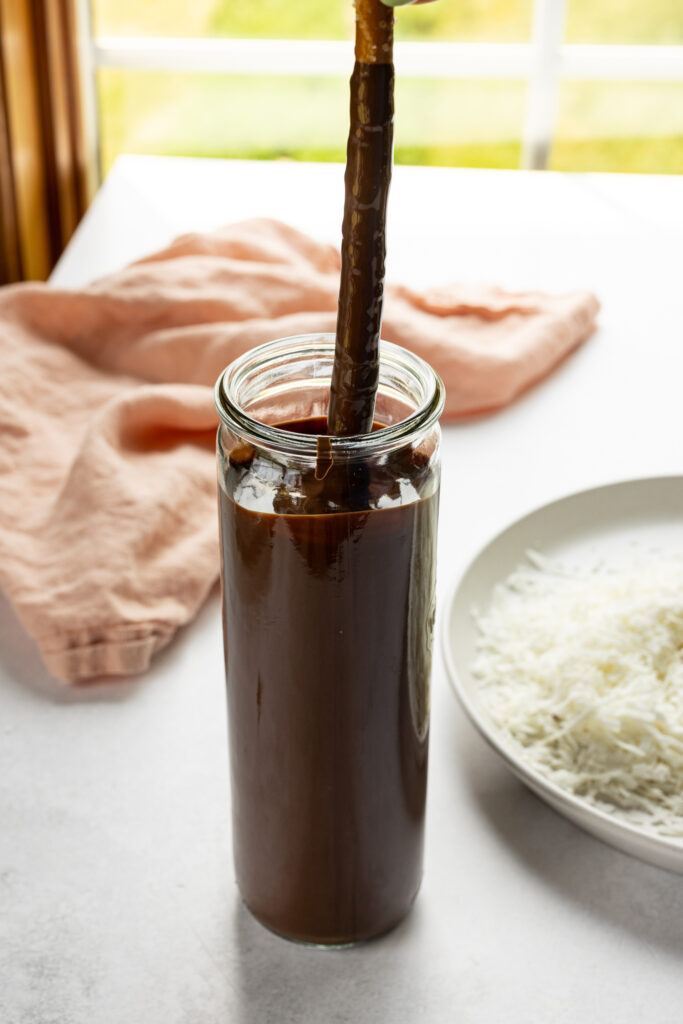
One thing that really helps the process go better is a super tall thin glass. I love using Weck 905 ½ L Cylindrical Jars for this.
Here’s why: You can melt your chocolate in a large glass measuring cup in the microwave (or in a double boiler on the stovetop) and pour it into this jar and you’ll be able to submerge most of your pretzel rod. If you do that with a normal 32 ounce barrel jar, you’ll need more chocolate to fill it up, resulting in more chocolate waste.
Another tip: If you only want to make a few vegan chocolate covered pretzels, you can pour the melted chocolate onto some wax paper and roll your pretzel rod in it there.
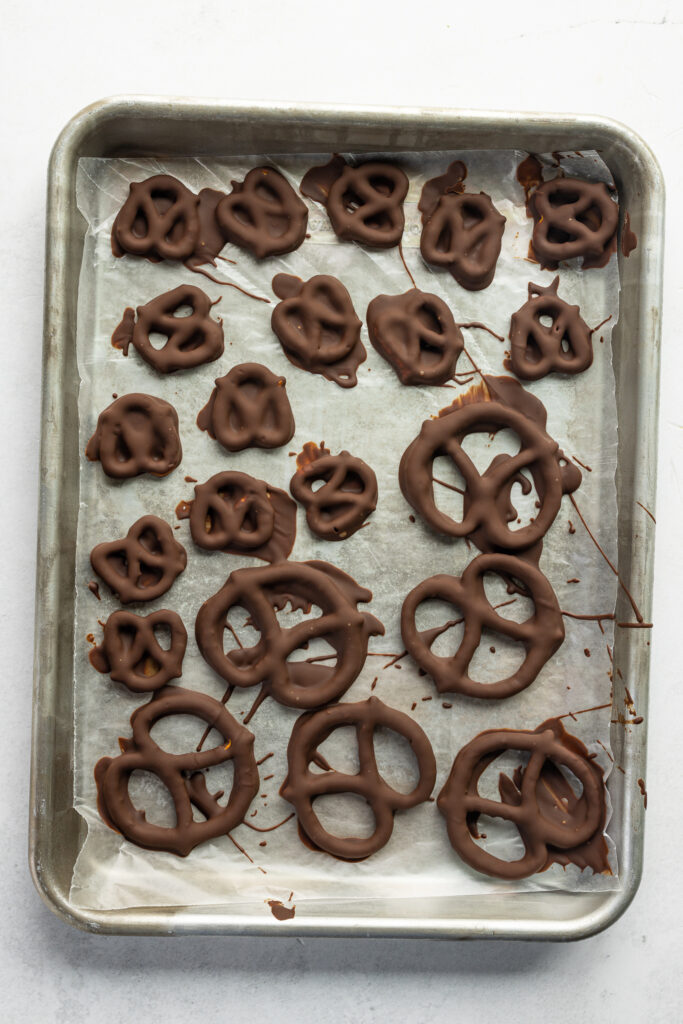
Using regular twist pretzels? Pour the chocolate into a bowl and use a fork to dunk and flip the pretzel to cover it in the melted chocolate.
Okay, now, vegan sprinkles. My favorite website for this is Sweetapolita. They have a section with vegan sprinkles and so many colors and styles to choose from!
I like doing both the regular jimmies (long thin sprinkles) and nonpareils (tiny sphere sprinkles).
And you can do any colors that you like, mix and match for any holidays like Christmas, Valentine’s day, etc. Or use someone’s favorite colors for their birthday.
Other brands include Supernatural Vegan Sprinkles, 365 Organics by Whole Foods (I’ve on occasion picked up sprinkles that are vegan there), and there are a few more you can look at if you search for vegan sprinkles on the internet.
I also really liked the coconut shreds as a topping. Get unsweetened or sweetened and you can also toast them if you like.
Never miss a recipe! Join my mailing list to receive a free copy of my e-book on my go-to plant based recipes as well as vegan tips, NEW recipes straight to your inbox. I will NEVER spam you or sell your information.
Ingredients and Substitutions
Note about quantity: This recipe makes enough for 24-30 dipped pretzel rods. If you’d like to make fewer, you may want to try the method where you pour the chocolate onto wax paper and roll the pretzel rod in it. This is an ineffective method if you’re making a large quantity, but it’s fine if you just want to make a few and waste less chocolate. If doing this, just melt as much chocolate as you need.
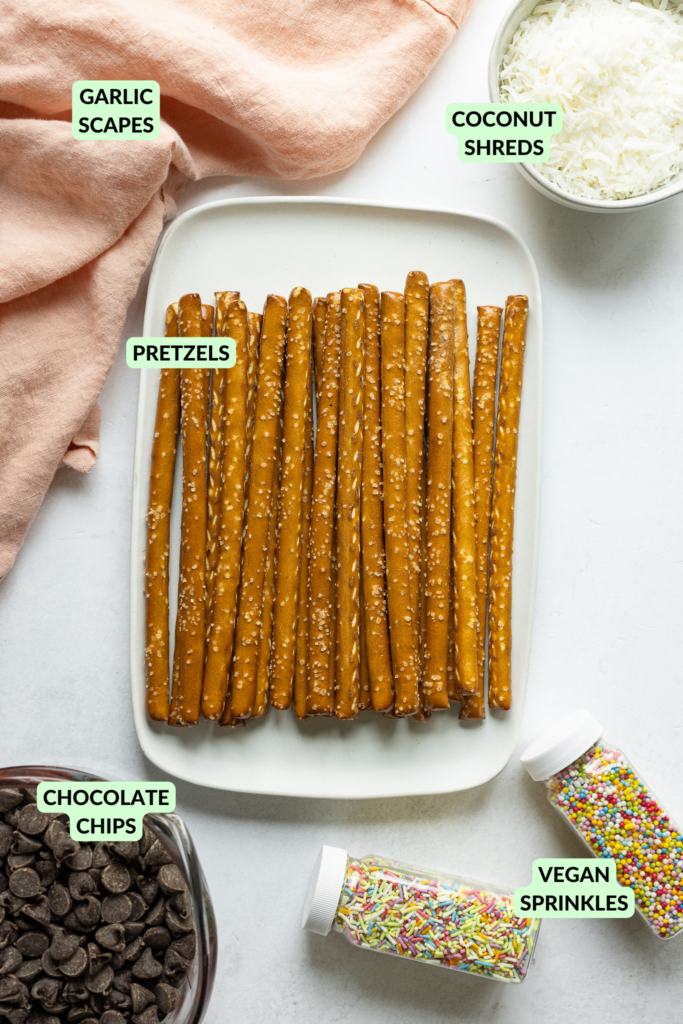
- 24-30 large pretzel rods (or around 6-8-ish cups regular twist pretzels) (note if you are doing rods, it’s helpful to have regular pretzels around to use up the rest of the melted chocolate when it gets too low to dip the rods into.)
- 24 ounces vegan chocolate chips (or you can use chopped chocolate bars)
- 1-2 tablespoons coconut oil, optional (you don’t need to add this but it does thin the chocolate not only making it go further, but reducing the likelihood of pooling (where the chocolate spreads once you put the pretzel on the wax paper).
- Vegan sprinkles, optional
- Shredded coconut, optional (you may choose to toast this or not)
- Any other toppings you’d like, such as crushed nuts, optional
Equipment
You don’t need much equipment but I wanted to talk through the different options.
- Wax paper: It really helps to have a surface to put the dunked pretzels on. They won’t stick to the wax paper after the chocolate has set. I’ve heard parchment paper will also work, but I haven’t personally tried it.
- 2 Quarter sheet pans: While you can put your pretzels on a plate to freeze, sometimes plates aren’t big enough to hold the pretzels and allow a bit of space between each pretzel rod so the vegan chocolate covered pretzels don’t all stick together. I like a few quarter sheet pans because they each comfortably fit around 12 pretzels with a bit of space between each, and they each fit on a shelf in my side-by-side freezer. I used two of these pans for this recipe.
- 4-cup glass measuring cup: This is a workhorse I use for everything in my kitchen from mixing salad dressings to melting chocolate. The handle doesn’t usually get too hot when melting chocolate (but be careful since microwaves differ) and it has a nice spout. You could definitely use this for dunking your pretzels, but it’s very wide so you need more chocolate to fill it. That’s why I recommend the jars (see below). You can also use a double boiler to melt chocolate if you prefer not to use a microwave.
- Weck 905 ½ L Cylindrical Jars: These tall cylindrical weck jars are amazing for this task because they are both tall and narrow, meaning you can submerge most of your pretzel rods and not use too much more chocolate than you need. Another option is a drinking glass.
- Medium bowl: Pour your melted chocolate into a bowl once you’re done making the vegan chocolate covered pretzel rods. You can use any other small pretzels in here and use a fork to lift them out and place them on a wax paper lined tray or plate. Extra chocolate covered pretzels = extra deliciousness. Plus it allows you to use up the excess chocolate.
- Paper towels (or damp kitchen towels): One rule of melted chocolate is that you will usually make a mess. I always do. Being ready with towels for cleaning up (even halfway through) is really helpful.

How to Make Vegan Chocolate Covered Pretzels
- Melt your chocolate either in a large microwave-safe bowl in 1-2 minute increments (stir each time) or glass measuring cup OR in a double boiler. I recommend adding a tablespoon or two of coconut oil as it thins the chocolate making it easier to work with, but it’s optional.
- While the chocolate melts, get your work station ready. I like to pre-line my quarter sheet pans with wax paper. Get out your sprinkles, toasted coconut, or whatever toppings you’re using. Place a damp kitchen towel or paper towels nearby because it will get messy.
- Once the chocolate is melted, give it a good stir until it is completely smooth and pour it either into your tall narrow jar (I like the tall cylindrical weck jar for this, but a drinking glass also works) or pour some onto wax paper if you’re only making a few pretzels.
- Holding a pretzel rod at one end between your thumb and index finger, carefully submerge the pretzel in the melted chocolate, stopping about 1-2 inches from the end of the rod. Pull it all the way up and hover over the jar, allowing the excess chocolate to drip off. Once the excess has dripped off, quickly but carefully place the pretzel on the wax paper line tray and repeat until the tray is filled.
- If you are doing twist pretzels (not rods), pour the chocolate into a bowl and use a fork to dunk the pretzel in, flipping if necessary to coat all sides of the pretzel. Place on the wax paper once you’ve let all the excess chocolate drip off.
- For the toppings, make sure the chocolate is still wet when you do this. Sprinkle your toppings over the pretzels. They’ll be on all sides except for the bottom. If you don’t like that, you can hold your just dunked pretzel over a paper plate and turn it while you add the toppings. You may want someone to help you with this, or maybe you’re totally coordinated and you can do it just fine! I’m jealous of that, because I’m pretty clumsy. You can alternatively roll the pretzel in the toppings, but I find the melted chocolate gets everywhere and kind of messes it up.
- Once you’ve filled a tray, carefully place it in the freezer and allow them to harden for at least 1-2 hours. If it’s summer, you may want to leave them in the freezer until you’re ready to eat since they melt pretty quickly.
- Once chilled, serve and enjoy! I definitely recommend eating these over a plate, especially the ones with sprinkles or coconut!
- These will keep for 3 months in the freezer. If storing at room temperature (don’t do this when it’s hot or leave them in the sunlight), keep in an airtight container and these should stay good for a few weeks.
Did you know I have books? Visit my shop page to see the various e-books I have available. My best seller is Plant-Based Jewish Recipes, and I’m in the middle of a second volume of that as well as a new book in the works that focuses on one of my favorite gluten-free vegan proteins.
Frequently Asked Questions
Since these are vegan chocolate covered pretzels, you can use any kind of chocolate you like as long as it’s vegan. I love Enjoy Life vegan chocolate chips, but there are other brands out there. Some stores like Trader Joe’s offer semi-sweet chocolate chips that are accidentally vegan, but make sure to read the ingredients label. You can also use chopped dark chocolate bars, though not all dark chocolate is dairy-free, so make sure to read those labels carefully. Finally, there are a number of vegan milk chocolates out there now that would likely work as well.
In the summer, I would. I actually like to keep them in my freezer (no, the chocolate doesn’t get too hard). But in the winter (in most climates), you’re fine to keep these in an airtight container on the counter.
In the freezer, 3 months. In an airtight container on the counter they should last a few weeks. Don’t leave them in the sunlight or a warm room.
Pro Tips for Success
- The coconut oil (vegetable shortening will also work) helps thin out the chocolate making it go further, pool less on the wax paper, and come out smoother, making much nicer looking vegan chocolate covered pretzels. Usually candy melts are used for this. They have a different composition which makes them melt smoother but they are not vegan, so that’s why I recommend just adding a bit of coconut oil to your melted chocolate.
- Vegan white chocolate chips did not work well for me. They didn’t melt properly, and when I tried to thin the chocolate with coconut oil, it became very translucent.
- Use any toppings you like (or none at all). We used vegan sprinkles (both jimmies and nonpareils) from Sweetapolita sprinkles (not sponsored!) and unsweetened coconut shreds. You can toast these shreds first if you like. You could also use chopped nuts or sesame seeds.
More Recipes Like This
I have a lot of no-bake vegan dessert recipes, so I’ll just mention the chocolate ones below.
- Vegan Ice Cream Cake
- Vegan Chocolate Pudding
- Healthy-ish Vegan Snickers Bites
- Vegan S'mores
- Vegan Puppy Chow (Muddy Buddies)
- Healthy-ish Vegan Chocolate Bliss Balls
- Vegan Mug Brownie (does microwaving count as baking? I don’t think so.)
- By the same logic, try my Vegan Protein Mug Cake
<3 Liz
Follow me on Instagram, Facebook, TikTok, Pinterest, or YouTube for more vegan tips, recipes, and to see all my recipe videos (I even have recipes not on the blog!).
Save this for later on Pinterest!
Vegan Chocolate Covered Pretzels
- Total Time: 25 minutes
- Yield: 24-30 peices 1x
- Diet: Vegan
Description
Vegan Chocolate Pretzel Rods are a super fun and delicious dessert to make, gift, and eat! This no-bake dessert is great any time of the year.
Ingredients
- 24-30 large pretzel rods (or 6-8-ish cups regular twist pretzels)
- 24 ounces vegan chocolate chips (see note 2)
- 1-2 tablespoons coconut oil, optional (see note 3)
- Vegan sprinkles, optional (see note 4)
- Shredded coconut, optional (toast if desired)
- Other toppings as desired, optional, such as crushed nuts
Instructions
- Note about quantity: This recipe makes enough for 24-30 dipped pretzel rods. If you’d like to make fewer, you may want to try the method where you pour the chocolate onto wax paper and roll the pretzel rod in it. This is an ineffective method if you’re making a large quantity, but it’s fine if you just want to make a few and waste less chocolate. If doing this, just melt as much chocolate as you need.
- Melt your chocolate either in a large microwave-safe bowl in 1-2 minute increments (stir each time) or glass measuring cup OR in a double boiler. I recommend adding a tablespoon or two of coconut oil as it thins the chocolate making it easier to work with, but it’s optional.
- Prep work station: While the chocolate melts, get your work station ready. I like to pre-line my quarter sheet pans with wax paper. Get out your sprinkles, toasted coconut, or whatever toppings you’re using. Place a damp kitchen towel or paper towels nearby because it will get messy.
- Prep chocolate: Once the chocolate is melted, give it a good stir until it is completely smooth and pour it either into your tall narrow jar (I like the tall cylindrical weck jar for this, but a drinking glass also works) or pour some onto wax paper if you’re only making a few pretzels.
- Dip pretzel rods: Holding a pretzel rod at one end between your thumb and index finger, carefully submerge the pretzel in the melted chocolate, stopping about 1-2 inches from the end of the rod. Pull it all the way up and hover over the jar, allowing the excess chocolate to drip off. Once the excess has dripped off, quickly but carefully place the pretzel on the wax paper line tray and repeat until the tray is filled.
- Using small pretzels? If you are doing twist pretzels (not rods), pour the chocolate into a bowl and use a fork to dunk the pretzel in, flipping if necessary to coat all sides of the pretzel. Place on the wax paper once you’ve let all the excess chocolate drip off.
- For the toppings, make sure the chocolate is still wet when you do this. Sprinkle your toppings over the pretzels. They’ll be on all sides except for the bottom. If you don’t like that, you can hold your just dunked pretzel over a paper plate and turn it while you add the toppings. You may want someone to help you with this, or maybe you’re totally coordinated and you can do it just fine! I’m jealous of that, because I’m pretty clumsy. You can alternatively roll the pretzel in the toppings, but I find the melted chocolate gets everywhere and kind of messes it up.
- Freeze: Once you’ve filled a tray, carefully place it in the freezer and allow them to harden for at least 1-2 hours. If it’s summer, you may want to leave them in the freezer until you’re ready to eat since they melt pretty quickly.
- Serve: Once chilled, serve and enjoy! I definitely recommend eating these over a plate, especially the ones with sprinkles or coconut!
- Store: These will keep for 3 months in the freezer. If storing at room temperature (don’t do this when it’s hot or leave them in the sunlight), keep in an airtight container and these should stay good for a few weeks.
Notes
- Note 1: I like to use 7 or 8-inch pretzel rods for this. You can use pretzel twists instead (but I’d use a bowl for the melted chocolate). If you are doing rods, it’s helpful to have regular pretzels around to use up the rest of the melted chocolate when it gets too low to dip the rods into.
- Note 2: I love Enjoy Life vegan chocolate chips, but there are other brands out there. Some stores like Trader Joe’s offer semi-sweet chocolate chips that are accidentally vegan, but make sure to read the ingredients label. You can also use chopped dark chocolate bars, though not all dark chocolate is dairy-free, so make sure to read those labels carefully. Finally, there are a number of vegan milk chocolates out there now that would likely work as well.
- Note 3: The coconut oil (vegetable shortening will also work) helps thin out the chocolate making it go further, pool less on the wax paper, and come out smoother, making much nicer looking vegan chocolate covered pretzels. Usually candy melts are used for this. They have a different composition which makes them melt smoother but they are not vegan, so that’s why I recommend just adding a bit of coconut oil to your melted chocolate.
- Note 4: I love Sweetapolita. They have a section with vegan sprinkles and so many colors and styles to choose from! I like using both the regular jimmies (long thin sprinkles) and nonpareils (tiny sphere sprinkles). And you can do any colors that you like, mix and match for any holidays like Christmas, Valentine’s day, etc. Other brands include Supernatural Vegan Sprinkles and 365 Organics by Whole Foods (I’ve on occasion picked up sprinkles that are vegan there).
- Prep Time: 20 minutes
- Cook Time: 5 minutes
- Category: Snack, Dessert
- Method: No Bake
- Cuisine: American

Leave a Reply