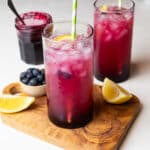
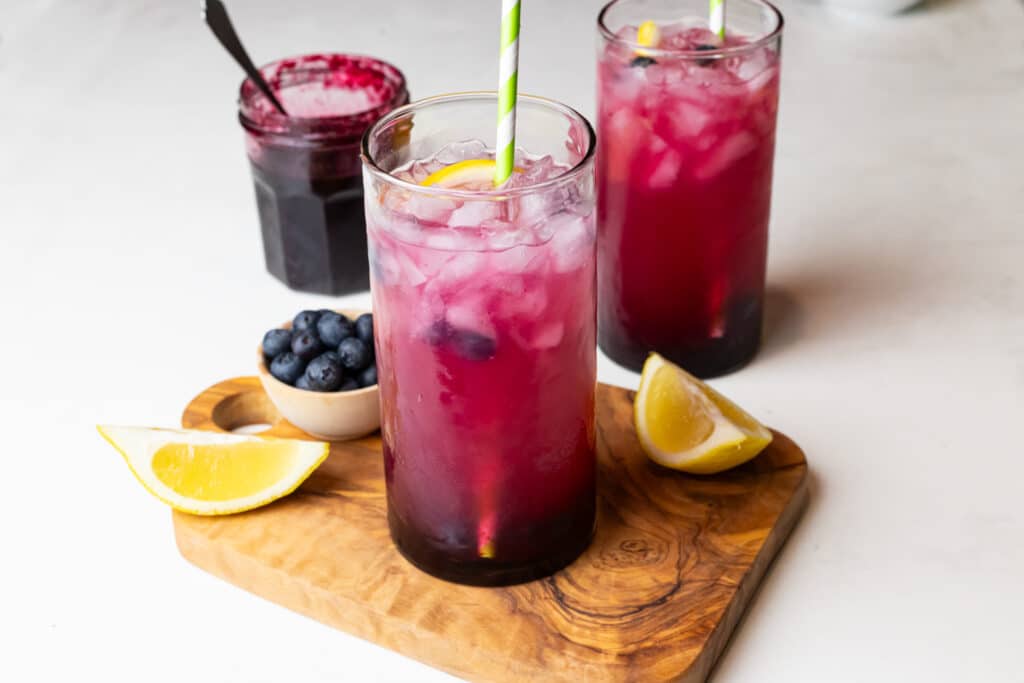
Easy Homemade Blueberry Fruit Syrup is perfect on top of French toast, pancakes and ice cream or you can use it in cold drinks for a big burst of sweet berry flavor. This fresh blueberry syrup is super easy to make and is loaded with blueberry flavor without the high fructose corn syrup or weird ingredients.

This post may contain affiliate links. See our disclosure policy for details.
Hey Internet, it's been awhile since we made a good sweet sauce recipe. We made a strawberry syrup for our Vegan Panna Cotta which is included in that recipe if you'd like it, but before that, the last sweet sauces we made were our Vegan Chocolate Sauce and Vegan Caramel Sauce.
This homemade blueberry syrup recipe is the best way to celebrate blueberry season, especially if you enjoy it with some blueberry pancakes (try adding fresh blueberries to our Plant Based Pancakes recipe!) or your favorite drinks such as coffee or matcha (both coming soon!). It's also great on dairy-free vanilla ice cream for a blueberry sundae!
It's also a super versatile syrup. You can add it in small batches to things like salad dressings (add vinegar and oil for a shortcut!), maple syrup (to make blueberry pancake syrup!), or you can use it in mocktail recipes. We like to use this in lemonades and various cold brew teas.

This recipe only calls for four ingredients (optional fifth): fresh or frozen blueberries, water, cane sugar, lemon juice, and optionally the zest of one lemon. If you have ripe blueberries, that will really boost the blueberry flavor here, but if you only have frozen it will work too. Frozen wild blueberries have more natural flavor than regular frozen blueberries.
This homemade syrup can also be made with raspberries (for raspberry syrup) or blackberries (for blackberry syrup. All you need is the four ingredients we mentioned above and a small saucepan.
Come learn how easy it is to make your own homemade blueberry syrup!
Why You'll Love this Blueberry Fruit Syrup
- Simple Ingredients: Blueberries, check. Sugar, check. Lemons, check. Water... well, I hope check. That's all you need for this recipe! And we know you're gonna ask... can you use a different sugar? Yup. Cane sugar (white sugar) gives the best results, but coconut sugar, brown sugar, etc. will work.
- Delicious Recipe: This blueberry syrup is SO good in drinks, on your morning pancakes, oatmeal, or waffles, or desserts. You could even add a little to your yogurt with some fresh fruit and granola (try our Coconut Cacao Granola for extra flavor).
- Easy to Adjust: You can use whatever type of sugar (or sugar substitute), whatever berry, etc. with this recipe because it works so well. You can also double or triple (or halve) the recipe depending on your needs. This recipe would be a great addition to a build-your-own pancake or dessert bar. Big stack of fluffy pancakes and blueberry syrup? Say less.

Ingredients
Pick up the following basic ingredients for this delicious blueberry fruit syrup recipe the next time you're at your local grocery store. See the recipe card at the bottom of this post for full ingredients, instructions, and accurate nutrition information (to the best of our ability; please consult your physician, registered dietitian, or healthcare professional if you have specific dietary needs or need to meet certain daily values of any nutrient). we give substitutions for the ingredients in the section below this one, so most people can still make this recipe!
- 2 Pints Fresh Blueberries (or 2 Cups Frozen Blueberries): While fresh berries equal better flavor, this recipe still works with frozen berries. Frozen wild blueberries have the most flavor of the frozen blueberry world. Still, using fresh, whole blueberries will give the best fresh flavor.
- ½ Cup Filtered Water: You might need a little less for frozen. Start with a quarter cup and add more if needed.
- ½ Cup Cane Sugar: Any simple syrup recipe is 50:50 sugar and water. The sugar dissolves and helps cook down the blueberry mixture during the simmering / boiling process, thickening the syrup nicely. See the substitution section if you don't want to use white sugar.
- Zest of 1 Small Lemon, Optional: This is a really nice addition but it's entirely optional. We use a microplane to get really nice fine zest, and just do it very lightly all over the lemon (avoid the white pith when possible to keep it from becoming bitter).
- Juice of 2 Small Lemons (About 4 Tablespoons Lemon Juice): Fresh lemons are best for this, but if you don't have access to fresh, the next best thing is Italian Volcano Lemon Juice which we buy in a two pack from Costco. Lemon juice really brings out the flavor in this recipe and provides the perfect balance to the sweetness coming from the berries and the sugar so we don't recommend skipping it entirely, Use lemon juice concentrate if you have to.

Substitutions
- Blueberries: As stated above, this recipe works with other fresh fruit such as strawberries, blackberries, or raspberries!
- Water: If you want even MORE blueberry flavor, you can use blueberry juice concentrate (or not concentrate) but it isn't necessary.
- Cane Sugar: Don't want to use cane sugar? Coconut sugar, brown sugar, or even a sugar substitute such as powdered stevia, monkfruit, or allulose will work. Those sugar substitutes may have an aftertaste, so only use ones that you know you like the taste of. For example, Liz enjoys the taste of Stevia but Paul doesn't, so this might be a consideration if you're thinking of using a sugar substitute.
- Lemons: You could use fresh limes instead, if you'd like!

How to Make Blueberry Syrup
- Heat the Blueberries: Combine blueberries, water, sugar, and the lemon zest (if using; do not add the lemon juice yet) in a small saucepan. (You can use a medium saucepan too but the cooking time may be less.) Heat the pan over medium heat until it comes to a boil.
- Simmer: Reduce the heat to medium low and cook uncovered for around 15-25 minutes. For us, the time took about 20 minutes on the power burner and more like 25 or so on the non-power burner. The exact time will differ on a variety of factors such as burner strength, the material your pan is made of, how much liquid your blueberries have in them, and also just how thick you like the consistency of the syrup. For slightly thicker syrup it will take a little longer but it is a little easier to strain and get a smooth syrup if you don't make it quite so thick.
- While it Simmers: After a bit you can start smashing the blueberries with the back of your cooking spoon (you can use a potato masher or a fork but be careful not to damage your pan). This will help thicken your syrup as well.
- Add Lemon Juice: When the syrup is the right consistency for you, remove the pan from heat and add the lemon juice and stir.
- Strain: For a nice smooth syrup, place a jar (or measuring cup with a spout to transfer it later) on the counter and place a fine mesh sieve or strainer on top. Pour the syrup into the sieve and let the hot liquid drip into the vessel. You can use the back of the spoon to stir the pulp around and press it down to get all the liquid syrup out.
- Save the Pulp: We like to use the blueberry pulp (or guts, as we like to call them) in a variety of ways. Blend it with water to make blueberry puree and add it to baked goods, or in oatmeal. Or blend the pulp into smoothies. You can freeze it (portion it in ice cube trays if you like) and just pop a few into the blender anytime you make a smoothie or a smoothie bowl.
- Storage: Refrigerate the blueberry syrup for 1-2 weeks in a jar or other airtight container (it may stain plastic containers so we recommend a glass jar or food storage container). You can also freeze this syrup (leave about 1 inch empty in the vessel because it will expand a bit as it freezes) for up to 6-12 months.

More Sweet and Fruity Recipes
- Lemon Blueberry Chia Pudding
- Strawberry Mug Cake
- Vegan Banana Pudding
- Vegan Strawberry Milk
- Banana Chia Pudding
- 10 Minute Caramelized Bananas
- Vegan Panna Cotta with Strawberry Sauce
- Strawberry Chia Pudding
- Caramelized Peaches
- Peach Chia Pudding

Easy Blueberry Fruit Syrup Recipe (Simple)
- Total Time: 25 minutes
- Yield: 1.5 cups 1x
- Diet: Dairy-Free, Gluten-Free, Vegan, Vegetarian
Description
Easy Homemade Blueberry Fruit Syrup is perfect on top of French toast, pancakes and ice cream or you can use it in cold drinks.
Ingredients
- 2 pints Fresh Blueberries (or 2 Cups Frozen Blueberries) (see Notes 1 and 2)
- ½ cup Filtered Water (see Note 3 if using frozen berries)
- ½ cup Cane Sugar (see Note 4 for substitutions)
- Zest of 1 Small Lemon, Optional
- Juice of 2 Small Lemons (About 4 Tablespoons Lemon Juice)
Instructions
- Heat the Blueberries: Combine blueberries, water, sugar, and the lemon zest (if using; do not add the lemon juice yet) in a small saucepan. (You can use a medium saucepan too but the cooking time may be less.) Heat the pan over medium heat until it comes to a boil.
- Simmer: Reduce the heat to medium low and cook uncovered for around 15-25 minutes. For us, the time took about 20 minutes on the power burner and more like 25 or so on the non-power burner. The exact time will differ on a variety of factors such as burner strength, the material your pan is made of, how much liquid your blueberries have in them, and also just how thick you like the consistency of the syrup. For slightly thicker syrup it will take a little longer but it is a little easier to strain and get a smooth syrup if you don't make it quite so thick.
- While it Simmers: After a bit you can start smashing the blueberries with the back of your cooking spoon (you can use a potato masher or a fork but be careful not to damage your pan). This will help thicken your syrup as well.
- Add Lemon Juice: When the syrup is the right consistency for you, remove the pan from heat and add the lemon juice and stir.
- Strain: For a nice smooth syrup, place a jar (or measuring cup with a spout to transfer it later) on the counter and place a fine mesh sieve or strainer on top. Pour the syrup into the sieve and let the hot liquid drip into the vessel. You can use the back of the spoon to stir the pulp around and press it down to get all the liquid syrup out.
- Save the Pulp: We like to use the blueberry pulp (or guts, as we like to call them) in a variety of ways. Blend it with water to make blueberry puree and add it to baked goods, or in oatmeal. Or blend the pulp into smoothies. You can freeze it (portion it in ice cube trays if you like) and just pop a few into the blender anytime you make a smoothie or a smoothie bowl.
- Storage: Refrigerate the blueberry syrup for 1-2 weeks in a jar or other airtight container (it may stain plastic containers so we recommend a glass jar or food storage container). You can also freeze this syrup (leave about 1 inch empty in the vessel because it will expand a bit as it freezes) for up to 6-12 months.
Notes
- Note 1: While fresh berries equal better flavor, this recipe still works with frozen berries. Frozen wild blueberries have the most flavor of the frozen blueberry world. Still, using fresh, whole blueberries will give the best fresh flavor.
- Note 2: This recipe works with other fresh berries such as strawberries, blackberries, or raspberries! Or use frozen berries of course. We always recommend adding lemon juice to complement the natural sweetness of the berries.
- Note 3: You might need a little less water for frozen. Start with a quarter cup and add more if needed.
- Note 4: Don't want to use cane sugar? Coconut sugar, brown sugar, or even a sugar substitute such as powdered stevia, monkfruit, or allulose will work. Those sugar substitutes may have an aftertaste, so only use ones that you know you like the taste of. For example, Liz enjoys the taste of Stevia but Paul doesn't, so this might be a consideration if you're thinking of using a sugar substitute.
- Note 5: Fresh lemons are best for this (limes will also work!), but if you don't have access to fresh, the next best thing is Italian Volcano Lemon Juice which we buy in a two pack from Costco. Lemon juice really brings out the flavor in this recipe and provides the perfect balance to the sweetness coming from the berries and the sugar so we don't recommend skipping it entirely, Use lemon juice concentrate if you have to.
- Cook Time: 25 minutes
- Category: Beverage, Dessert, Ingredients, Syrup
- Method: Stovetop
- Cuisine: Dessert, Drink

Leave a Reply