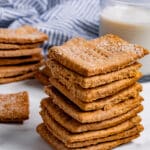
Crispy, sweet, classic--these Vegan Graham Crackers are made from whole wheat flour and contain no oil, so they’re healthy but delicious. They’re also pretty easy to make and taste way better than store bought graham crackers. Use them for vegan smores and more!

This post may contain affiliate links. See our disclosure policy for details.
Hey Internet, I really wanted to make s’mores but had a challenging time finding healthy vegan graham crackers.
If you don’t want to make your own vegan graham crackers, there’s always Annie’s Graham Bunnies which are vegan, or Nabisco’s Classic Graham Crackers which actually do not contain honey, though non-organic sugar is sometimes not vegan (processed/filtered through animal bone char).
Of course, you know me, I had to make my own vegan graham crackers, because why not?
I try not to consume oil at home for health reasons, so I decided to challenge myself to try and make some graham crackers at home.
The result? They were actually MORE delicious than store-bought and they were pretty easy. A little effort, but most from-scratch cooking is TOTALLY worth the effort and these are no different.
Do my graham crackers look perfect? No, but they taste really good.
And before I had a food blog, I read food blogs and made their recipes. The food blogs I liked the most featured food that did not look immaculate, and the recipes were easy enough that a real human could make them.
Well I, Internet folk, am not a human; I’m bionic. No really, I have an electronic appliance in my body. Do you know what I’m referring to? :)
Anyway, though, I’m definitely not perfect or a professional chef, and I definitely made these graham crackers and it was not hard at all. And you can too.
Or buy them, and go check out my vegan smores recipe. I’m not here to judge.
But if you want to make your own graham crackers that are free of oil and animal products, just keep reading--I swear it’s actually pretty easy and definitely fun!

What You’ll Need
Let’s start with the basics: flour, baking powder, baking soda, salt. For flour, I actually used whole wheat flour. For baking with other flours, check out my substitutions section below.
I used organic brown sugar for this recipe, since brown sugar is crucial to the graham cracker flavor, and it’s also a really unique texture, due to the molasses content.
So making graham cracker dough is similar to pastry, in that you need cold butter. I don’t even use vegan butter, though, so I needed a substitute similar in structure.
Coconut cream, my favorite butter replacement, worked perfectly! When you refrigerate a can of coconut milk or coconut cream, the thick creamy coconut becomes very hard and perfect to work with as you cut it into the flour.
Canned coconut milk usually has a little less of the creamy white part and a little more water, if it’s separated like some brands are.
Coconut cream will give you more bang for your buck, but it can be hard to find. Look for it in the International aisle by the soy sauce or in the alcohol section as sometimes it’s used for making drinks!
And then all you have to do is put it in the fridge overnight and you will have the perfect butter replacement. And it doesn’t make the crackers taste like coconut, I promise.
These definitely wouldn’t be delicious graham crackers without cinnamon. Use as much or as little cinnamon as you’d like.
Finally, for wetness and a little more sweetness, I used a touch of maple syrup mixed with some water. This helps hydrate the dough and give a little much-needed stickiness.
What Substitutions Can I Make?
Flour
I used whole wheat flour but all purpose flour will also work (it will use a tad less moisture, so add water a little at a time).
To make these gluten-free, I recommend using a high quality cup for cup replacement like King Arthur Measure for Measure Gluten-Free Flour or Bob’s Red Mill 1:1 Gluten-Free Flour.
Brown Sugar
Organic brown sugar is the BEST sugar for this recipe because it is kind of sticky and thick. However, you can try using regular cane sugar or coconut sugar with a little extra maple syrup or molasses and it should work.
Coconut Cream
You can use vegan butter in place of coconut cream if you wish. Use a vegan butter like Earth Balance or Miyokos.
Maple Syrup
A thick liquid sweetener is important for the texture of the dough in this recipe. Instead of maple syrup, you could use agave or molasses (keep in mind this is a much stronger flavor, so I’d use a little less).
How Can I Prep These in Advance?
You can actually make the dough up to 24 hours ahead of time. We’ll be letting it rest at least one hour in the fridge (wrapped in plastic wrap), so you can leave it in there for up to a day.
When you’re ready to roll out your dough, take it out of the fridge and let it sit for 5-10 minutes before working with it.

How to Make the Dough
It’s pretty easy to make the dough.
Get out your coconut cream or vegan butter and measure it out first. We want to let it soften just a bit.
Then, add all your dry ingredients to a large bowl: flour, sugar, salt, baking powder, baking soda, and ground cinnamon. Mix them together with a fork or whisk.
Work in the coconut cream or vegan butter with a fork, pastry cutter, or I prefer my hands. The warmth and pressure from my hands softens the coconut cream up and helps it blend into the flour.
Blend until all the large chunks have been incorporated. The texture should resemble a coarse meal.
Now, add the water and maple syrup. Mix it until the mixture has darkened from the moisture and no super dry parts remain.
Add an extra tablespoon of water if you need to--I did because I used whole wheat flour, but 2 tablespoons was too much and it got too sticky. It will come together more later, if you’re worried about how crumbly it is.
Mix until smooth and turn out your dough onto your work surface. It will look pretty crumbly at this point.

Using your hands, pat the dough together into one mound. Using a dough scraper if you have it (or cut with a knife), cut the dough in half and place one half on top of the other and push it down.
Repeat this process 5 or 6 times until the dough is more solidly together.

Now wrap the dough tightly in plastic wrap and refrigerate it for at least an hour or up to 24 hours.
I know, I know, using plastic wrap sucks. But I will reuse this plastic wrap a lot during the next process, so I’m trying not to be wasteful!

Rolling Out the Dough
Preheat your oven to 300 degrees Fahrenheit or 149 degrees Celsius.
After removing your dough from the fridge, let it warm up a bit for 5-10 minutes, then turn it out onto your work surface. Save the plastic wrap!

Using your dough scraper or a knife, cut the dough into 4 equal chunks and set 3 of them aside.
TIP: use a piece of parchment paper beneath each piece while you work on it. Once the crackers are rolled out, it may be tough to remove them from your work surface to put them on the pan. You can easily just pick up the parchment paper and put it right on your baking tray and bake!
Now we’re going to roll out each piece.
TIP: You might find that the dough sticks to your rolling pin. I recommend taking the plastic wrap that you rested the dough in and placing it over the ball of dough as you roll it out. This keeps the dough from sticking.
Roll out the dough till it’s about a quarter of an inch thick. It might look like a blobby shape, rather than a rectangle.
Remove the plastic wrap temporarily (I used one piece of plastic wrap for this whole recipe, you can keep using even poor quality plastic wrap) and even out the rectangle by taking some of the outer pieces and filling in the gaps.
So if I have a litte peninsula of dough on the bottom but I’m missing some in the top right corner, I can pull off some extra and press it up there. Then replace the plastic and roll in that area.
When it’s mostly rectangular, remove the plastic and use a knife or a pizza cutter to trim the edges so you have a nice straight rectangle. I used a ruler to help me get an even rectangle but you don’t need to.
TIP: Save the scraps! You can make a whole nother dough ball just by saving all your dough scraps. I just pile them in the corner of my work surface.

Now use your knife or pizza cutter to section your rectangle into even smaller rectangles, but don’t separate the pieces.

Finally, use a fork to poke holes in the crackers, aim for a set of holes every half inch. This keeps them from puffing up in the oven.
Place the piece of parchment holding the crackers on your baking tray and repeat the process with all remaining balls of dough.
Because I saved my scraps, I was able to roll out 5 balls of dough total which enabled me to make more crackers than I otherwise would have been able to!
Bake the Crackers
Bake your crackers at 300 degrees Fahrenheit (or 149 degrees Celsius) for approximately 15-20 minutes depending on how thick your crackers are.
I like to check on my crackers every 5 minutes and rotate the trays so they are cooking evenly.
IMPORTANT: The crackers will not feel fully hard while they are still in the oven. They should be firm, but not hard. They will harden as they cool so don’t over bake your crackers!
I like to carefully peel up one of the corners. If the bottom seems mostly hardened or lightly browned, they’re done. Take ‘em out!
Let your crackers cool COMPLETELY before removing them from the baking sheet or separating them from each other. Otherwise they may bend, curl, or throw a temper tantrum.

Store the Crackers
If you’re not promptly storing all these crackers in your face, I recommend storing them in an airtight container for up to 5 days.
Other Cool Vegan Baking Recipes
Like baking from scratch? So do I! Check out these other cool vegan baking recipes, and let me know via my contact page if there’s any specific recipe you wanna see!
- Vegan Challah
- Thick Crust Pizza Dough
- Matcha Pound Cake
- Coconut Cake
- Carrot Cake
- Lemon Blueberry Muffins
- Chocolate Banana Muffins
- Banana Bread
Anything Else?
As always, I hope you love this recipe–I know I do and so does Mr. Zardyplants. We kept eating them while we were trying to photograph them! Classic food blogger problems, haha.
These vegan graham crackers are:
- Sweet
- Crispy
- Cozy
- Crunchy
- And perfect for vegan smores and more! I’ve heard something about frosting graham cracker sandwiches?
Let me know in the comments below if you make this recipe or tag me @Zardyplants on Instagram so I can see your beautiful recreations! If you tag me on IG, I will share your post in my stories :)
Also, one quick request: if you love how this recipe looks or tastes, please leave me a 5-star rating and a nice comment–ratings help more people find my recipes which helps me keep providing them! Thank you!
<3 Liz

Vegan Graham Crackers (oil-free!)
- Total Time: 1 hour, 40 minutes
- Yield: 28 crackers 1x
- Diet: Vegan
Description
Crispy, sweet, classic--these Vegan Graham Crackers are made from whole wheat flour and contain no oil, so they’re healthy but delicious.
Ingredients
- 2+½ cups (about 410g) whole wheat flour (see note 1)
- ¾ cup organic brown sugar
- 1.5 tsp ground cinnamon
- ¼ tsp baking soda
- ¼ tsp baking powder
- ¼ tsp salt
- ⅔ cup cold coconut cream or vegan butter
- ¼ cup maple syrup
- ¼ cup water
Topping, optional
- ¼ cup organic cane sugar or raw sugar
- 1 tsp cinnamon
Instructions
- Make the Dough: Add all your dry ingredients to a large bowl: flour, sugar, salt, baking powder, baking soda, and ground cinnamon. Mix them together with a fork or whisk. Work in the coconut cream or vegan butter with a fork, pastry cutter, or I prefer my hands. The warmth and pressure from my hands softens the coconut cream up and helps it blend into the flour. Blend until all the large chunks have been incorporated. The texture should resemble a coarse meal.
- Now, add the water and maple syrup. Mix it until the mixture has darkened from the moisture and no super dry parts remain. Add an extra tablespoon of water if you need to--I did because I used whole wheat flour, but 2 tablespoons was too much and it got too sticky. It will come together more later, if you’re worried about how crumbly it is.
- Mix until smooth and turn out your dough onto your work surface. It will look pretty crumbly at this point. Using your hands, pat the dough together into one mound. Using a dough scraper if you have it (or cut with a knife), cut the dough in half and place one half on top of the other and push it down. Repeat this process 5 or 6 times until the dough is more solidly together.
- Now wrap the dough tightly in plastic wrap and refrigerate it for at least an hour or up to 24 hours. I know, I know, using plastic wrap sucks. But I will reuse this plastic wrap a lot during the next process, so I’m trying not to be wasteful!
- Roll Out the Dough: Preheat your oven to 300 degrees F or 149 degrees C. Let the dough warm up a bit for 5-10 minutes, then turn it out onto your work surface. Save the plastic wrap! Using your dough scraper or a knife, cut the dough into 4 equal chunks and set 3 of them aside.
- TIP: use a piece of parchment paper beneath each piece while you work on it. Once the crackers are rolled out, it may be tough to remove them from your work surface to put them on the pan. You can easily just pick up the parchment paper and put it right on your baking tray and bake!
- TIP: You might find that the dough sticks to your rolling pin. I recommend taking the plastic wrap that you rested the dough in and placing it over the ball of dough as you roll it out. This keeps the dough from sticking.
- Roll out the dough till it’s about a quarter of an inch thick. It might look like a blobby shape, rather than a rectangle. Remove the plastic wrap temporarily (I used one piece of plastic wrap for this whole recipe, you can keep using even poor quality plastic wrap) and even out the rectangle by taking some of the outer pieces and filling in the gaps. So if I have a litte peninsula of dough on the bottom but I’m missing some in the top right corner, I can pull off some extra and press it up there. Then replace the plastic and roll in that area. When it’s mostly rectangular, remove the plastic and use a knife or a pizza cutter to trim the edges so you have a nice straight rectangle. I used a ruler to help me get an even rectangle but you don’t need to.
- TIP: Save the scraps! You can make a whole nother dough ball just by saving all your dough scraps. I just pile them in the corner of my work surface. Because I saved my scraps, I was able to roll out 5 balls of dough total which enabled me to make more crackers than I otherwise would have been able to!
- Now use your knife or pizza cutter to section your rectangle into even smaller rectangles, but don’t separate the pieces. Finally, use a fork to poke holes in the crackers, aim for a set of holes every half inch. This keeps them from puffing up in the oven.
- Place the piece of parchment holding the crackers on your baking tray and repeat the process with all remaining balls of dough.
- Bake the Crackers: Bake your crackers at 300 degrees F (or 149 degrees C) for about 15-20 minutes depending on how thick the crackers are. Check on the crackers every 5 minutes and rotate the trays so they are cooking evenly. IMPORTANT: The crackers will not feel fully hard while they are still in the oven. They should be firm, but not hard. They will harden as they cool so don’t over bake your crackers! Carefully peel up one of the corners. If the bottom seems mostly hardened or lightly browned, they’re done. Take ‘em out! Let your crackers cool COMPLETELY before removing them from the baking sheet or separating them from each other. Otherwise they may bend, curl, or throw a temper tantrum.
- Store the Crackers: If you’re not promptly storing all these crackers in your face, I recommend storing them in an airtight container for up to 5 days.
Notes
- Note 1: I used whole wheat flour but all purpose flour will also work (it will use a tad less moisture, so add water a little at a time). To make these gluten-free, I recommend using a high quality cup for cup replacement like King Arthur Measure for Measure Gluten-Free Flour or Bob’s Red Mill 1:1 Gluten-Free Flour.
- Prep Time: 1 hour, 20 minutes
- Cook Time: 20 minutes
- Category: Snack
- Method: Baking
- Cuisine: American

Lynn
Has anyone tried these crackers in the dehydrator?
clementine & declan
I was hesitant because I have to switch it up for gluten free and that can always be tricky but they turned out well. I had trouble rolling the tough but that's operator error. I ended up putting it all in the baking pan and rolling in there slowly but surely. They were a tad thicker due to this but still delicious. Oh we added cocoa to make them chocolate graham crackers cause that's my jam. The cocoa added well into this recipe!!
Kristin
Retired prof baker & graham cracker addict here. I've tried a LOT of graham cracker recipes & was never happy, but THIS one is great! Replaced brown sugar w golden monkfruit and a tiny bit of blackstrap molasses for lower glycemic index (I'm a juvenile diabetic) and rolled a bit thinner (1/8" or so), but was otherwise faithful. Baked 1/2 & reserved 1/2 the dough to bake later but ate half the remaining raw dough! (Gonna make it a little softer & try in coconut milk ice cream next time).
Simply super recipe! Thank you!
Ello JackSon
I am amazed you were able to make an oil free recipe. And while I myself am not vegan, even I am impressed by the fact that this recipe came out so great without using animals or the food they provide in any way! I'm going to use these to make graham cracker crust for Escondido Pie (It's a family recipe, so you won't be able to find it sorry.)