
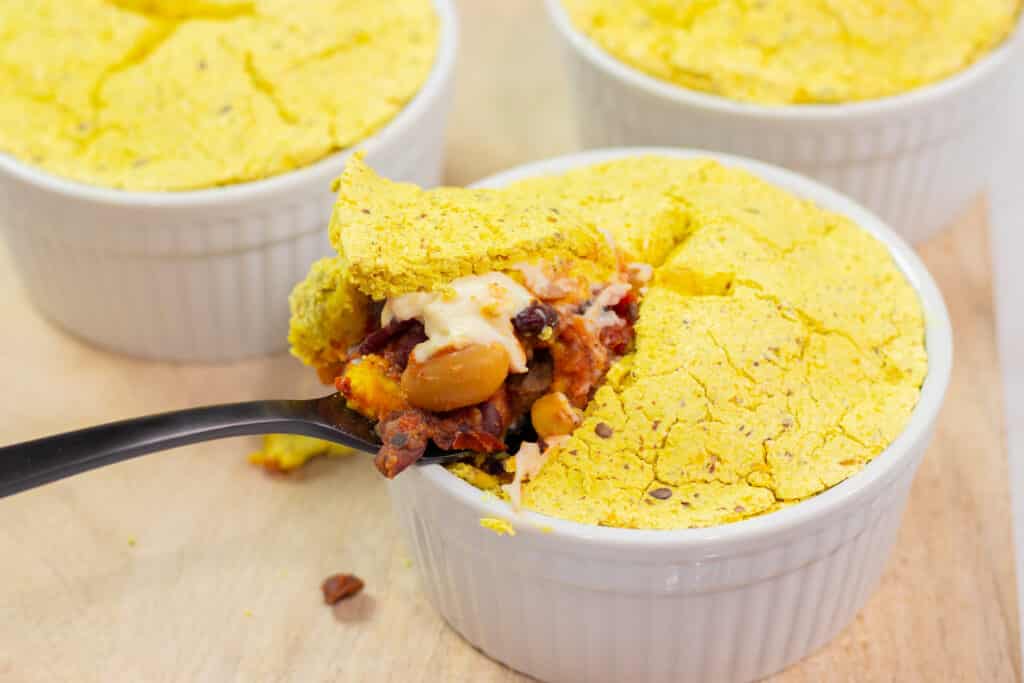
Hey Internet, I’m excited to bring you a fun recipe today: Vegan and Gluten-Free Chili Cheese Pot Pies!
Okay, now I seem really off my rocker, but hang tight.
Pot pie is delicious. Chili is delicious. Cheese is delicious.
Why not combine them? The result is a hearty, smoky, chili with a buttery cornmeal crust and a surprise of melty, gooey, stretchy mozzarella cheese.
Oh, and it’s vegan AND gluten-free (and oilfree + nut-free). Say what?!
This recipe is super comforting, crazy delicious, and actually really easy.
So, let’s talk about what you’ll need to make these adorable little pot pies (everything’s cuter in a ramekin, am I right?).
WHAT DO I NEED TO MAKE THE CHILI?
The chili is easy and super customizable (shut up Spell Check, that’s totally a word), so if you hate beans use lots of veggies, omit the mushrooms if you like, etc. But I’ll tell you what I recommend and you can just use my recipe as a base for your own creations!
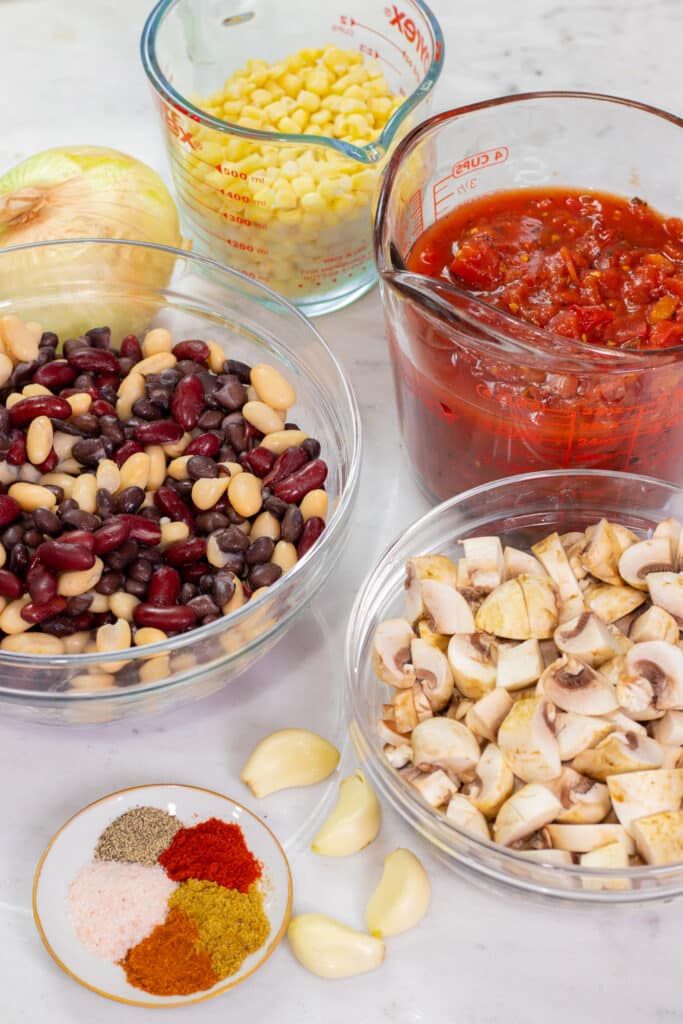
Beans
I like a 3-bean mixture in my chili because it gives different flavors and textures. My 3 favorites to use in chili are dark red kidney beans, black beans, and white beans. Feel free to experiment with little red beans, chickpeas, black eyed peas, etc. I used canned beans to save time, but feel free to make yours from scratch ahead of time.
Corn
Corn is a delicious, sweet addition to this chili. Note that this recipe is as corny as I am, so if you are allergic, you may want to try using my gluten-free pie crust recipe (try to ignore the rest of the chocolate pecan deliciousness in the recipe) instead of the cornmeal crust. Also omit the corn from the chili. :)
Tomatoes
I LOVE diced tomatoes in my chili. I actually buy fire-roasted diced tomatoes for this recipe because I love how they add to the BBQ feel and smoky taste. Sub with regular tomatoes, fresh tomatoes (even cherry / grape tomatoes for a sweeter taste), or omit if desired. Note that you may need to add a liquid like vegetable broth or water to make up for the moisture loss if you omit the tomatoes.
Onions and Garlic
Sauteing onions and fresh garlic provides another layer of delicious flavor in this recipe. You can omit if you cannot or do not eat onions / garlic, but I highly recommend keeping them in. If you simply don’t like eating them by themselves, you won’t taste them directly in this recipe.
Mushrooms
Again, if you don’t like mushrooms, feel free to leave them out. I find that they add a certain meaty texture to the chili, and they add more smoky and umami flavor. Also consider substituting with lentils, TVP, soy curls, or a vegan ground meat.
Spices
You can use a pre-made spice mix but I like to make my own from chili powder, cumin, black pepper, salt, and smoked paprika. Smoked paprika really adds to the flavor here so it’s highly recommended.
Making the Chili
Making the chili is super easy. All you do is start by sauteing your onions, garlic, and mushrooms. Add the rest of the ingredients, bring to a boil, then simmer for 30 minutes to an hour. Really, that’s it.
HOW TO MAKE THE CRUST
The gluten-free (and vegan) cornmeal crust is super delicious AND easy to make. Again, if you can’t eat corn, try the crust in my pecan pie recipe (it’s not super sweet so it will be fine with chili).

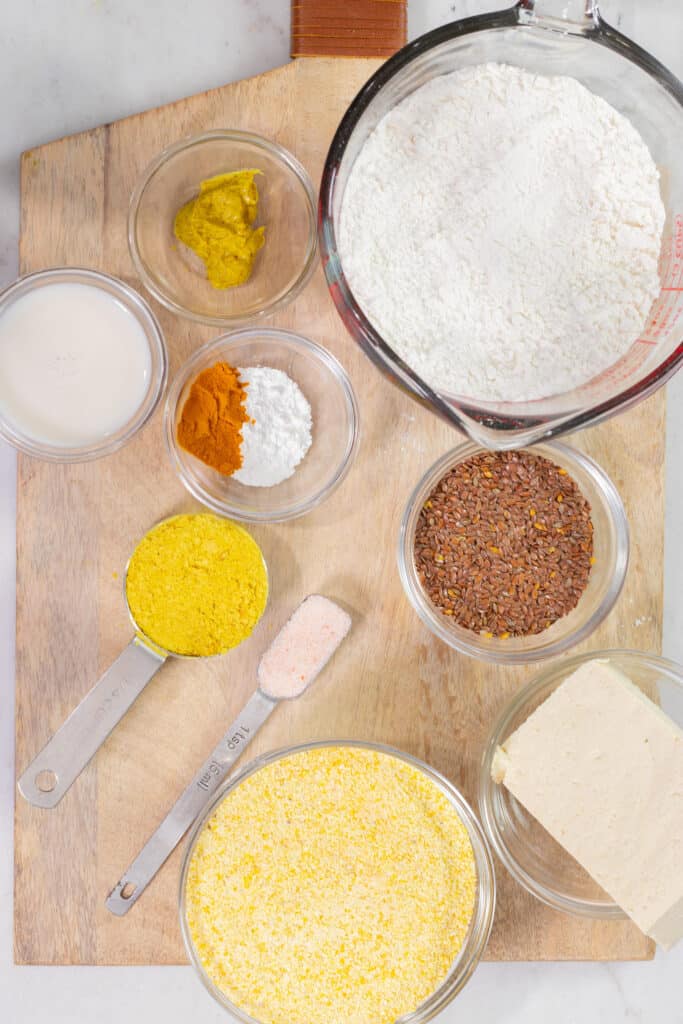
Use a food processor or blender to blend up a little mustard (optional), flax eggs (1 flax egg = 1 tablespoon ground flaxseed + 3 tablespoon water), nondairy milk, and tofu (sub coconut cream or vegan butter if you are allergic to soy), then add gluten-free flour (or sub all purpose flour), cornmeal (I used medium grind but fine will work too), nutritional yeast, a pinch of turmeric for color, a little baking powder (for a bit of puff), and salt.
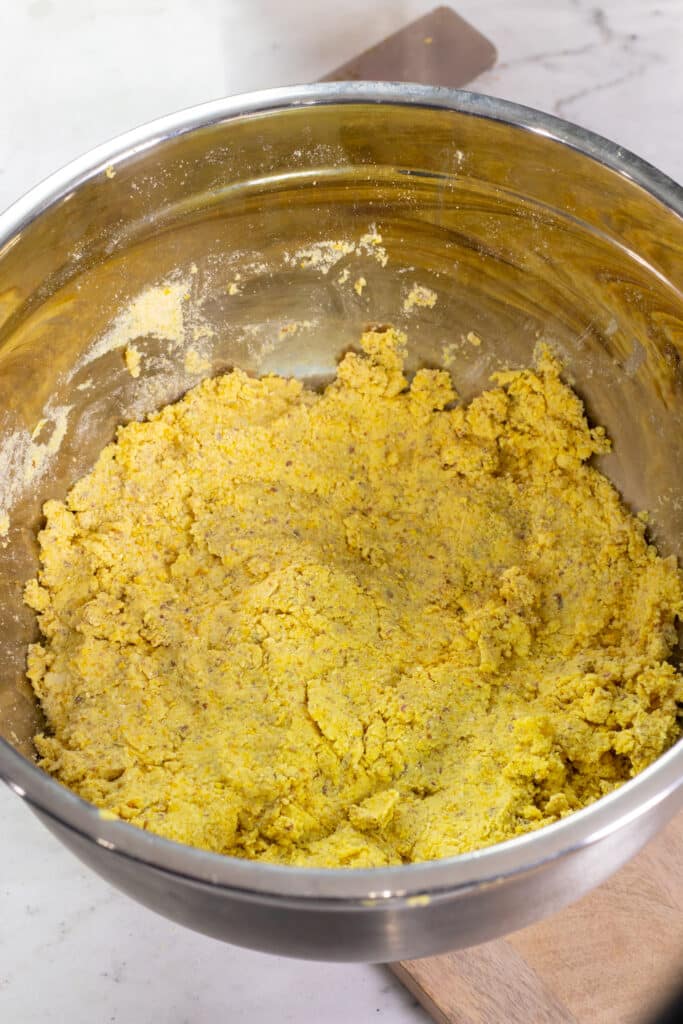
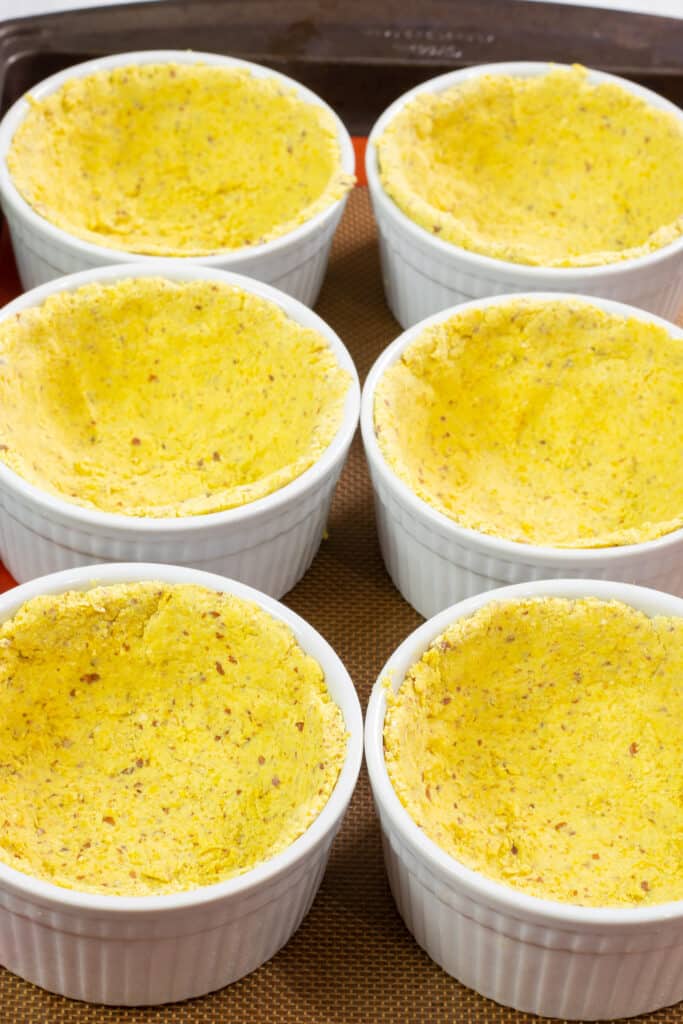
After the mixture is combined, refrigerate it for 30 minutes so it’s easier to work with. Grab a bit of the dough (about a half cup) and make a ball with your hands.

Place it in one of the ramekins and press it out so it covers the inside of the ramekin in an even layer. Build out the crust so it reaches the top--if you're short dough, add a little extra from the bowl to cover any blank space.
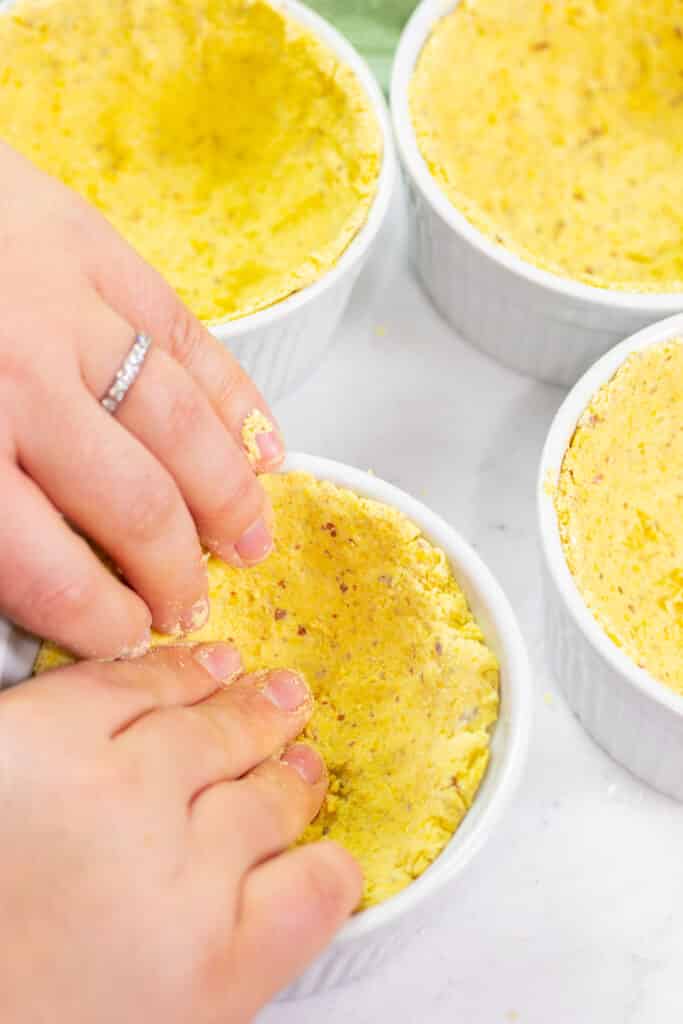
Repeat the process with the rest of the dough. You can also just use all of the dough in a square baking dish or pie dish.
Place ramekins on a rimmed cookie sheet and pre-bake for 10 minutes (at 375 degrees Fahrenheit or 190 degrees Celsius) so they’re not totally wet when you add in the cooked chili.
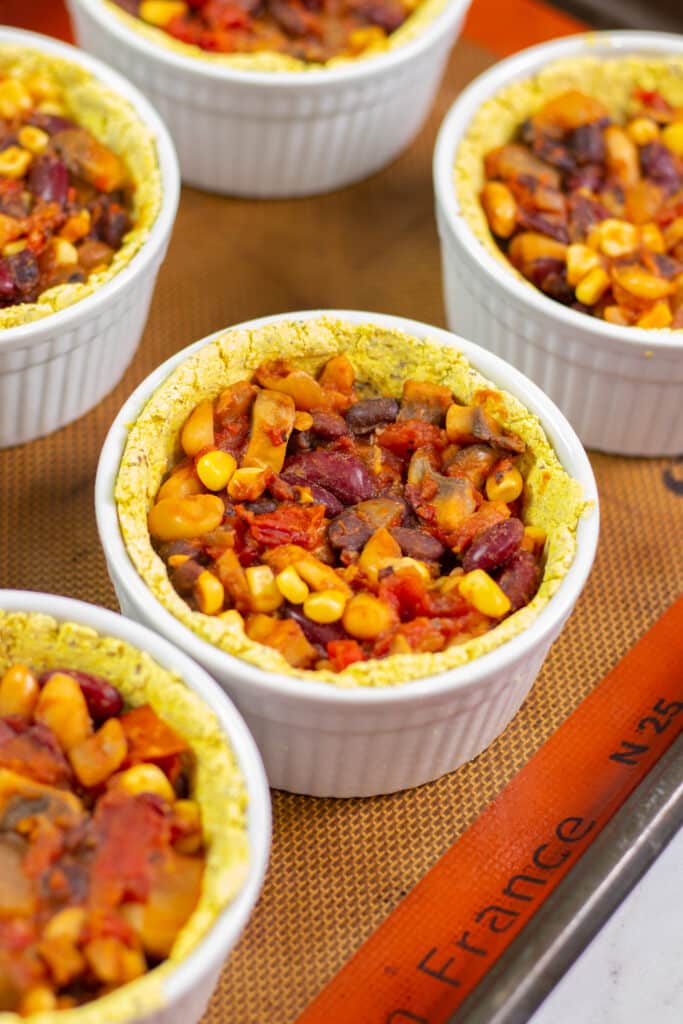
Now we can build our chili cheese pot pies!
PUTTING IT ALL TOGETHER
Putting these little savory pies together is pretty easy. Once you’ve pre-baked the crust, you’ll want to scoop the cooked chili into the ramekins and fill almost to the top, leaving about ½ inch of space.
If you’ve decided to use my easy, 6-minute mozzarella cheese, Use a spoon to add it now, spreading it over the chili, but not the edge of the crust.
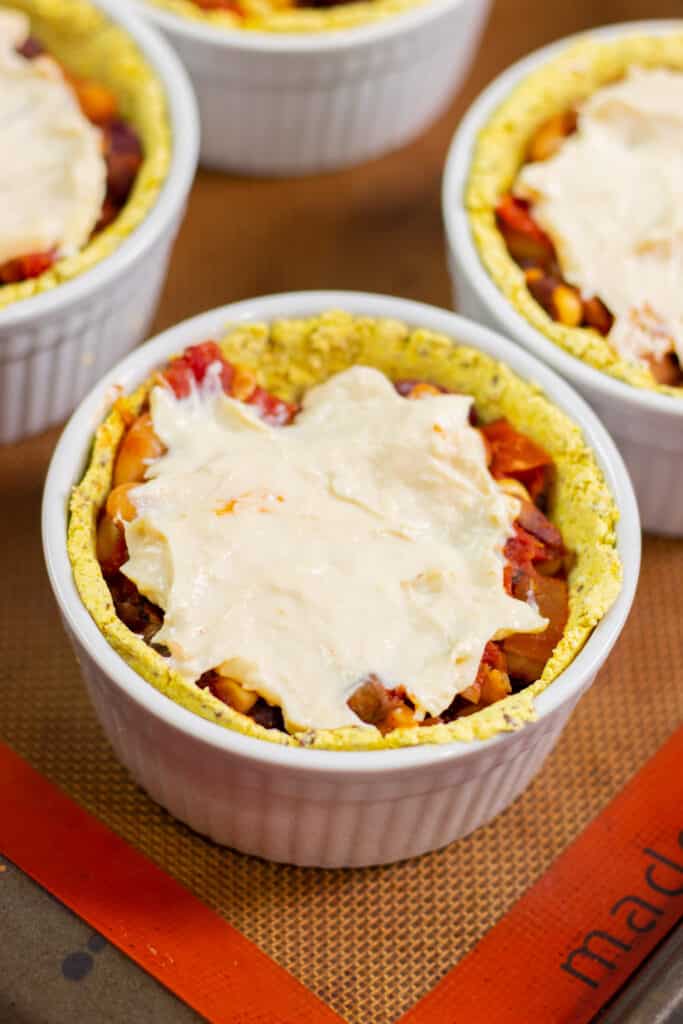
Take a smaller ball of leftover crust (about ¼ cup worth) and roll it into a ball, then flatten it with a rolling pin or with your hands. Place over each pot pie, gently connecting the edges with your finger tips and pressing. If your crust has dried out a little, revive it by adding a little more nondairy milk and working it in with your hands.
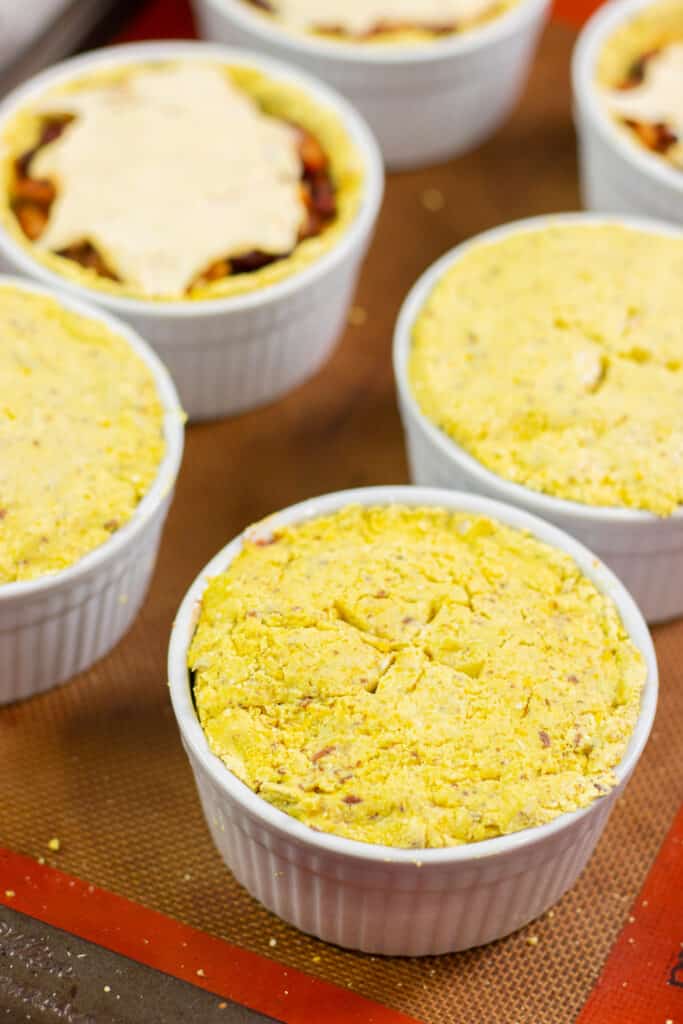
You’ll want to poke a few holes in the top for air to escape. Use your fingers or a pastry brush to spread a little nondairy milk over the tops of all the crusts to help it crisp in the oven (I used about 1 teaspoon for all 6 pies). Then bake for about 10 – 15 more minutes, until the top is lightly golden brown. (You may need to bake slightly longer if using a full size baking dish.)
That’s it! Serve to your family and friends, guests while entertaining, or keep them all to yourself. These reheat well from refrigerated either in the oven or microwave (oven will yield crisper results).
As always, let me know if you make this recipe and please tag #Zardyplants and mention me @Zardyplants so I can see your beautiful recreations! If you tag me on IG or Facebook, I will share your post in my stories :) With your permission, I might also include your photo on this site!
<3 LIZ
Follow me on Social Media!

Vegan Gluten-Free Chili Cheese Pot Pies
- Total Time: 1 hour, 30 minutes
- Yield: 6 Bowls 1x
Description
Want a twist for your Super Bowl Party? Try combining your cornbread and chili! My Vegan Gluten-Free Chili Cheese Pot Pies are like breadbowls.
Vegan, Gluten-Free, Oilfree, Nut-free, Sugar-free
Ingredients
Crust:
- 3 cups 1:1 gluten-free flour
- 1 cup cornmeal
- 3 flax eggs (3 tbsp ground flaxseed + 9 tbsp water, mixed and gelled in fridge for 5 min)
- 1 tsp salt
- 1.5 tsp baking powder
- ¼ cup nutritional yeast
- 1.5 tsp spicy brown mustard (or sub any mustard you like)
- ½ tsp turmeric
- ½ block (about 8 oz or 197g) firm tofu
- ¼ to ⅓ cup unsweetened nondairy milk (I used almond) start with ¼, add more if needed) + extra (up to) ½ cup as needed
Chili:
- 1-15 oz can (or 1.5 cups) black beans
- 1-15 oz can (or 1.5 cups) dark red kidney beans
- 1-15 oz can (or 1.5 cups) cannellini / white kidney beans
- 2-15 oz cans (or 3 cups) fire roasted diced tomatoes (can sub reg. diced tomatoes)
- 1.5 cups frozen corn
- 16 oz white or crimini mushrooms, diced
- 1 medium sweet onion, diced
- 3-4 cloves garlic, minced
- ½ tsp - 1 teaspoon chili powder (to taste)
- 1 tsp salt
- ½ tsp smoked paprika
- ½ tsp cumin
- ½ tsp black pepper
Cheeze:
- ½ batch vegan mozzarella cheese
Instructions
- To make the crust, add tofu, mustard, and ¼ cup of nondairy milk to food processor or blender and blend until smooth. Transfer to a large bowl and add flax eggs. Stir well.
- Next add flour, cornmeal, nutritional yeast, turmeric, salt, and baking powder and stir well. May need to use hands. You want the dough to be thick. If the mixture is too dry (not coming together), add a little more nondairy milk and mix. Cover and refrigerate 30 minutes.
- To save time, start the chili after the crust has been in the refrigerator for 15 minutes.
- Heat a large nonstick pot over medium high heat. When hot, add onions and saute for 4 minutes, letting stick a little, then adding water to de-glaze. Note if you are using a stainless steel pan, keep adding water to keep it from sticking. After 4 minutes, add garlic and saute another minute.
- Add mushrooms and tomatoes, stir well and cook for 3 minutes. Then add spices, beans, and corn. Stir well and let come to a boil, then lower the heat to medium low and let simmer until the crusts are pre-baked.
- Remove dough from refrigerator and preheat the oven to 375 degrees F (or 190 degrees C). Grab ½ cup of the dough and make a ball with your hands. Place it in one of the ramekins and press it out so it covers the inside of the ramekin in an even layer.
- Build out the crust so it reaches the top--if you're short dough, add a little extra from the bowl to cover any blank space. You want the crust to be thin--around ⅛ of an inch. Try to make the dough an even thickness throughout.
- Repeat the process with the rest of the dough. You can also just use all of the dough in a square baking dish or pie dish. Cover the rest of the dough back up but leave on the counter or table.
- Place ramekins on a rimmed cookie sheet and pre-bake for 10 minutes so they’re not totally wet when you add in the cooked chili.
- While the crusts are pre-baking, if you have not already made the mozzarella, make it now by adding all the cheese ingredients to a blender, blending till smooth, adding it to a medium saucepan, and boiling + stirring until thick, gooey, and stretchy (about 4-5 min).
- Now we will assemble the pies. Use a spoon to fill the ramekins with chili until about ½ inch from the top of the crust. Using a separate spoon, add a generous amount of cheese (2-3 tbsp) and spread over the top layer.
- Finally, take about ¼ cup of dough (revive with a few tablespoon of nondairy milk if it has become too dry) and make another ball with your hands. Flatten between your palms or on a cutting board until wide enough to cover the inside surface of the ramekins. Dough should be ⅛" thick, the same as the walls.
- Gently lay the top over the cheese covered chili. Stretch and pinch the dough top to the exposed dough walls, sealing the pie shut. Using a knife or toothpick, create a few air holes for the pies to breathe while cooking. Use your fingers or a pastry brush to spread a little nondairy milk across the tops of all the pies.
- Bake 10-15 minutes, until crust is lightly crispy.
- Serve warm and gooey.
- Cover and refrigerate up to 5 days.
Notes
- If reheating, I recommend to reheat in the oven to preserve crispiness, but microwave will work too.
- If you don't have ramekins, try making these in muffin tins (lower the cook time somewhat) or a pie/square baking dish (8" square pan should work, but I haven't tested it).
- If you are allergic to corn, you may want to try using my gluten-free pie crust recipe (try to ignore the rest of the chocolate pecan deliciousness in the recipe) instead of the cornmeal crust. Also omit the corn from the chili.
- Prep Time: 40 minutes
- Cook Time: 50 minutes
- Category: Entree, Soup, Snack
- Method: Stove top, Oven
- Cuisine: Chili, Party

carol howell
This is so yummy--I LOVE cornbread anything--and it's very smart to make them in individual servings, because otherwise I would take a giant scoop and go back for more. Love the mix of beans in this, and mushrooms as a sub for meat are oddly satisfying. Thank you!