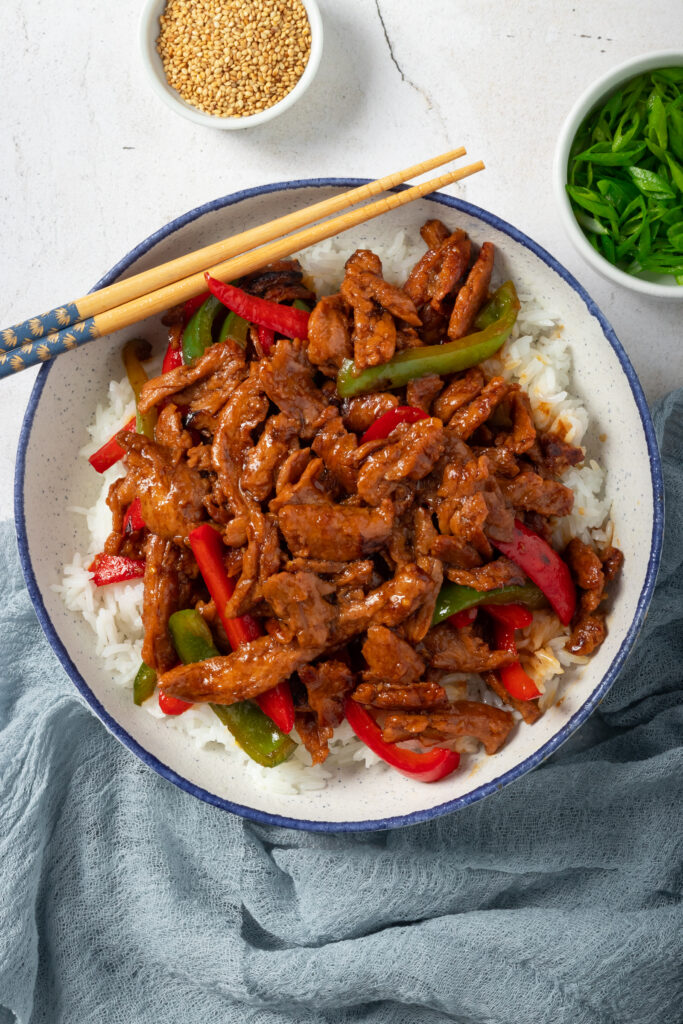
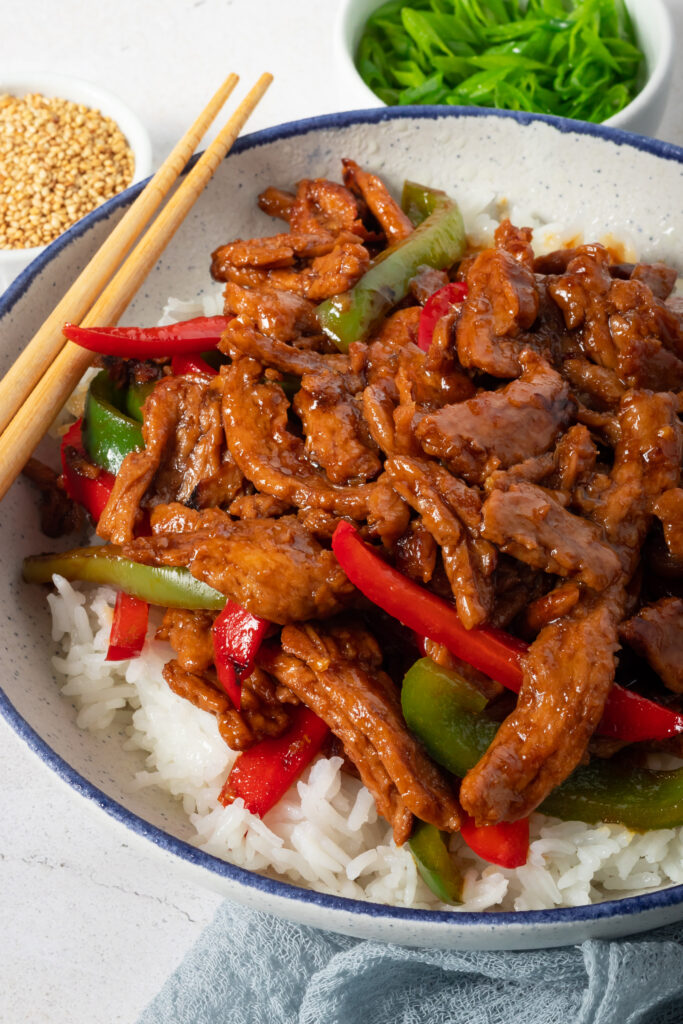
This saucy and delicious Vegan Pepper Steak comes together in under 20 minutes, making it a great choice for a healthy weeknight meal. It’s made with tender but chewy soy curls (or any vegan meat sub you like), crisp and fresh bell peppers, and coated in an umami sauce with a hint of sweetness.
This post may contain affiliate links. See our disclosure policy for details.
Hey Internet, between a full time job, a full time blog, and a full time dog, I can never get enough easy and quick weeknight dinners. I’m tired when I come home from work, and if we’re not trying to fit in a recipe, I’m definitely looking for something that’s fast to put on the table so I don’t fall into the eating out trap (which I do sometimes).
Enter my new favorite recipe: vegan pepper steak. It’s kind of like a stir fry, but better.
Soy curls are just one of my new favorite meat replacements. Now that I’ve learned how to make their texture awesome (soak, squeeze out liquid, dry fry, use as needed), I’m putting them in everything.
And my stomach couldn’t be happier. When I crave a meat-like dish, I know by now I’m not craving animal meat, I’m just craving a chewy texture with whatever flavors I’m also craving (sweet, savory, tangy, umami, etc. Before, it was easy to use store-bought vegan meat options which are quick but don't make my stomach (or my wallet) happy.
Enter soy curls. Made from whole soybeans, they’re a less processed and more wholesome vegan protein option and they’re truly super versatile. I’ve put them in everything from soups, to pasta, to wraps… I’ve even made soy curl bacon recently and it’s amazing!
But back to today’s awesome dish. It’s made by rehydrating soy curls--this time in vegan beef broth but vegetable broth mixed with a splash of soy sauce will also work.
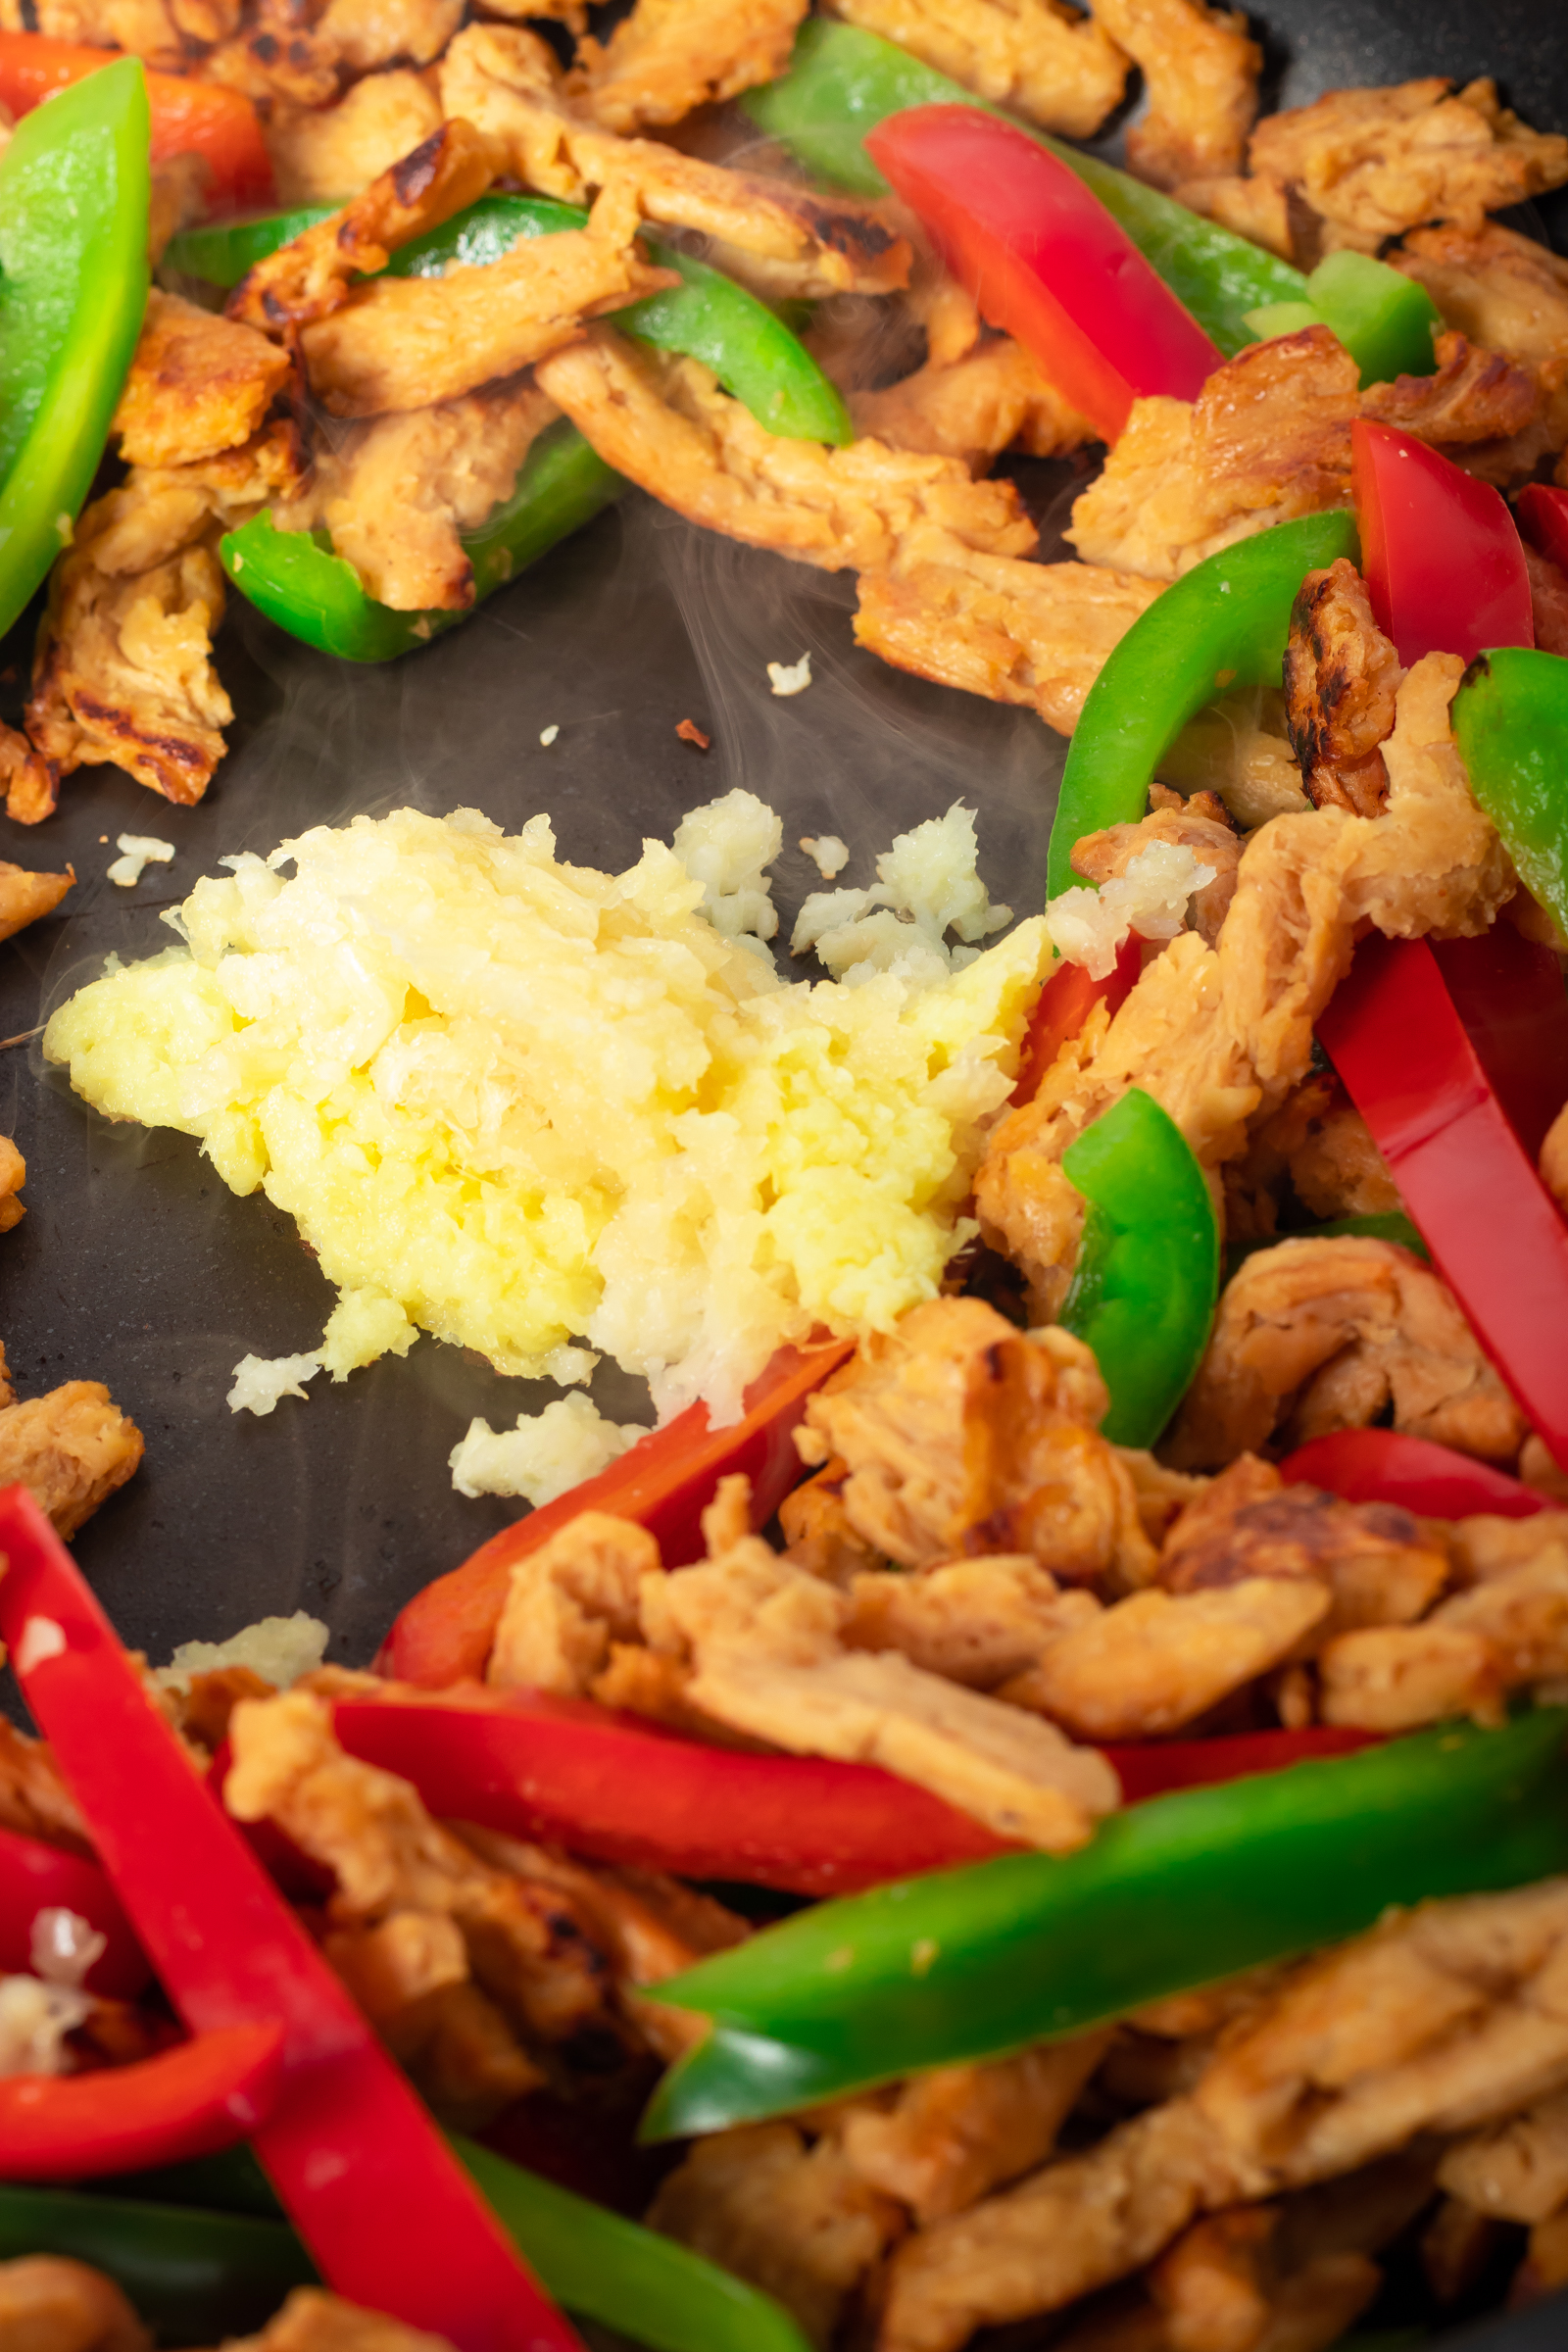
Then you squeeze out the liquid and dry fry them for a few minutes, then add garlic, ginger, peppers, and finally a really simple but delicious sauce.
This simple and customizable recipe -- use whatever veggies you like or customize the sauce -- is so quick, it comes together in less than 20 minutes! And half that time is soaking the soy curls, so you could be doing other things like prepping the veggies, cooking rice to go along with this dish, making a side salad, or putting your feet up because rest is underrated.
Ready to jump into this delicious dish? Let’s do it.
What You’ll Need
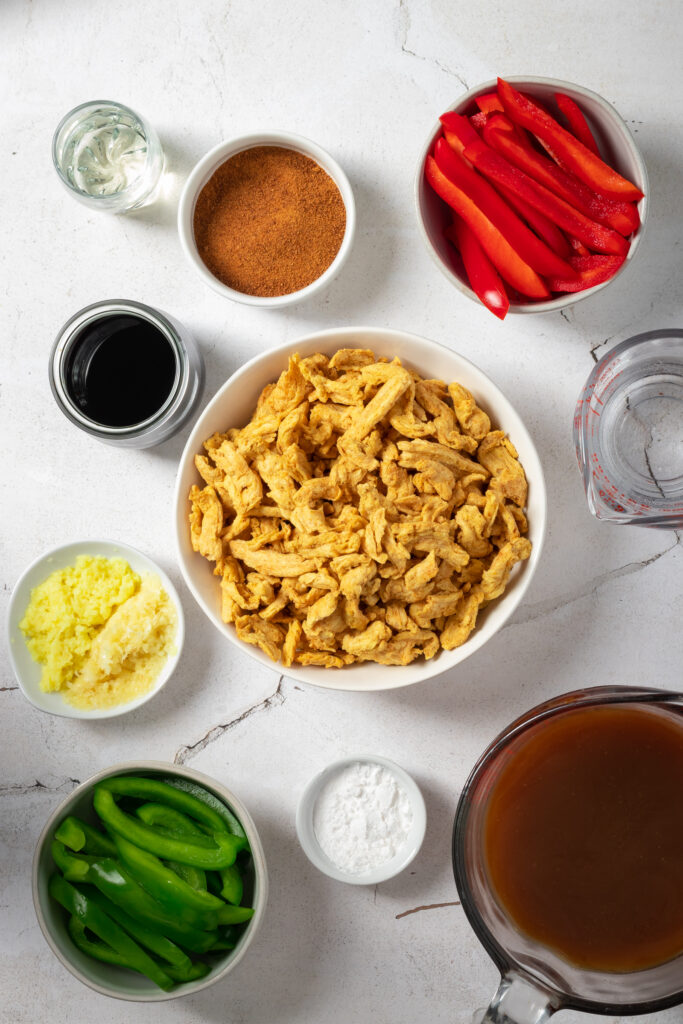
- Soy curls: Butler soy curls are the base of this simple dish. I used the whole 8 ounce pack. Try to avoid the small crumbles for this dish. The small crumbles I save and use whenever I make soup, chili, or like a TVP pasta sauce. If you prefer not to use soy curls you could use baked or air fried tofu (or even puffed tofu), seitan beef like my simple recipe for instant pot seitan (instructions for those without an instant pot are included), or a store-bought vegan beef product like Gardein.
- Vegan beef broth or vegetable broth: I like to use vegan beef broth for this recipe so I can have that particular flavor. I use Better Than Bouillon No Beef Base (mixed with water. The soy curls won’t absorb all of it so I usually strain it into a jar and use it in a soup or stir fry sauce later in the week (can also be frozen). You could alternatively use vegetable broth with a splash of soy sauce or if you’re really in a pinch, water will work. I just like to do broth because I feel like it gives the overall dish more flavor.
- Fresh garlic and ginger: Fresh is best because it really, to me, is a different flavor than the dried powder stuff. But if the dried spices are all you have, that’s fine. I’d add them to the soy curls right as you add them to the pan for dry-frying.
- Bell peppers: You can use any peppers you like. I used a red bell pepper and a green bell pepper for this soy curls pepper steak dish.
- Water
- Soy sauce: I used reduced sodium soy sauce here but regular sodium should work fine. If you’re worried about it being too salty, use half the amount of regular soy sauce and dilute it with a little water. If you can’t have gluten, try a gluten-free tamari or coconut aminos.
- Mirin: Mirin is a tasty bottled fluid used in Japanese cooking. It adds flavor and depth to the vegan pepper steak sauce. It’s a little sweet and a little tangy. It’s optional for this dish. A good substitute is rice vinegar, or you can leave it out.
- Coconut sugar: Any sugar will work here. I used coconut sugar because I feel it pairs well with Asian cuisine inspired dishes but you can use whatever you like.
- Arrowroot powder or cornstarch: For thickening the sauce.
- Fresh cracked black pepper (and salt if needed) for seasoning

How to Make Vegan Pepper Steak
- Note: If serving with rice, get that going first (note that if you’re doing brown rice, you may want to get that started well before you start this recipe).
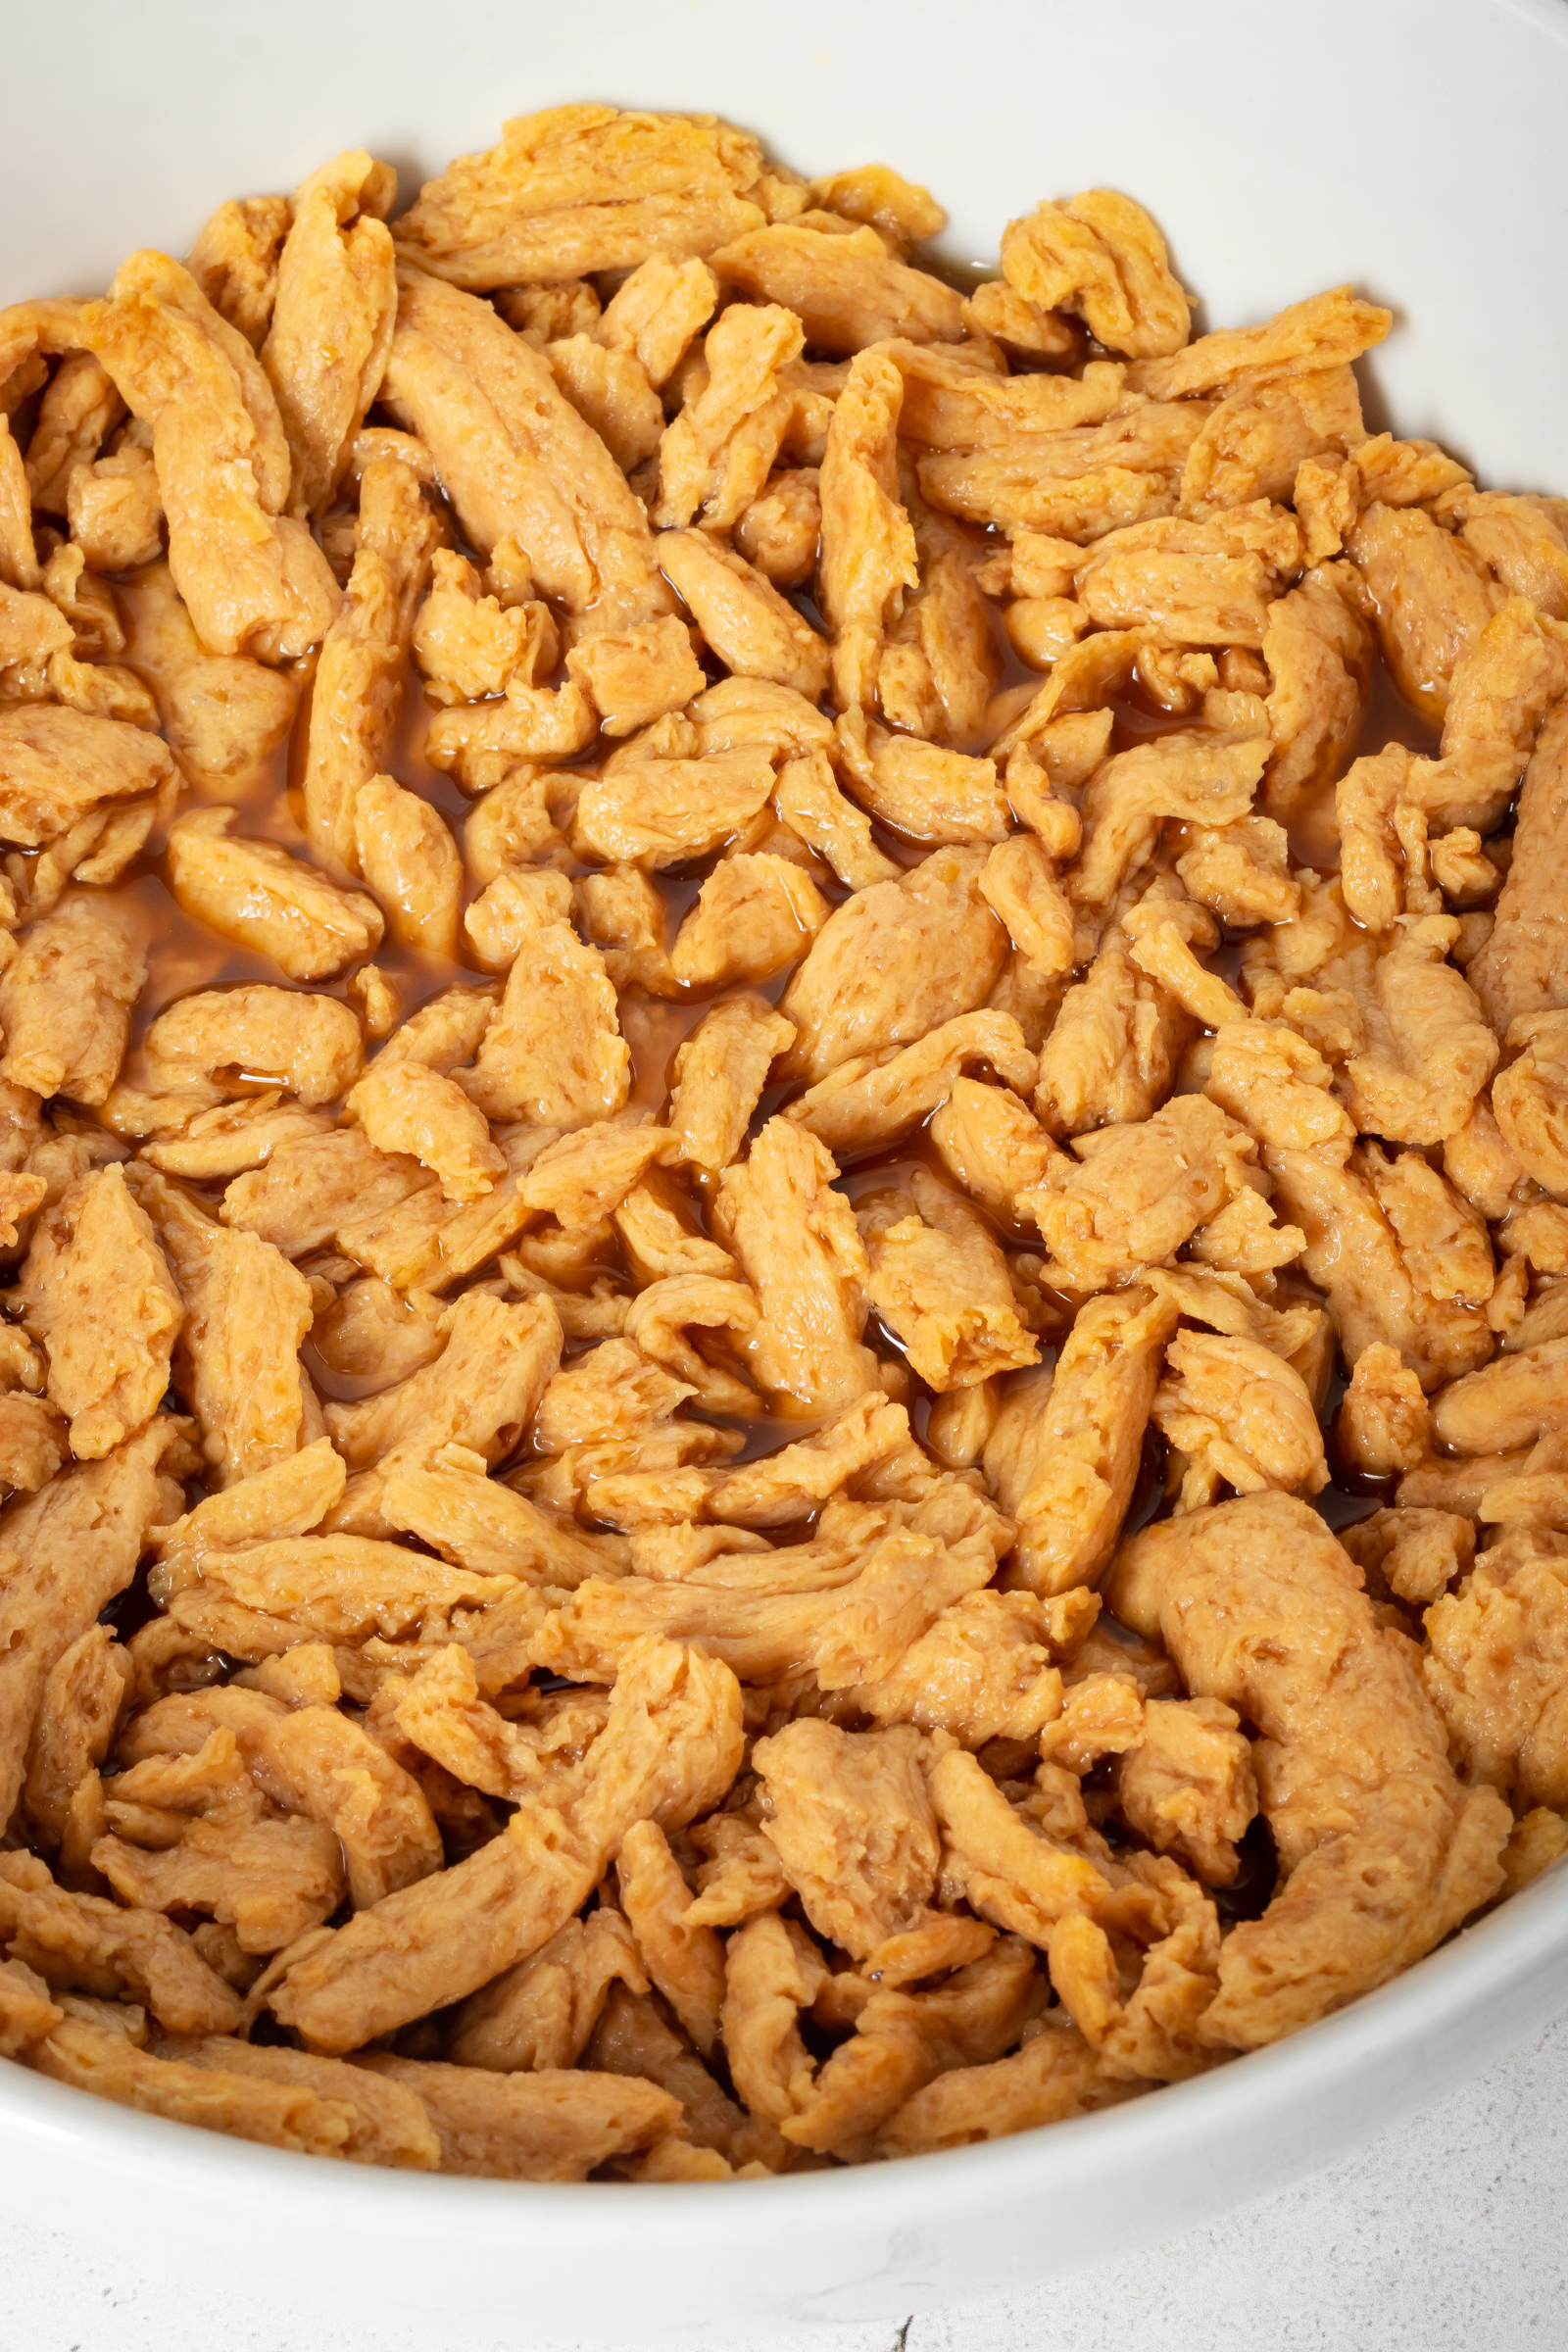
- Start this recipe by soaking your soy curls. Add the soy curls to a medium bowl, discarding any of the powder at the bottom of the bag. I usually save the small crumbles for other recipes. Cover the soy curls with the broth and mix gently. Let sit for 10-12 minutes. While you wait, measure out the other ingredients, chop the peppers, mince the garlic, grate the ginger, etc.
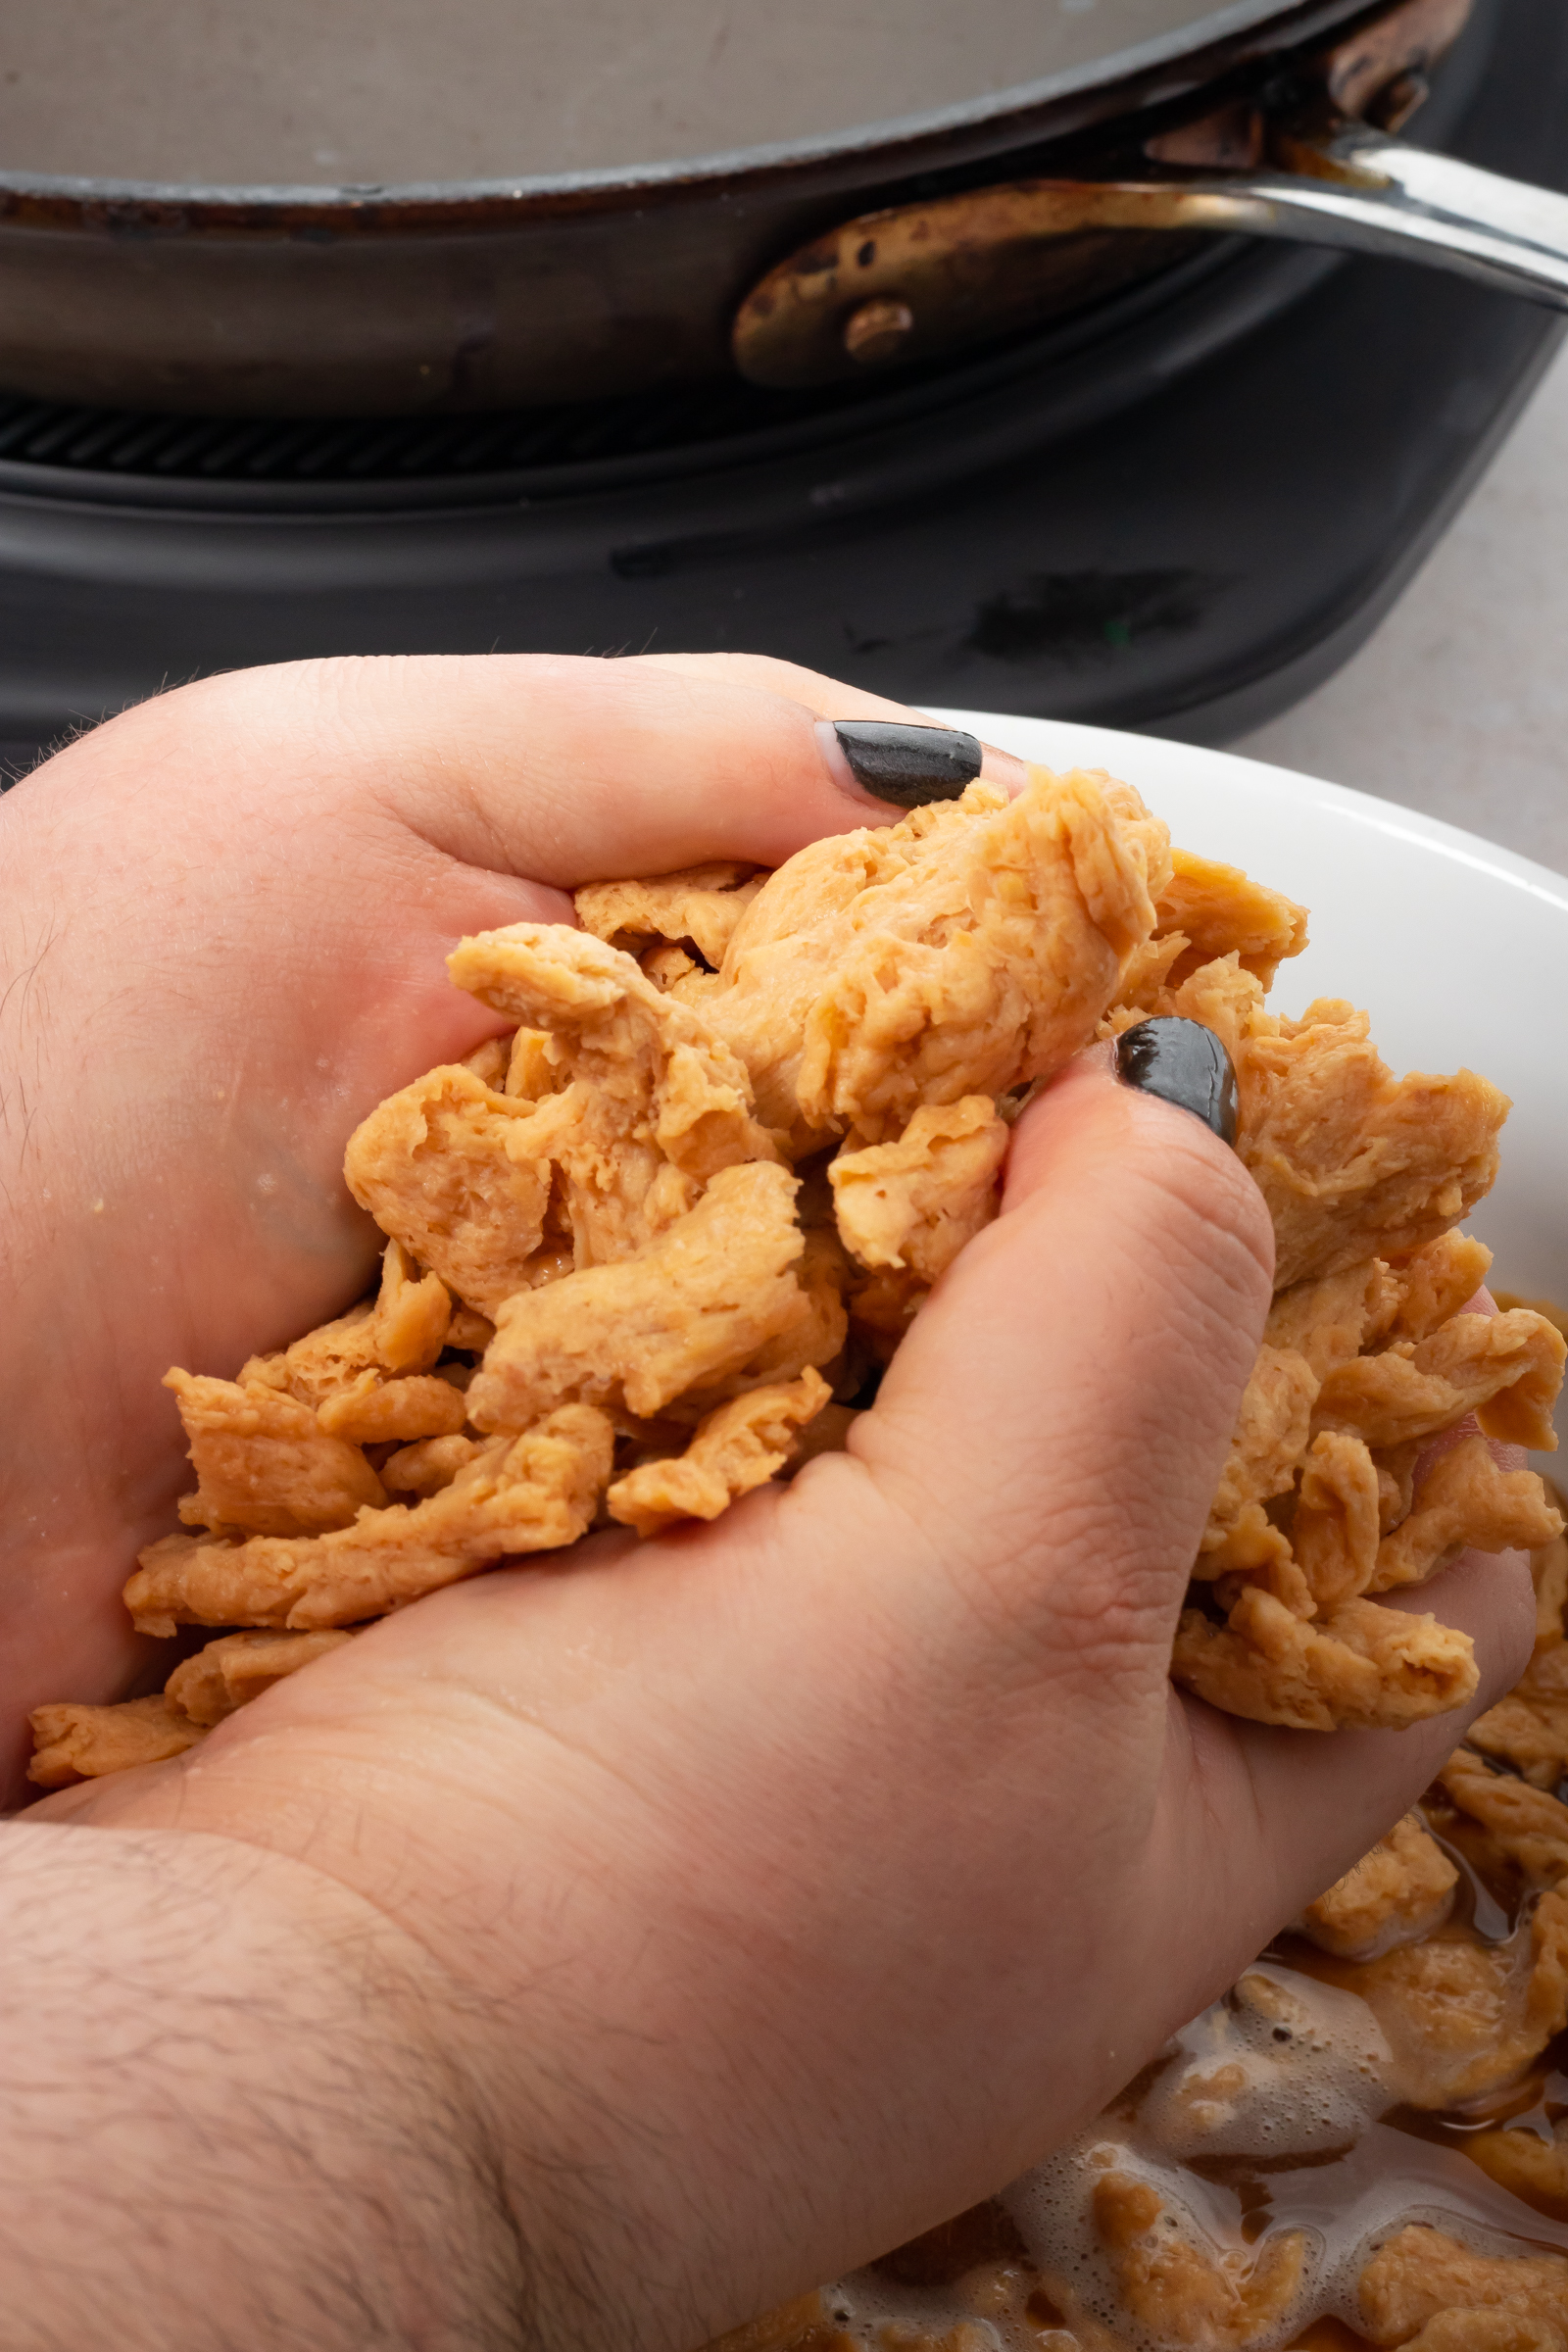
- When the soy curls have absorbed most of the liquid (they won’t absorb it all), you’re ready to dry fry. Start a large nonstick skillet over medium high heat. Place the bowl of soy curls next to or near the stove with the skillet. Working with one handful at a time, gently squeeze the excess broth out of the soy curls and throw them in the skillet. You don’t have to go crazy getting them dry--just squeeze out the majority of the liquid, whatever comes out in 1-2 squeezes.
- You can save the extra broth if you like. Strain out the excess liquid--I like to save it in a jar and use it in soup, rice, or other things throughout the week or it can be frozen for later use.
- Dry fry the soy curls for about 3-5 minutes or until they start to get a little browned. Stir them often with a wood or silicone cooking spatula/spoon. If you notice them start to get really dark or burned, turn the heat way down. I don’t use oil when I do this because I feel like the soy curls absorb the oil and stay kind of wet. The dry frying technique really helps to brown the soy curls.
- Add the sliced peppers and cook for 4-6 more minutes until the peppers start to get softer. You can customize this a little based on how cooked you like your peppers--I like mine to still have a bite to them.
- In a small bowl or measuring cup (I like to use the measuring cup because it has a spout), whisk together the water (reserve ¼ cup of the water just in case you need it but don’t add it to the mix at this time), soy sauce, mirin, coconut sugar, and arrowroot powder or cornstarch until smooth. Set aside for a minute.
- Now add the garlic and ginger and stir constantly for one minute. Then turn the heat down to medium.
- Add the sauce and stir constantly for about a minute--it should thicken quite quickly. If you think it’s gotten too thick, go ahead and add a bit of the reserved water at a time until you get the consistency you want. If it gets too thin you have two options--cook it down for a little while (5-6 minutes) and it will thicken on its own, but the peppers may get too soft during this time. So the other option is to mix another tablespoon of arrowroot powder or cornstarch with a few tablespoons of water in your bowl or measuring cup and add that to the pan. Mix it in and it should thicken in a few minutes.
- Remove from heat, season with fresh cracked black pepper (and salt if you think it needs it, but I found it salty enough) and serve with rice. I like to garnish mine with roasted sesame seeds and chopped green onion. Red pepper flakes would be good too.
- Refrigerate leftover vegan pepper steak separately from rice in an airtight container for up to 3-4 days, or freeze in a freezer safe container for up to 3 months.
More Vegan Chinese-Takeout Inspired Recipes
I love making vegan Chinese takeout inspired dishes. This vegan pepper steak is definitely not authentic Chinese food… It's more like American Chinese restaurant food, but many people including myself grew up loving some of these dishes. So I decided it was worthwhile to make vegan versions and share them on my site.
- Vegan General Tso’s (also soy curl based)
- Vegan Chicken Teriyaki (also soy curl based)
- Sweet and Sour Tofu
- Sticky Tofu
- Vegan Orange Chicken
- Vegan Beef and Broccoli
- Puffed Tofu
- Veggie Lo Mein (only takes 15 minutes!)
- Vegan Teriyaki Chicken (mushroom based) with optional Brussels sprouts
- Garlic Noodles
- Tofu Adobo
- Teriyaki Cauliflower Wings (more like Chinese takeout and American fusion, oops)
- Tofu Poke Bowl with Sesame Ginger Sauce
- Vegan Kung Pao
Anything Else?
As always, I hope you love this recipe--I know I do, and Mr. Zardyplants does too. This is has become a go-to dinner for us so much that I started keeping bell peppers in the house at all times!
This Vegan Pepper Steak is:
- Saucy
- Sweet
- Savory
- A tiny bit spicy (but customizable)
- Cozy
- Satisfying
- Surprisingly healthy
- And oh so delicious!
Let me know in the comments below if you make this recipe or tag me @Zardyplants on Instagram so I can see your beautiful recreations! If you tag me on IG, I will share your post in my stories :)
Also, one quick request: if you love how this recipe looks or tastes, please leave me a 5-star rating and a nice comment–ratings help more people find my recipes which helps me keep providing them! Thank you!
<3 Liz
Save this for later on Pinterest!

Vegan Pepper Steak
- Total Time: 25 minutes
- Yield: 6 cups 1x
- Diet: Vegan
Description
This saucy and delicious Vegan Pepper Steak comes together in under 20 minutes, making it a great choice for a healthy weeknight meal.
Ingredients
- 8 ounce bag (around 4 cups) soy curls (see note 1)
- 3 ¼ cups vegan beef broth or vegetable broth (see note 2)
- 2 medium bell peppers, sliced (we used green and red)
- 3-4 cloves garlic, minced
- 1-2 teaspoons minced ginger, to taste
- ¾ - 1 cup water (reserve ¼ cup water)
- 7 tablespoons reduced sodium soy sauce (see note 3 for GF option)
- 3 tablespoons coconut sugar (or any sugar)
- 1 ½ tablespoons mirin (see note 4 for sub)
- 1 ½ tablespoons arrowroot powder or cornstarch
Instructions
- Note: If serving with rice, get that going first (note that if you’re doing brown rice, you may want to get that started well before you start this recipe).
- Rehydrate soy curls: Start this recipe by soaking your soy curls. Add the soy curls to a medium bowl, discarding any of the powder at the bottom of the bag. I usually save the small crumbles for other recipes. Cover the soy curls with the broth and mix gently. Let sit for 10-12 minutes. While you wait, measure out the other ingredients, chop the peppers, mince the garlic, grate the ginger, etc.
- Squeeze excess broth from soy curls: When the soy curls have absorbed most of the liquid (they won’t absorb it all), you’re ready to dry fry. Start a large nonstick skillet over medium high heat. Place the bowl of soy curls next to or near the stove with the skillet. Working with one handful at a time, gently squeeze the excess broth out of the soy curls and throw them in the skillet. You don’t have to go crazy getting them dry--just squeeze out the majority of the liquid, whatever comes out in 1-2 squeezes.
- Save leftover broth: You can save the extra broth if you like. Strain out the excess liquid--I like to save it in a jar and use it in soup, rice, or other things throughout the week or it can be frozen for later use.
- How to dry fry soy curls: Dry fry the soy curls for about 3-5 minutes or until they start to get a little browned. Stir them often with a wood or silicone cooking spatula/spoon. If you notice them start to get really dark or burned, turn the heat way down. I don’t use oil when I do this because I feel like the soy curls absorb the oil and stay kind of wet. The dry frying technique really helps to brown the soy curls.
- Add peppers: Add the sliced peppers and cook for 4-6 more minutes until the peppers start to get softer. You can customize this a little based on how cooked you like your peppers--I like mine to still have a bite to them.
- Make the sauce: In a small bowl or measuring cup (I like to use the measuring cup because it has a spout), whisk together the water (reserve ¼ cup of the water just in case you need it but don’t add it to the mix at this time), soy sauce, mirin, coconut sugar, and arrowroot powder or cornstarch until smooth. Set aside for a minute.
- Add garlic and ginger: Now add the garlic and ginger and stir constantly for one minute. Then turn the heat down to medium.
- Add the sauce: Add the sauce and stir constantly for about a minute--it should thicken quite quickly. If you think it’s gotten too thick, go ahead and add a bit of the reserved water at a time until you get the consistency you want. If it gets too thin you have two options--cook it down for a little while (5-6 minutes) and it will thicken on its own, but the peppers may get too soft during this time. So the other option is to mix another tablespoon of arrowroot powder or cornstarch with a few tablespoons of water in your bowl or measuring cup and add that to the pan. Mix it in and it should thicken in a few minutes.
- Serve: Remove from heat, season with fresh cracked black pepper (and salt if you think it needs it, but I found it salty enough) and serve with rice. I like to garnish mine with roasted sesame seeds and chopped green onion. Red pepper flakes would be good too.
- Store: Refrigerate leftover vegan pepper steak separately from rice in an airtight container for up to 3-4 days, or freeze in a freezer safe container for up to 3 months.
Notes
- Note 1: Butler soy curls are the base of this simple dish. I used the whole 8 ounce pack. Try to avoid the small crumbles for this dish. The small crumbles I save and use whenever I make soup, chili, or like a TVP pasta sauce. If you prefer not to use soy curls you could use baked or air fried tofu (or even puffed tofu), seitan beef like my simple recipe for instant pot seitan (instructions for those without an instant pot are included), or a store-bought vegan beef product like Gardein.
- Note 2: I like to use vegan beef broth for this recipe so I can have that particular flavor. I use Better Than Bouillon No Beef Base mixed with water. The soy curls won’t absorb all of it so I usually strain it into a jar and use it in a soup or stir fry sauce later in the week (can also be frozen). You could alternatively use vegetable broth with a splash of soy sauce or if you’re really in a pinch, water will work. I just like to do broth because I feel like it gives the overall dish more flavor.
- Note 3: If you can’t have gluten, try a gluten-free tamari or coconut aminos. I used reduced sodium soy sauce here but regular sodium should work fine. If you’re worried about it being too salty, use half the amount of regular soy sauce and dilute it with a little water.
- Note 4: Mirin is a tasty bottled fluid used in Japanese cooking. It adds flavor and depth to the vegan pepper steak sauce. It’s a little sweet and a little tangy. It’s optional for this dish. A good substitute is rice vinegar, or you can leave it out.
- Prep Time: 10 minutes
- Cook Time: 15 minutes
- Category: Entree
- Method: Stove top
- Cuisine: American

Jill
This was so good!!! Definitely a new family favorite.
Maggie McMann
So good! I added broccoli also for more veg so I had to increase the sauce but we will definitely be making it again!
Juli
This is a it's so good it's bad recipe. First time using soy curls, those coupled with the sauce in this recipe is so delicious! So yummy that I went back for seconds, which makes it bad for dieting purposes. Oh well it was worth it! Thank You!!!
Brenda
I have to tell you that this is the best Vegan Peper Steak I ever tasted is like the real thing. I recommend 100%
L
This was tasty, though I used it as a jump off to adapt, i.e made a smaller amount for two, left out the sugar, used sherry in the sauce, added cilantro and Thai basil at the end. Thanks!
Julie
We loved this!!! We added onion wedges. Also instead of using water we reused the broth that we used to rehydrate the soy curls. We wanted to keep the beefy flavor. I highly recommend this recipe. can’t wait for the leftovers tonight.
Liz Madsen
So glad you guys loved it so much!
Hiroshi
I used water instead of broth, Korean red chili pepper flakes instead of the garlic and ginger, and then ACV instead of the mirin. It turned out great. It tastes way better than any meat I've ever had and isn't tough and grisly like I remember meat to have been half the time. It's perfectly tender yet not mushy at all. Thank you for the amazing recipe. :)
Lola
Can I use textured soy protein?
Liz Madsen
Yes!