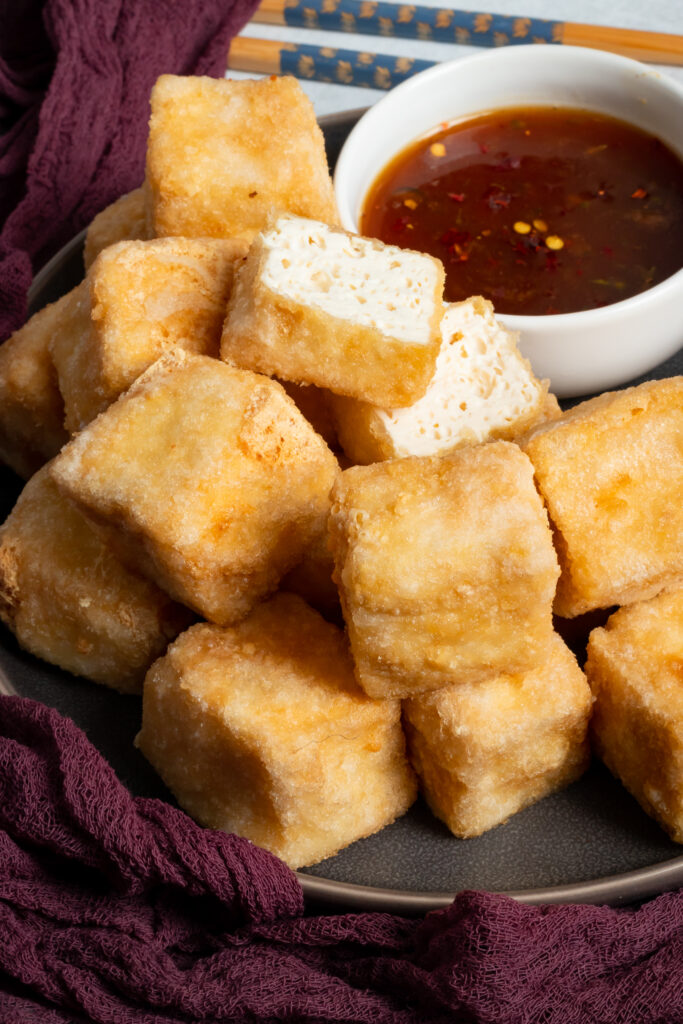
Light, crispy and spongy in a good way, this Puffed Tofu does not disappoint. It’s great for a variety of different meals and it’s super quick and easy to make!
This post may contain affiliate links. See our disclosure policy for details.
Hey Internet, have you ever heard of puffed tofu? Maybe, maybe not.
But if you’ve eaten at more than a few Chinese restaurants, there’s a good chance you’ve had this type of tofu.
It’s crispy on the outside and kind of a mix of fluffy and spongy on the inside. I don’t know how else to describe it. Lightly chewy and amazing--how’s that?
This basic recipe only includes a few ingredients to make the basic tofu puffs. What you do with them is up to you.
I’ll share a few sauces and dishes this tofu would be great in, as well as other ideas for how to eat it.
I will also be sharing two different ways to make it. While deep frying is the traditional method--and the method that will produce the softest and fluffiest puffs (along with using the right type of tofu, more on that later), I’ll also show you how to make baked tofu puffs to cut down on calories and fat from oil. Both are good options!
Finally, as mentioned above, there are a few tips and tricks to getting your tofu to puff like store-bought/restaurant style puffed tofu, so I’ll share those with you as well.
What You’ll Need
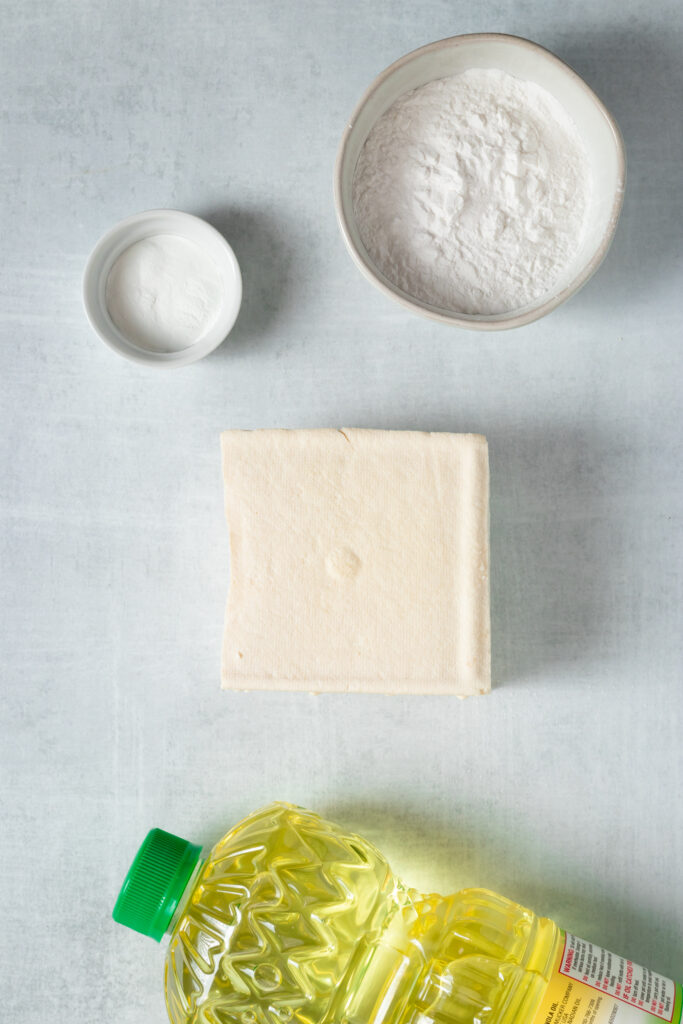
- Oil: If doing the deep frying method (or if you’d rather pan fry), you’ll need oil that’s proper for deep frying (a high heat oil). Safflower seed, canola, or vegetable oil are great for this. Do NOT use something with a low heat rating like sesame seed oil or olive oil.
- Fresh tofu: I HIGHLY recommend using FRESH tofu--the package will say Fresh on it. This can be found at Asian grocery stores and markets, or if you’re especially dedicated, you can make your own. While you can still make some tasty tofu using the normal water packed tofu (I recommend Firm or Extra Firm but NOT vacuum sealed tofu), it will be more chewy than fluffy. I’ve made this both with Extra Firm normal tofu and with Fresh Tofu and both were good, but the Fresh Tofu makes THE BEST puffed tofu.
- Arrowroot powder or cornstarch: While this isn’t absolutely necessary, I found it to be really important for getting a nice crust onto the tofu.
- Baking powder: Just a smidgen of baking powder really makes a difference in the puffs. I tried tofu puffs from my local Asian market (that they make) and they have baking powder in them and were fantastic, so that’s where I got the idea.
Equipment for Frying Tofu
While you absolutely NEED very little to make this recipe--a large pot and the ingredients--it helps to have a few things around to make the process easier.
First, a large pot with tall sides (I used a 4.5 quart sauce pan) will help avoid oil splatter. Using a heavy bottomed pot (like a Dutch oven) helps the oil maintain a consistent temperature.
I also HIGHLY recommend a frying thermometer or similar (NOT an oven thermometer) to test how hot the oil is. We don’t want it to be too hot--375 degrees Fahrenheit (191 degrees Celsius) is ideal.
If you don’t have a frying or candy thermometer, you can use a long wooden skewer--gently place the tip of it in the oil--if little bubbles start to form quickly around the tip, the oil should be hot enough.
A splatter screen will help protect your skin against oil splatters.
To stir and remove the tofu puffs, I highly recommend a spider strainer--kind of like a slotted spoon crossed with a ladle.
You'll want to cool the tofu on some sort of rack so the excess oil drips off. I recommend a regular grated cooling rack. Make sure to place a tray or foil or something under the rack to keep the dripping oil off your counter.
How to Make Puffed Tofu
As mentioned above, I’m going to share two methods with you. Please note that frying will give you a more authentic and puffy tofu, while the oven method results in a chewier end product but still delicious.
Deep Frying Method
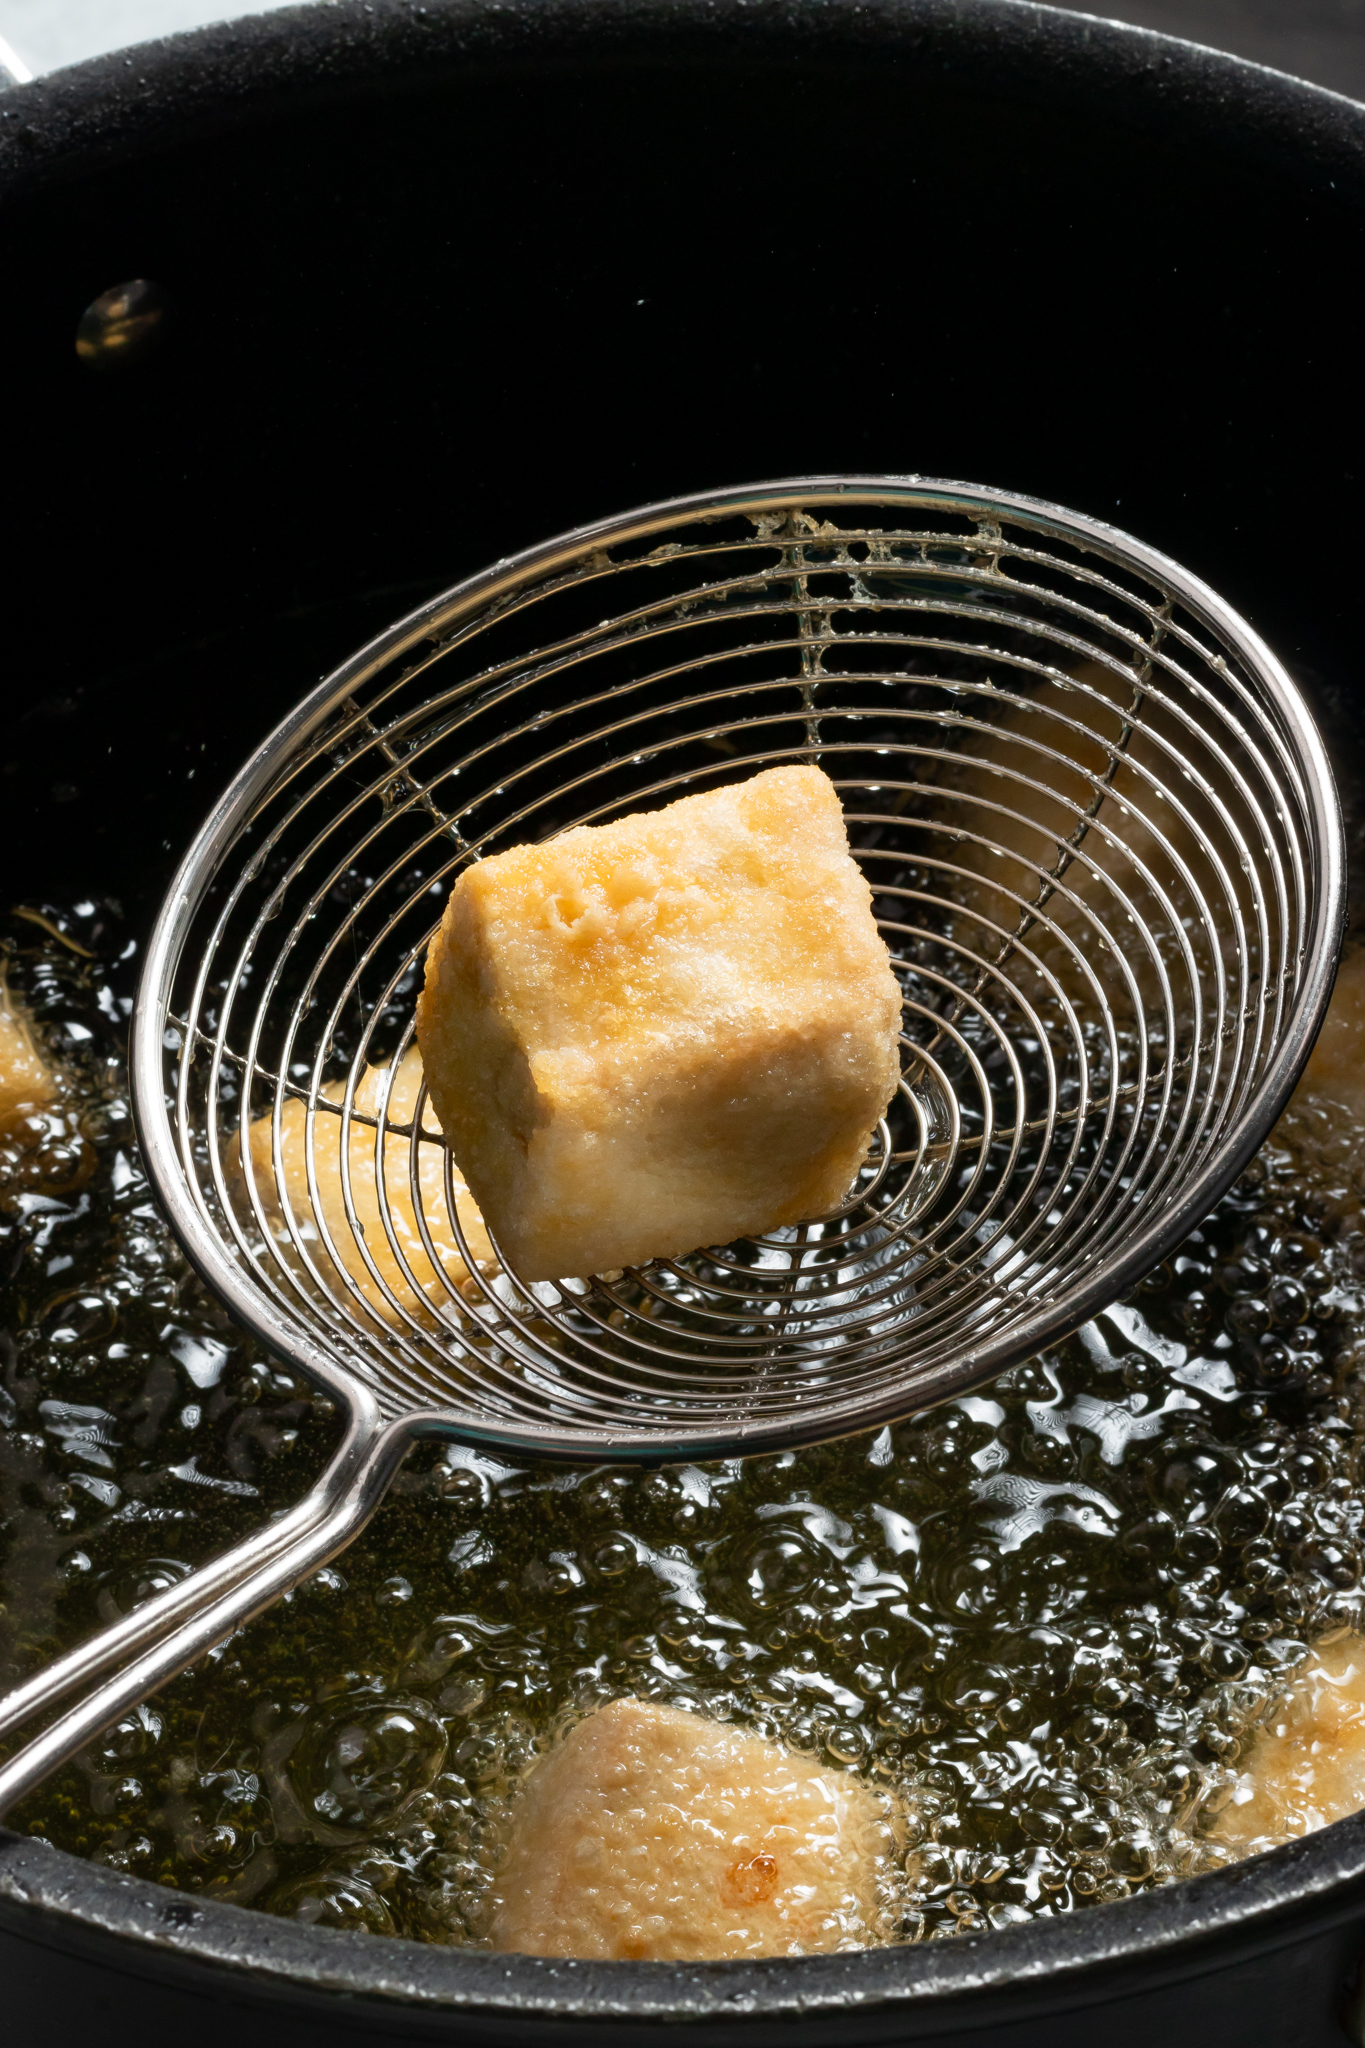
- Heat about 3 inches of oil in a large, heavy bottomed pot with tall sides over medium high heat. How long it takes depends on the strength of your burner and the thickness of your pot--it took about 10 minutes for me. Note that it’s important to have the right temperature of oil--pick up a frying thermometer or similar and keep testing the oil. Once it’s at 375 degrees Fahrenheit (191 degrees Celsius), you’ll want to turn the heat down to medium or medium low and periodically re-test the oil. The actual cooking process is quite quick once the oil is the right heat. I’ve read online that you can place a wooden skewer in the oil temporarily to test the oil--if it starts bubbling little bubbles then it’s hot enough.
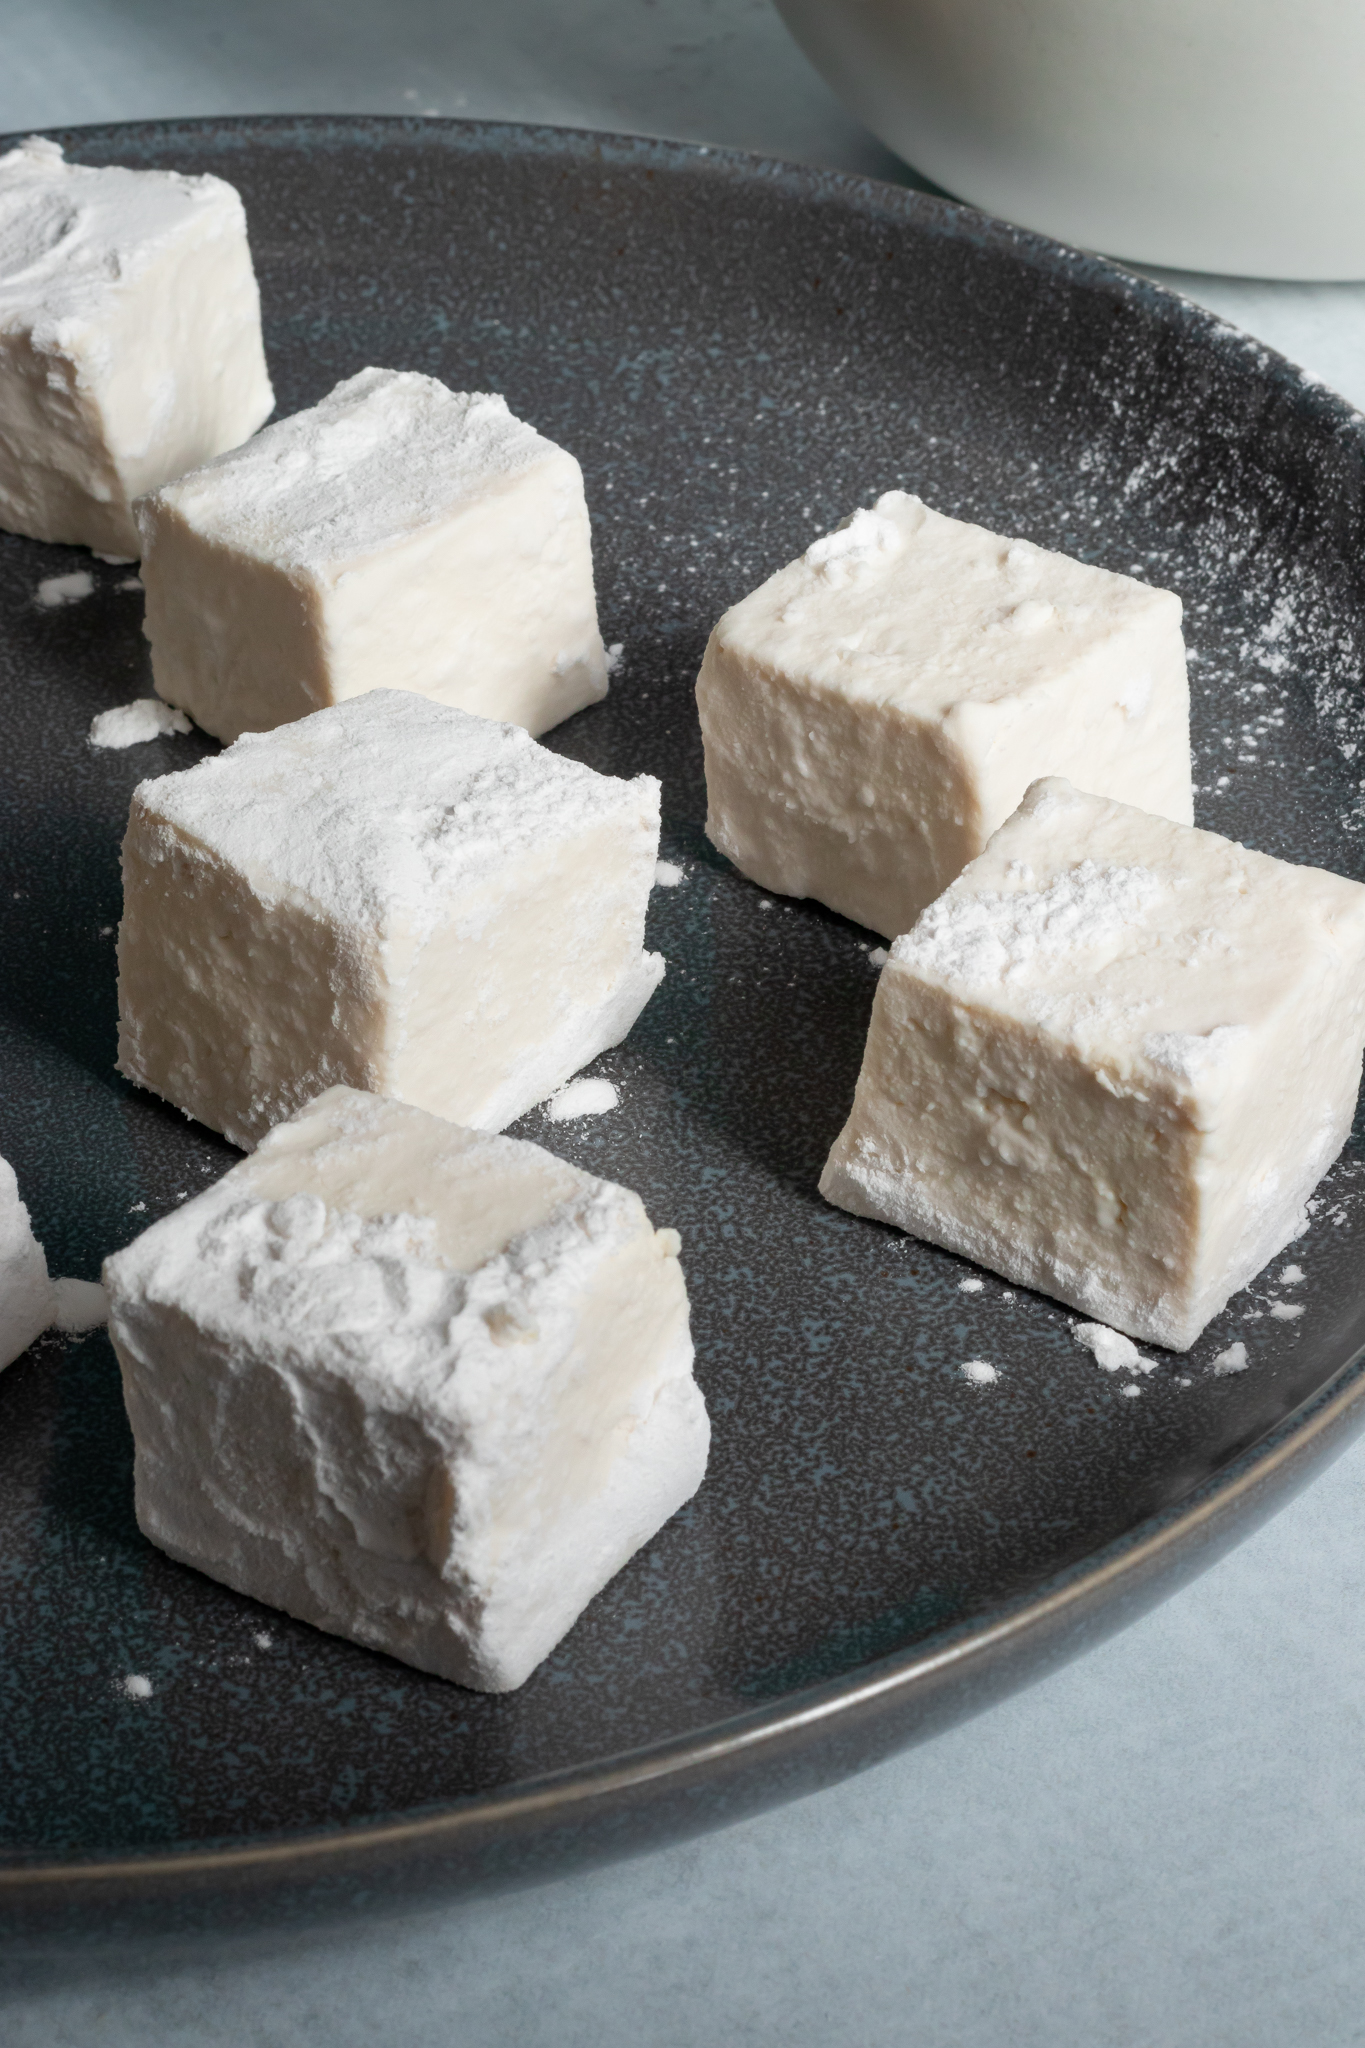
- While the oil heats, remove the tofu from the package. The fresh tofu I buy from my local Asian grocery store comes packed in a clear container with water. Drain the water and gently wrap with paper towels or a clean tea towel/kitchen towel. You don’t want to break the tofu--there’s no need to press it. Just use a towel or two to absorb the excess water. Cube or cut the tofu into triangles. I like chunky tofu puffs, so I cut them in cubes that were about 1 ¼ inches in size.
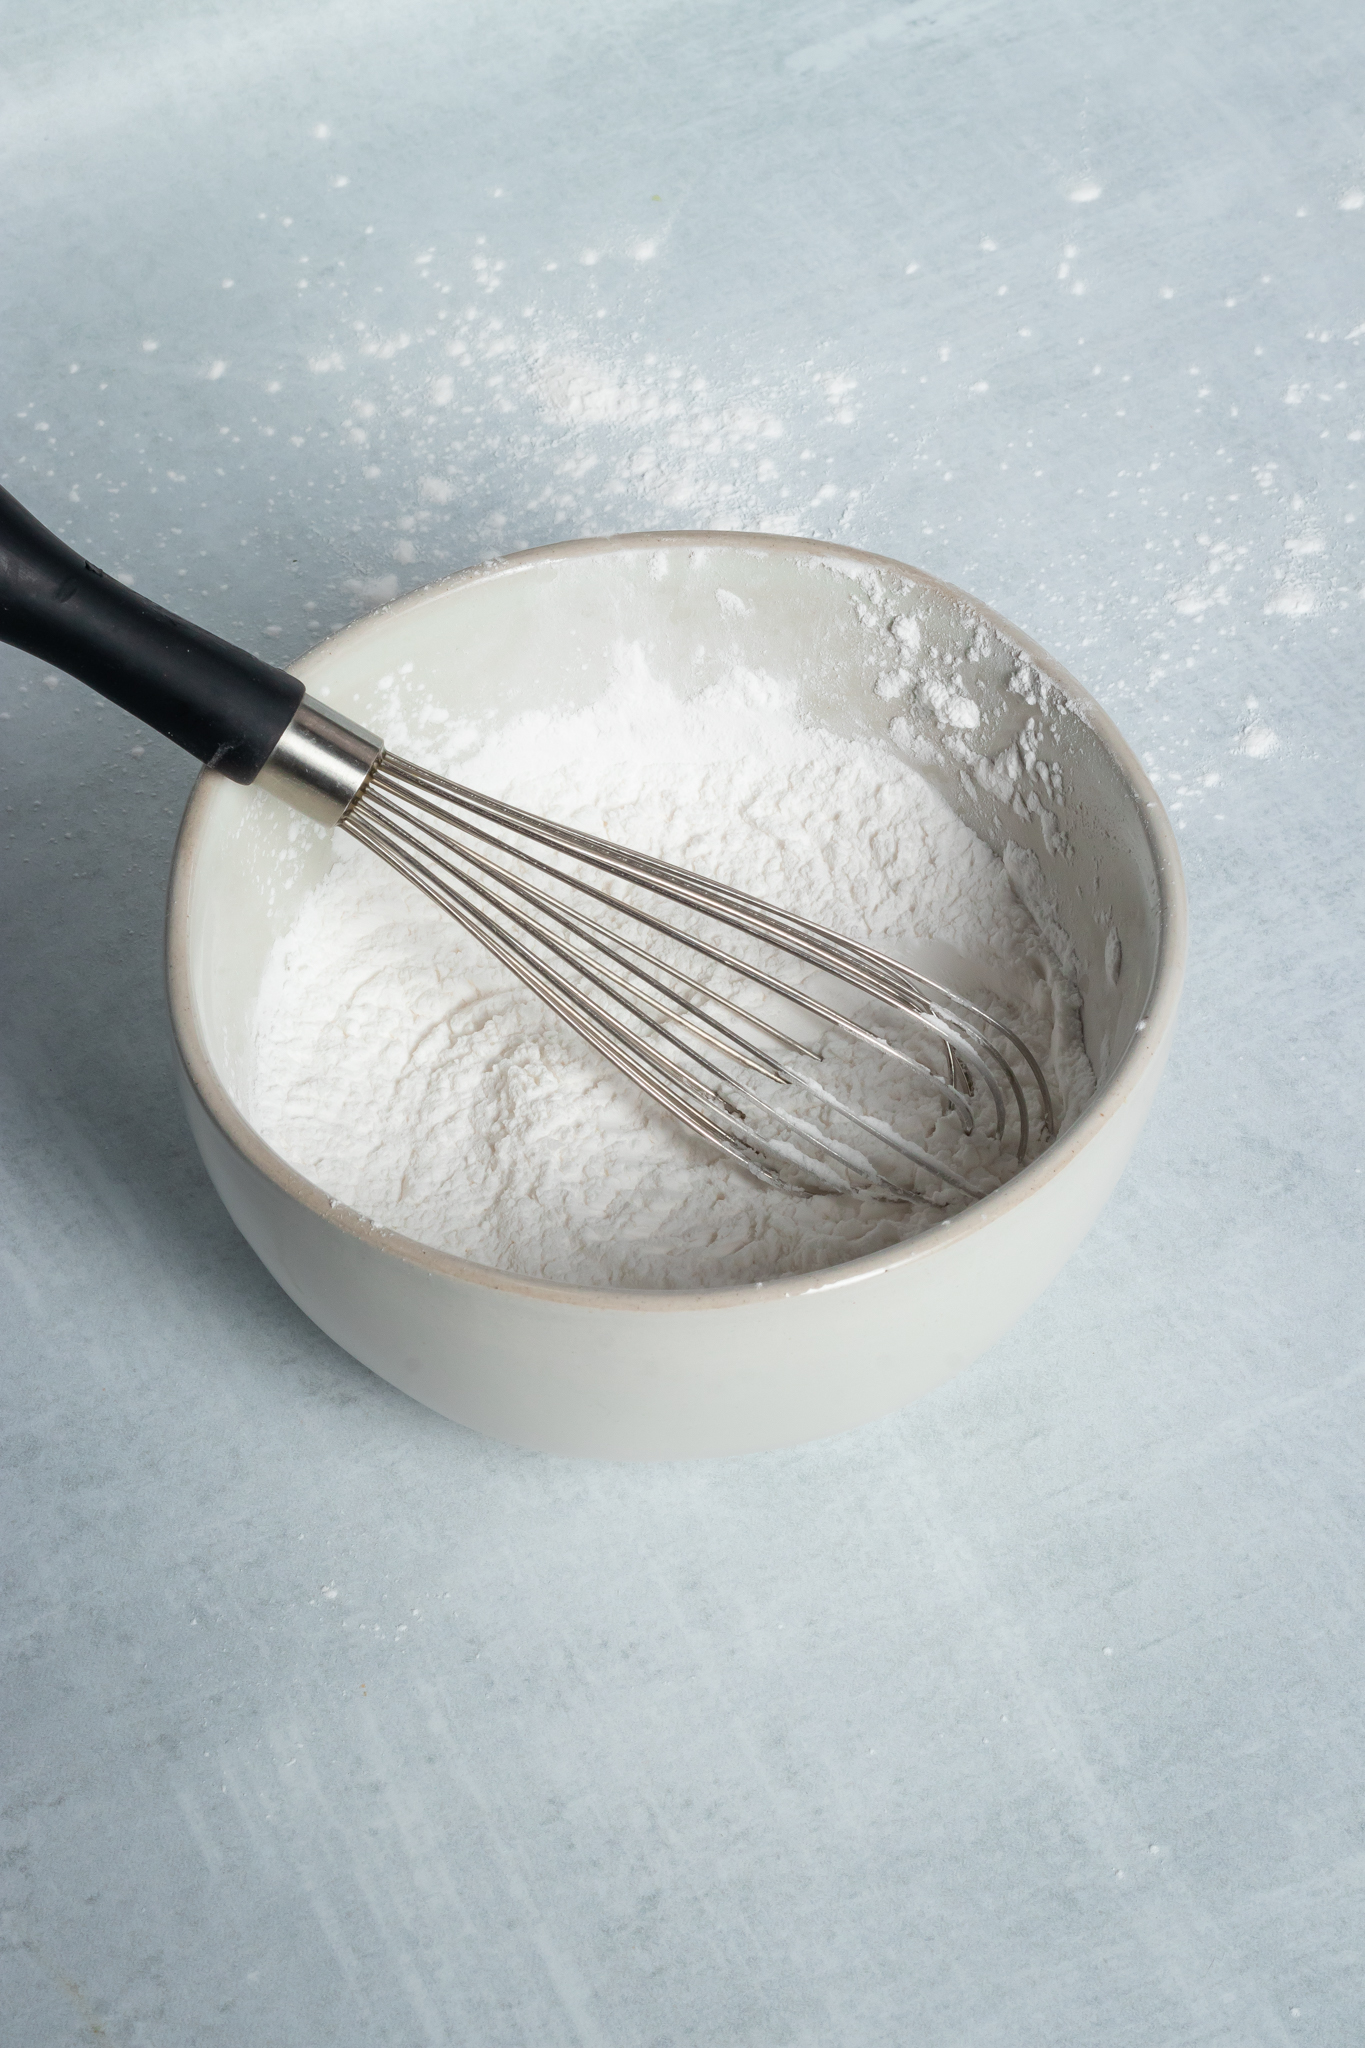
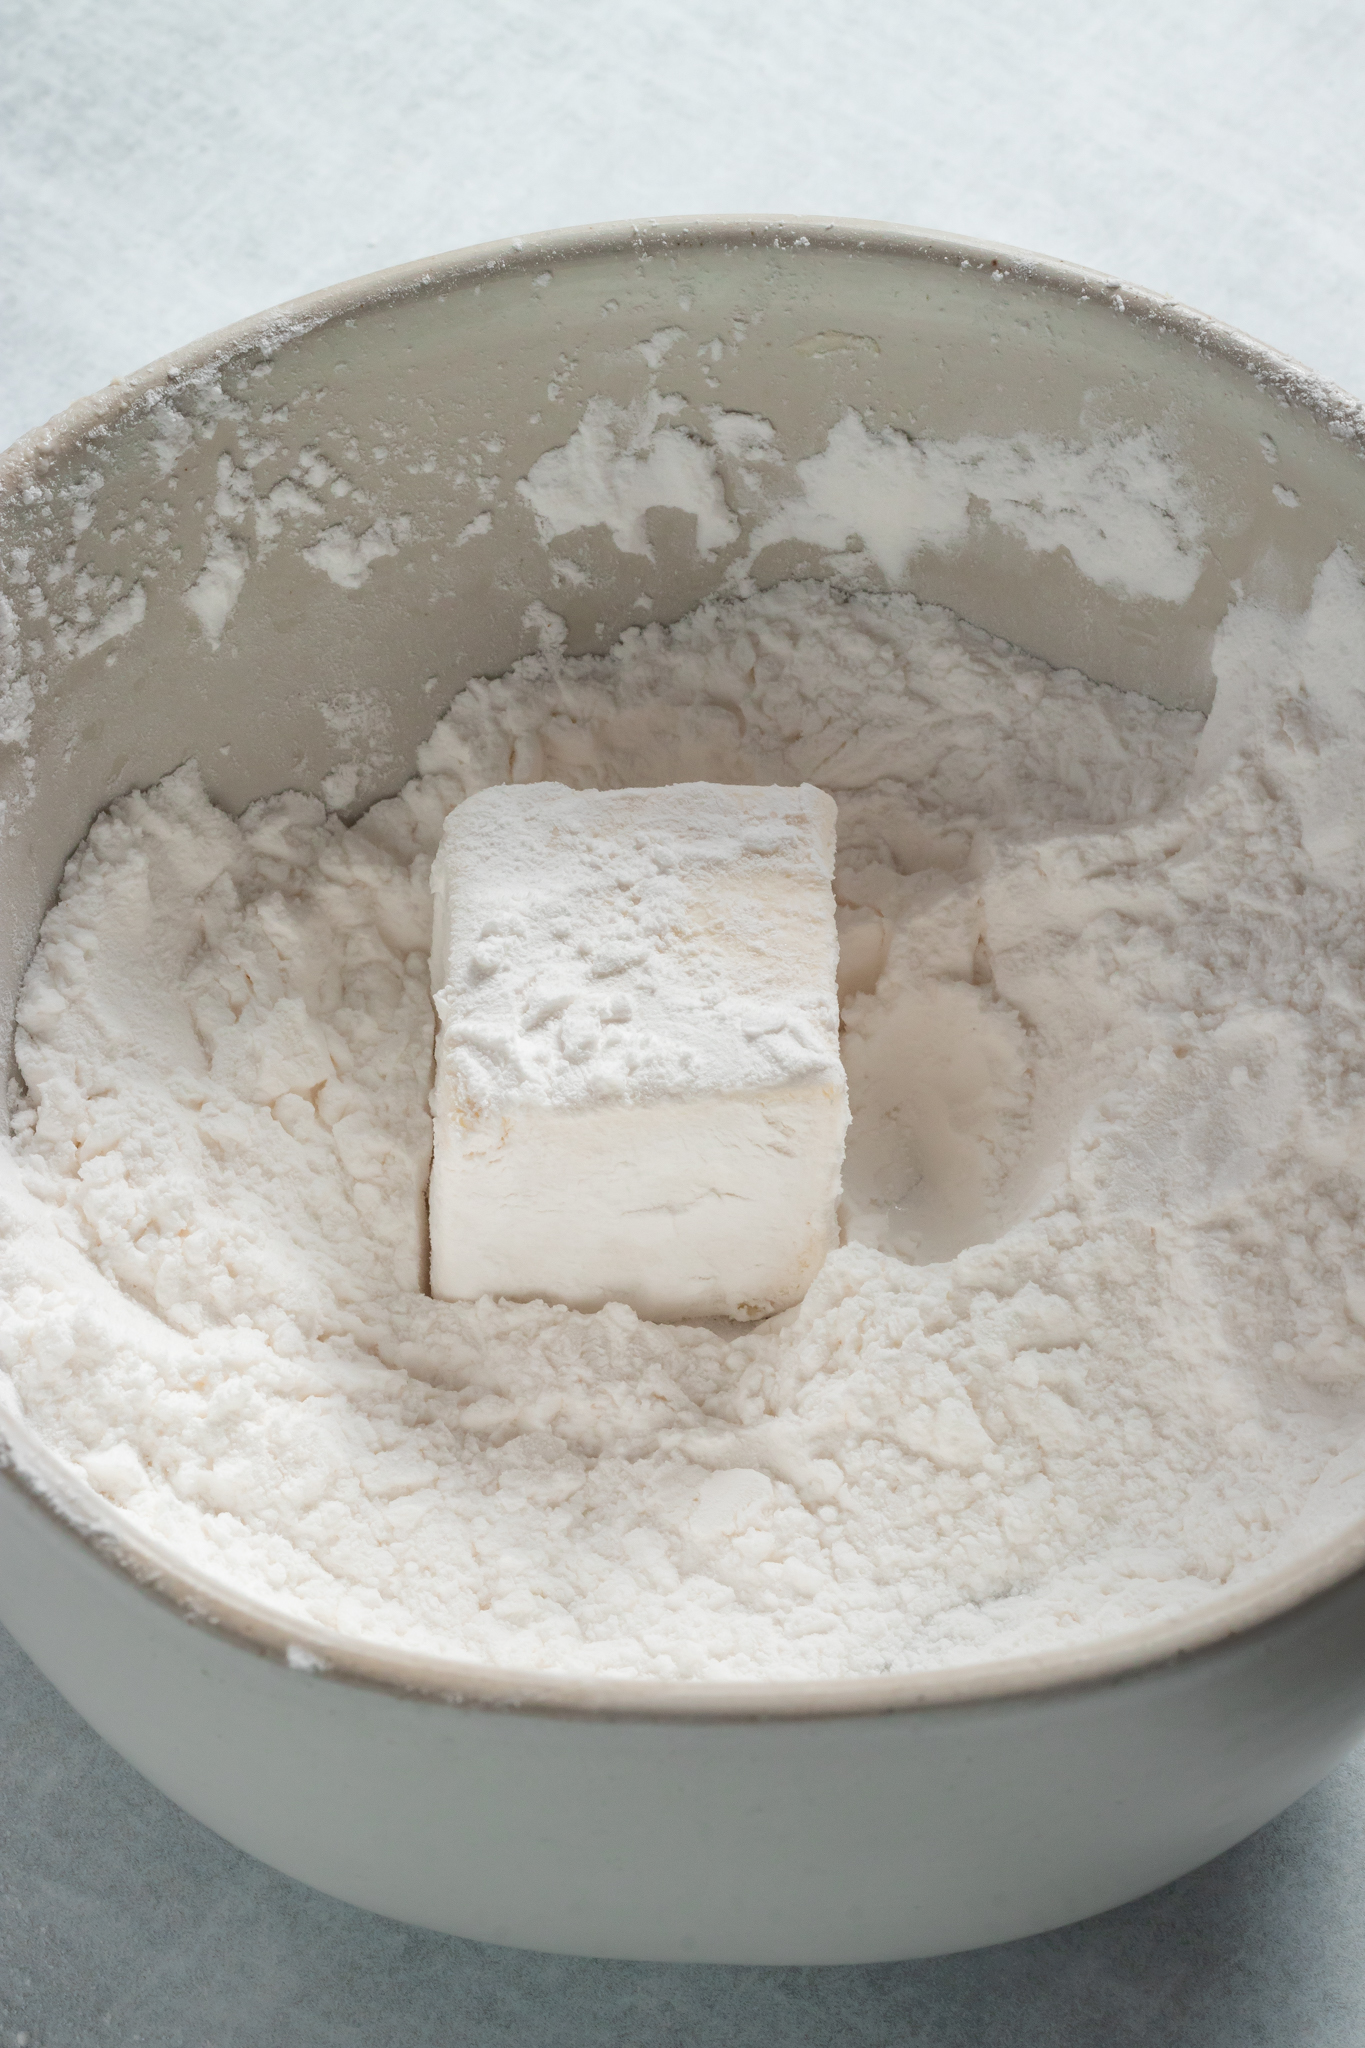
- In a medium bowl, whisk together the arrowroot powder or cornstarch with the baking powder. Roll each tofu cube in it so all sides are covered, then place on a plate.
- Once the oil is to heat, CAREFULLY drop in the tofu cubes one at a time. Depending on the diameter of your pot, cook the tofu in 2-3 batches--do not crowd it. When you drop them in, try to either use your spider strainer or drop them in so that they splash AWAY from you. Best to use a utensil for this. And ideally cover the pot with a splatter screen to help protect your skin against oil splatters.
- Stir the tofu for the first 2 minutes gently, using your spider strainer or a slotted spoon to keep the tofu cubes from sticking together. They should float within 3-4 minutes and should be stirred occasionally after that. When they’re evenly and lightly browned, they’re ready to remove.
- Place on a cooling rack with a tray or foil underneath it OR a paper towel lined plate to catch the excess oil.
- Cook remaining tofu and then turn the heat off.
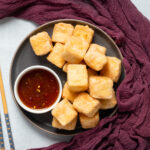
- Serve puffed tofu with a dipping sauce, with rice and a sauce you made, or incorporate into another dish (see suggestions below). Enjoy!
- Refrigerate leftover puffs in an airtight container for up to 2-3 days, however my personal opinion is that they’re best on the first night. You can freeze them, but freezing seems to affect the molecular makeup of tofu and cause it to be a little chewier, so keep that in mind.
Oven Method
- Preheat the oven to 400 degrees Fahrenheit (205 degrees Celsius) and line a rimmed baking tray with a silicone baking mat or parchment paper.
- Wrap tofu in kitchen or paper towels and press with a heavy weight or a tofu press for 15-20 minutes.
- Cube or cut the tofu into triangles. I like chunky tofu, so I cut them in cubes that were about 1 ¼ inches in size.
- In a medium bowl, whisk together the arrowroot powder or cornstarch with the baking powder. Roll each tofu cube in it so all sides are covered, then place on the tray, leaving a little room between each piece.
- Bake for 25-30 minutes (until desired texture is reached), flipping each piece and rotating the tray about halfway through the cooking process.
- Serve with a dipping sauce, with rice and a sauce you made, or incorporate into another dish (see suggestions below). Enjoy!
- Refrigerate leftover tofu in an airtight container for up to 2-3 days, however my personal opinion is that they’re best on the first night. You can freeze them, but freezing seems to affect the molecular makeup of tofu and cause it to be a little chewier, so keep that in mind.
Ideas for Serving and Enjoying Tofu Puffs
There are SO MANY ways to serve and eat this tofu! I’m only scratching the surface with my ideas here. If you love tofu as much as I do, check out my round up of tofu recipes!
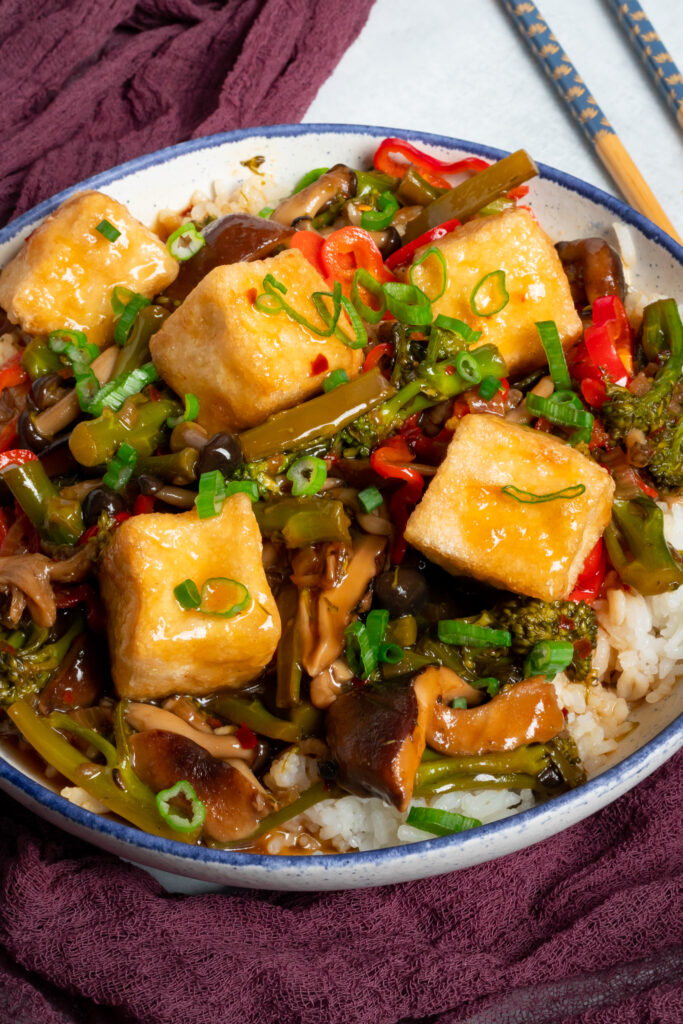
In the recipe video and some of the photos, I show this tofu with a stir fry of shallots, broccolini, shiitake mushrooms, beech mushrooms, peppers served over rice and topped with rice.
I have a number of recipes that call for cubed cooked tofu, and this puffed tofu would definitely be an upgrade for any of the following recipes:
- Sweet and Sour Tofu
- Sticky Tofu
- Tofu Adobo
- Vegan Orange Chicken (Tofu)
- Tofu Poke Bowl
- Vegan Beef and Broccoli (it’s tofu)
- Kung Pao Tofu
- Tofu Buddha Bowl
- Bang Bang Tofu
It would also be great as an alternative protein in my Vegan General Tso’s, or in my Vegan Teriyaki Chicken.
Alternatively, you could just make this fried tofu as an appetizer and serve it with a dipping sauce such as my vegan teriyaki sauce or my vegan sweet and sour sauce.
Anything Else?
As always, I hope you love this recipe--I know I do, and Mr. Zardyplants does too. We loved every round of testing (just experimenting with different tofus to get the right one!). This puffed tofu is:
- Crispy on the outside
- Soft and pillowy on the inside
- Chunky
- Versatile
- Satisfying
- And super fun!
Let me know in the comments below if you make this recipe or tag me @Zardyplants on Instagram so I can see your beautiful recreations! If you tag me on IG, I will share your post in my stories :) Also, one quick request: if you love how this recipe looks or tastes, please leave me a 5-star rating and a nice comment–ratings help more people find my recipes which helps me keep providing them! Thank you!
<3 Liz
Save this for later on Pinterest!
Puffed Tofu (2 Ways)
- Total Time: 20 minutes
- Yield: 18 pieces 1x
- Diet: Vegan
Description
Light, crispy and spongy in a good way, this Puffed Tofu does not disappoint. It’s great for a variety of different meals and quick to make!
Ingredients
- Oil for frying, such as safflower seed, canola, or vegetable (omit if baking)
- 1 pound block of FRESH tofu (preferred, but can use firm-extra firm) (see note 1)
- ½ cup arrowroot powder or cornstarch (see note 2)
- 1 teaspoon baking powder (see note 3)
Instructions
Deep Frying Method
- Heat oil: Heat about 3 inches of oil in a large, heavy bottomed pot with tall sides over medium high heat. How long it takes depends on the strength of your burner and the thickness of your pot--it took about 10 minutes for me. Note that it’s important to have the right temperature of oil--pick up a frying thermometer or similar and keep testing the oil. Once it’s at 375 degrees Fahrenheit (191 degrees Celsius), you’ll want to turn the heat down to medium or medium low and periodically re-test the oil. The actual cooking process is quite quick once the oil is the right heat. I’ve read online that you can place a wooden skewer in the oil temporarily to test the oil--if it starts bubbling little bubbles then it’s hot enough.
- Prep tofu: While the oil heats, remove the tofu from the package. The fresh tofu I buy from my local Asian grocery store comes packed in a clear container with water. Drain the water and gently wrap with paper towels or a clean tea towel/kitchen towel. You don’t want to break the tofu--there’s no need to press it. Just use a towel or two to absorb the excess water. Cube or cut the tofu into triangles. I like chunky tofu puffs, so I cut them in cubes that were about 1 ¼ inches in size.
- Coat tofu: In a medium bowl, whisk together the arrowroot powder or cornstarch with the baking powder. Roll each tofu cube in it so all sides are covered, then place on a plate.
- Add to pot: Once the oil is to heat, CAREFULLY drop in the tofu cubes one at a time. Depending on the diameter of your pot, cook the tofu in 2-3 batches--do not crowd it. When you drop them in, try to either use your spider strainer or drop them in so that they splash AWAY from you. Best to use a utensil for this. And ideally cover the pot with a splatter screen to help protect your skin against oil splatters.
- Cook tofu: Stir the tofu for the first 2 minutes gently, using your spider strainer or a slotted spoon to keep the tofu cubes from sticking together. They should float within 3-4 minutes and should be stirred occasionally after that. When they’re evenly and lightly browned, they’re ready to remove.
- Cool: Place on a cooling rack with a tray or foil underneath it OR a paper towel lined plate to catch the excess oil.
- Repeat: Cook remaining tofu and then turn the heat off.
- Serve: Serve puffed tofu with a dipping sauce, with rice and a sauce you made, or incorporate into another dish (see suggestions in the article above). Enjoy!
- Store: Refrigerate leftover puffs in an airtight container for up to 2-3 days, however my personal opinion is that they’re best on the first night. You can freeze them, but freezing seems to affect the molecular makeup of tofu and cause it to be a little chewier, so keep that in mind.
Oven Method
- Prep oven: Preheat the oven to 400 degrees Fahrenheit (205 degrees Celsius) and line a rimmed baking tray with a silicone baking mat or parchment paper.
- Press tofu: Wrap tofu in kitchen or paper towels and press with a heavy weight or a tofu press for 15-20 minutes.
- Cut tofu: Cube or cut the tofu into triangles. I like chunky tofu, so I cut them in cubes that were about 1 ¼ inches in size.
- Bread tofu: In a medium bowl, whisk together the arrowroot powder or cornstarch with the baking powder. Roll each tofu cube in it so all sides are covered, then place on the tray, leaving a little room between each piece.
- Bake: Bake for 25-30 minutes (until desired texture is reached), flipping each piece and rotating the tray about halfway through the cooking process.
- Serve: Serve with a dipping sauce, with rice and a sauce you made, or incorporate into another dish (see suggestions below). Enjoy!
- Store: Refrigerate leftover tofu in an airtight container for up to 2-3 days, however my personal opinion is that they’re best on the first night. You can freeze them, but freezing seems to affect the molecular makeup of tofu and cause it to be a little chewier, so keep that in mind.
Notes
- Note 1: I HIGHLY recommend using FRESH tofu--the package will say Fresh on it. This can be found at Asian grocery stores and markets, or if you’re especially dedicated, you can make your own. While you can still make some tasty tofu using the normal water packed tofu (I recommend Firm or Extra Firm but NOT vacuum sealed tofu), it will be more chewy than fluffy. I’ve made this both with Extra Firm normal tofu and with Fresh Tofu and both were good, but the Fresh Tofu makes THE BEST puffed tofu.
- Note 2: While this isn’t absolutely necessary, I found it to be really important for getting a nice crust onto the tofu.
- Note 3: Just a smidgen of baking powder really makes a difference in the puffs. I tried tofu puffs from my local Asian market (that they make) and they have baking powder in them and were fantastic, so that’s where I got the idea.
- Prep Time: 5 minutes
- Cook Time: 15 minutes
- Category: Appetizers, Entree, Meat Alternatives
- Method: Frying, Stove top
- Cuisine: Asian


Amy Cano
I have not made this yet, but am thrilled to discover your recipes for puffed tofu! I have been a vegetarian for 43 years and must admit I have not been much of an adventurous cook as you make it seem easily doable! My favorite order from our local Chinese restaurant in St. Louis is “Tofu with Vegetables,” which is fabulous puffed tofu. I am now going to research your sauces and other recipes. Thank you so, so much as I plan to make my own puffed tofu this week. Amy💜
Ruchama Burrell
Can this be baked in our air fryer? Seems as if it would be a perfect method.
Paul Madsen
We've yet to test it, but it should work!