This Easy Crispy Tofu is arguably one of the best ways to enjoy tofu. If you’ve never tried making it crispy, or if you’ve struggled, check out one of the three methods I’ll share in this post for the best crispy tofu ever.

This post may contain affiliate links. See our disclosure policy for details.
Hey Internet, this post is kind of a long time coming. SO MANY of my recipes either feature tofu or would pair perfectly with tofu. And when I say tofu in this instance, I mean crispy tofu.
Firm or super firm tofu that has a crisp exterior and a chewy yet soft (not too soft) texture on the inside. It’s amazing.
You can flavor the “breading” (my method is no-fuss though) with any spices you like, and add it to any sauce such as homemade vegan sweet and sour sauce or vegan teriyaki sauce, or store bought is fine too… I guess… Just kidding. But I do prefer homemade sauce.
It’s taken me a while to write this recipe only because I’m super “shiny-object” about recipes. I get an idea and I abandon everything else I’m working on to do it.
I mean, I’m glad I’m still that passionate about it after years of running this blog. But this crispy tofu recipe must happen.
Mostly because I said it would when I published my saucy tahini pasta which just happens to go perfectly with crispy tofu!
But I mean, what doesn’t? This stuff is so versatile and delicious, it will go with almost any dish and can be seasoned or sauced however you like. You could even just dip it in a sauce and eat it as a snack or appetizer.
Anyway, I’m going to share my three different methods for getting super crispy tofu depending on how much time you have and what kind of gear you have in your kitchen.
The airfryer method is not the fastest method (pan frying is), but it’s my favorite for two reasons. It’s hands-off (I shake the basket once halfway through but otherwise I’m free to do other things) and it allows me to use less (or no) oil.
What You’ll Need
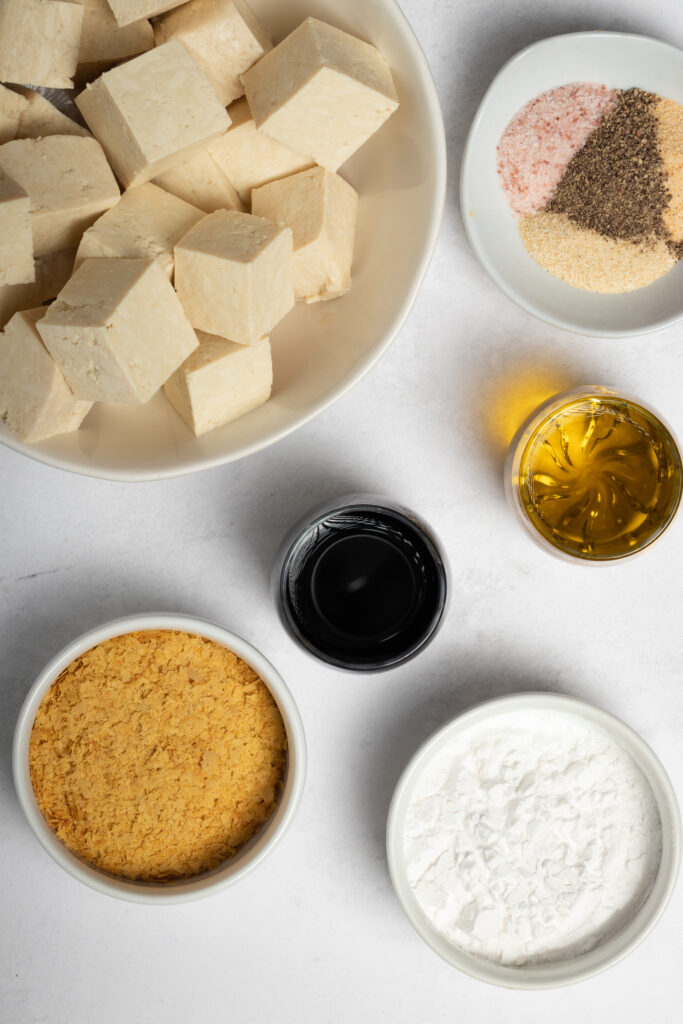
- Super firm tofu: I’m talking about the kind in the vacuum-sealed plastic, not a tub full of water. If you only have firm or extra firm tofu (that comes in water), you can still make this deliciousness. Drain all the water from the package and then use a tofu press or two plates or cutting boards, paper towels, and a heavy weight (like books or a cast iron pan) to press the tofu for 20-30 minutes. Otherwise the tofu may turn out soggy--I speak from experience. I recommend the super firm tofu if you can find it--I can usually find it in my local supermarket, Trader Joe’s, Asian market, and even Costco.
- Reduced sodium soy sauce: You can use regular soy sauce if you prefer, I just find it too salty for my tastes. Use gluten-free tamari if you can’t have gluten.
- Oil: So this is optional, BUT it will give you super crispy tofu. You absolutely can obtain crispy tofu without the oil, and when I’m just cooking it to have outside of a recipe, I don’t use oil. But adding it really will make it that much crispier. You can use any neutral high heat oil--I like to use avocado oil.
- Nutritional yeast: I know it sounds strange but it’s super savory and delicious here--and no, it does not make the tofu taste cheesy. But if you hate the stuff, replace it with plain old breadcrumbs (use gluten-free if needed).
- Arrowroot powder or cornstarch: This does two things for the tofu--it helps soak up any extra moisture and it also helps create a “skin” that will get crispy while cooking.
- Spices: You can use any you like. I usually start with a base of granulated onion, granulated garlic, black pepper, and sea salt. Often I will add paprika or smoked paprika. For Asian-inspired dishes I will add ground ginger. If putting in a curry, you could add turmeric or curry powder. I find layering the flavor to be very helpful with whatever dish I’m making. If watching sodium, leave out the salt.

How to Make Crispy Tofu
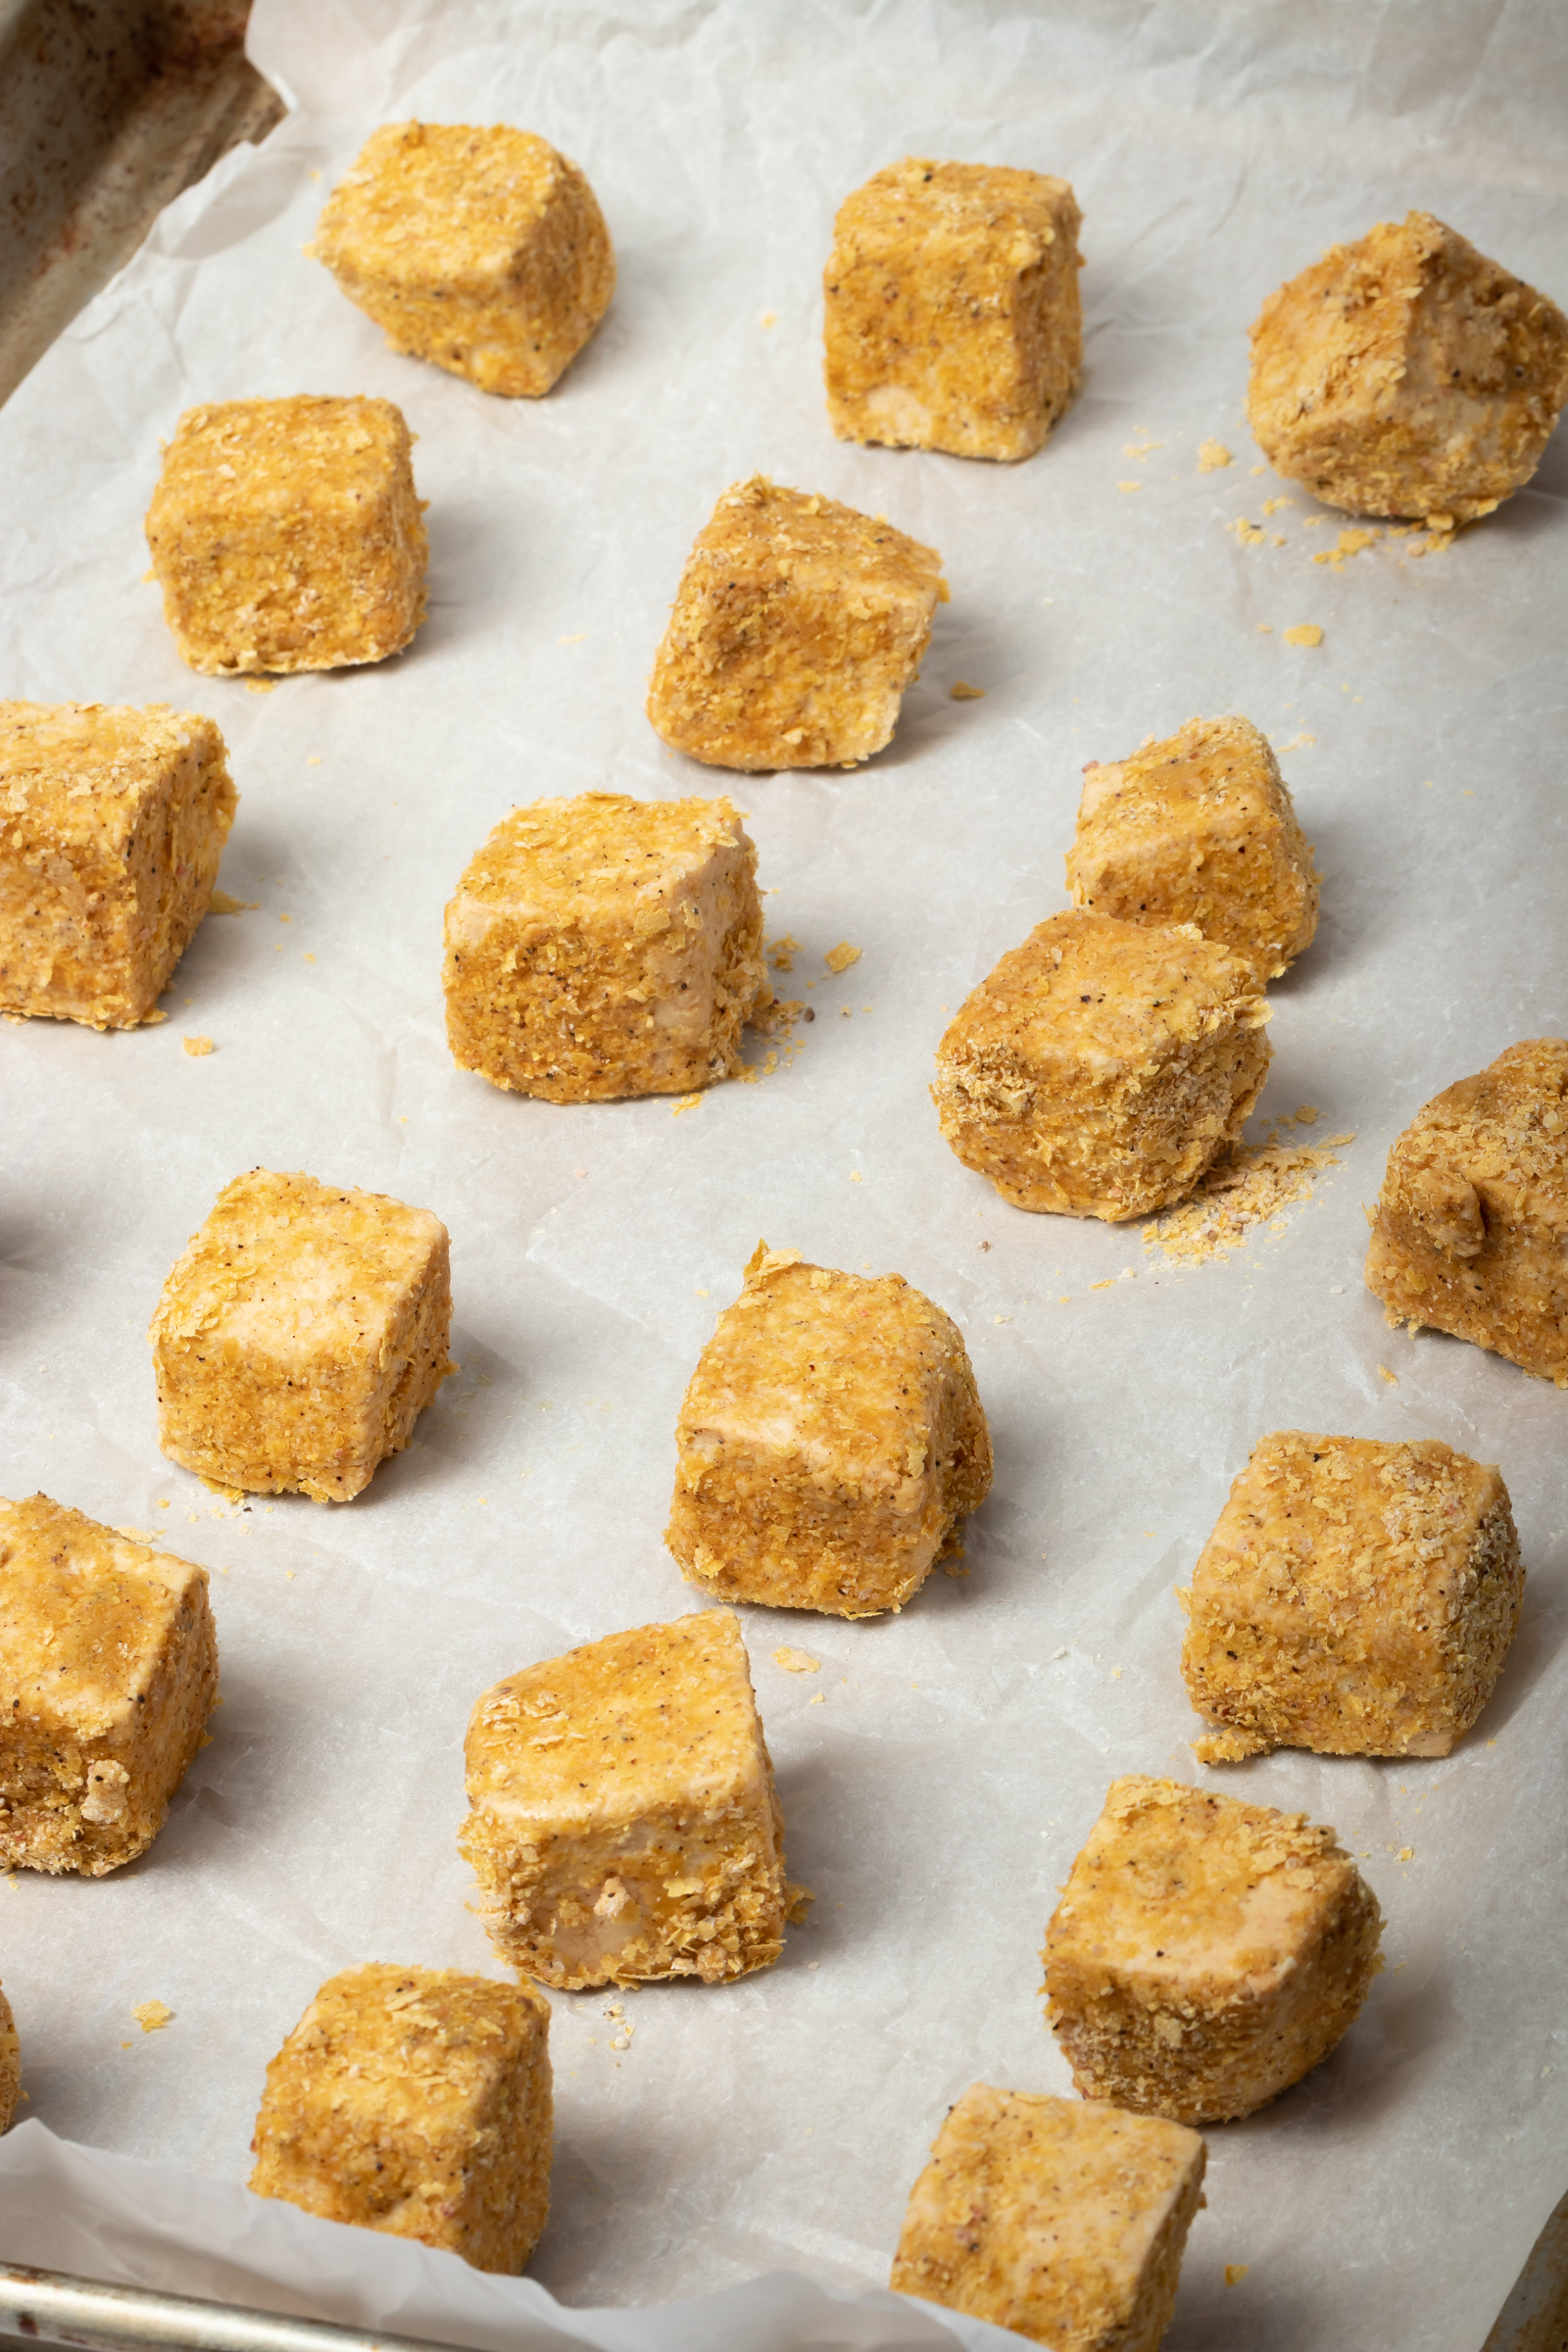
- Start by prepping your tofu. If you did not buy super firm tofu (the kind that comes vacuum sealed), drain out all the water and press the block of tofu in either a tofu press or between two plates/cutting boards with a heavy weight on them for 20-30 minutes. Waterlogged tofu will not get very crispy. Cube your super firm or pressed tofu in 1 inch cubes.
- In a large wide bowl, add your tofu and pour the oil (if using) and soy sauce over it. Mix gently with a spatula.
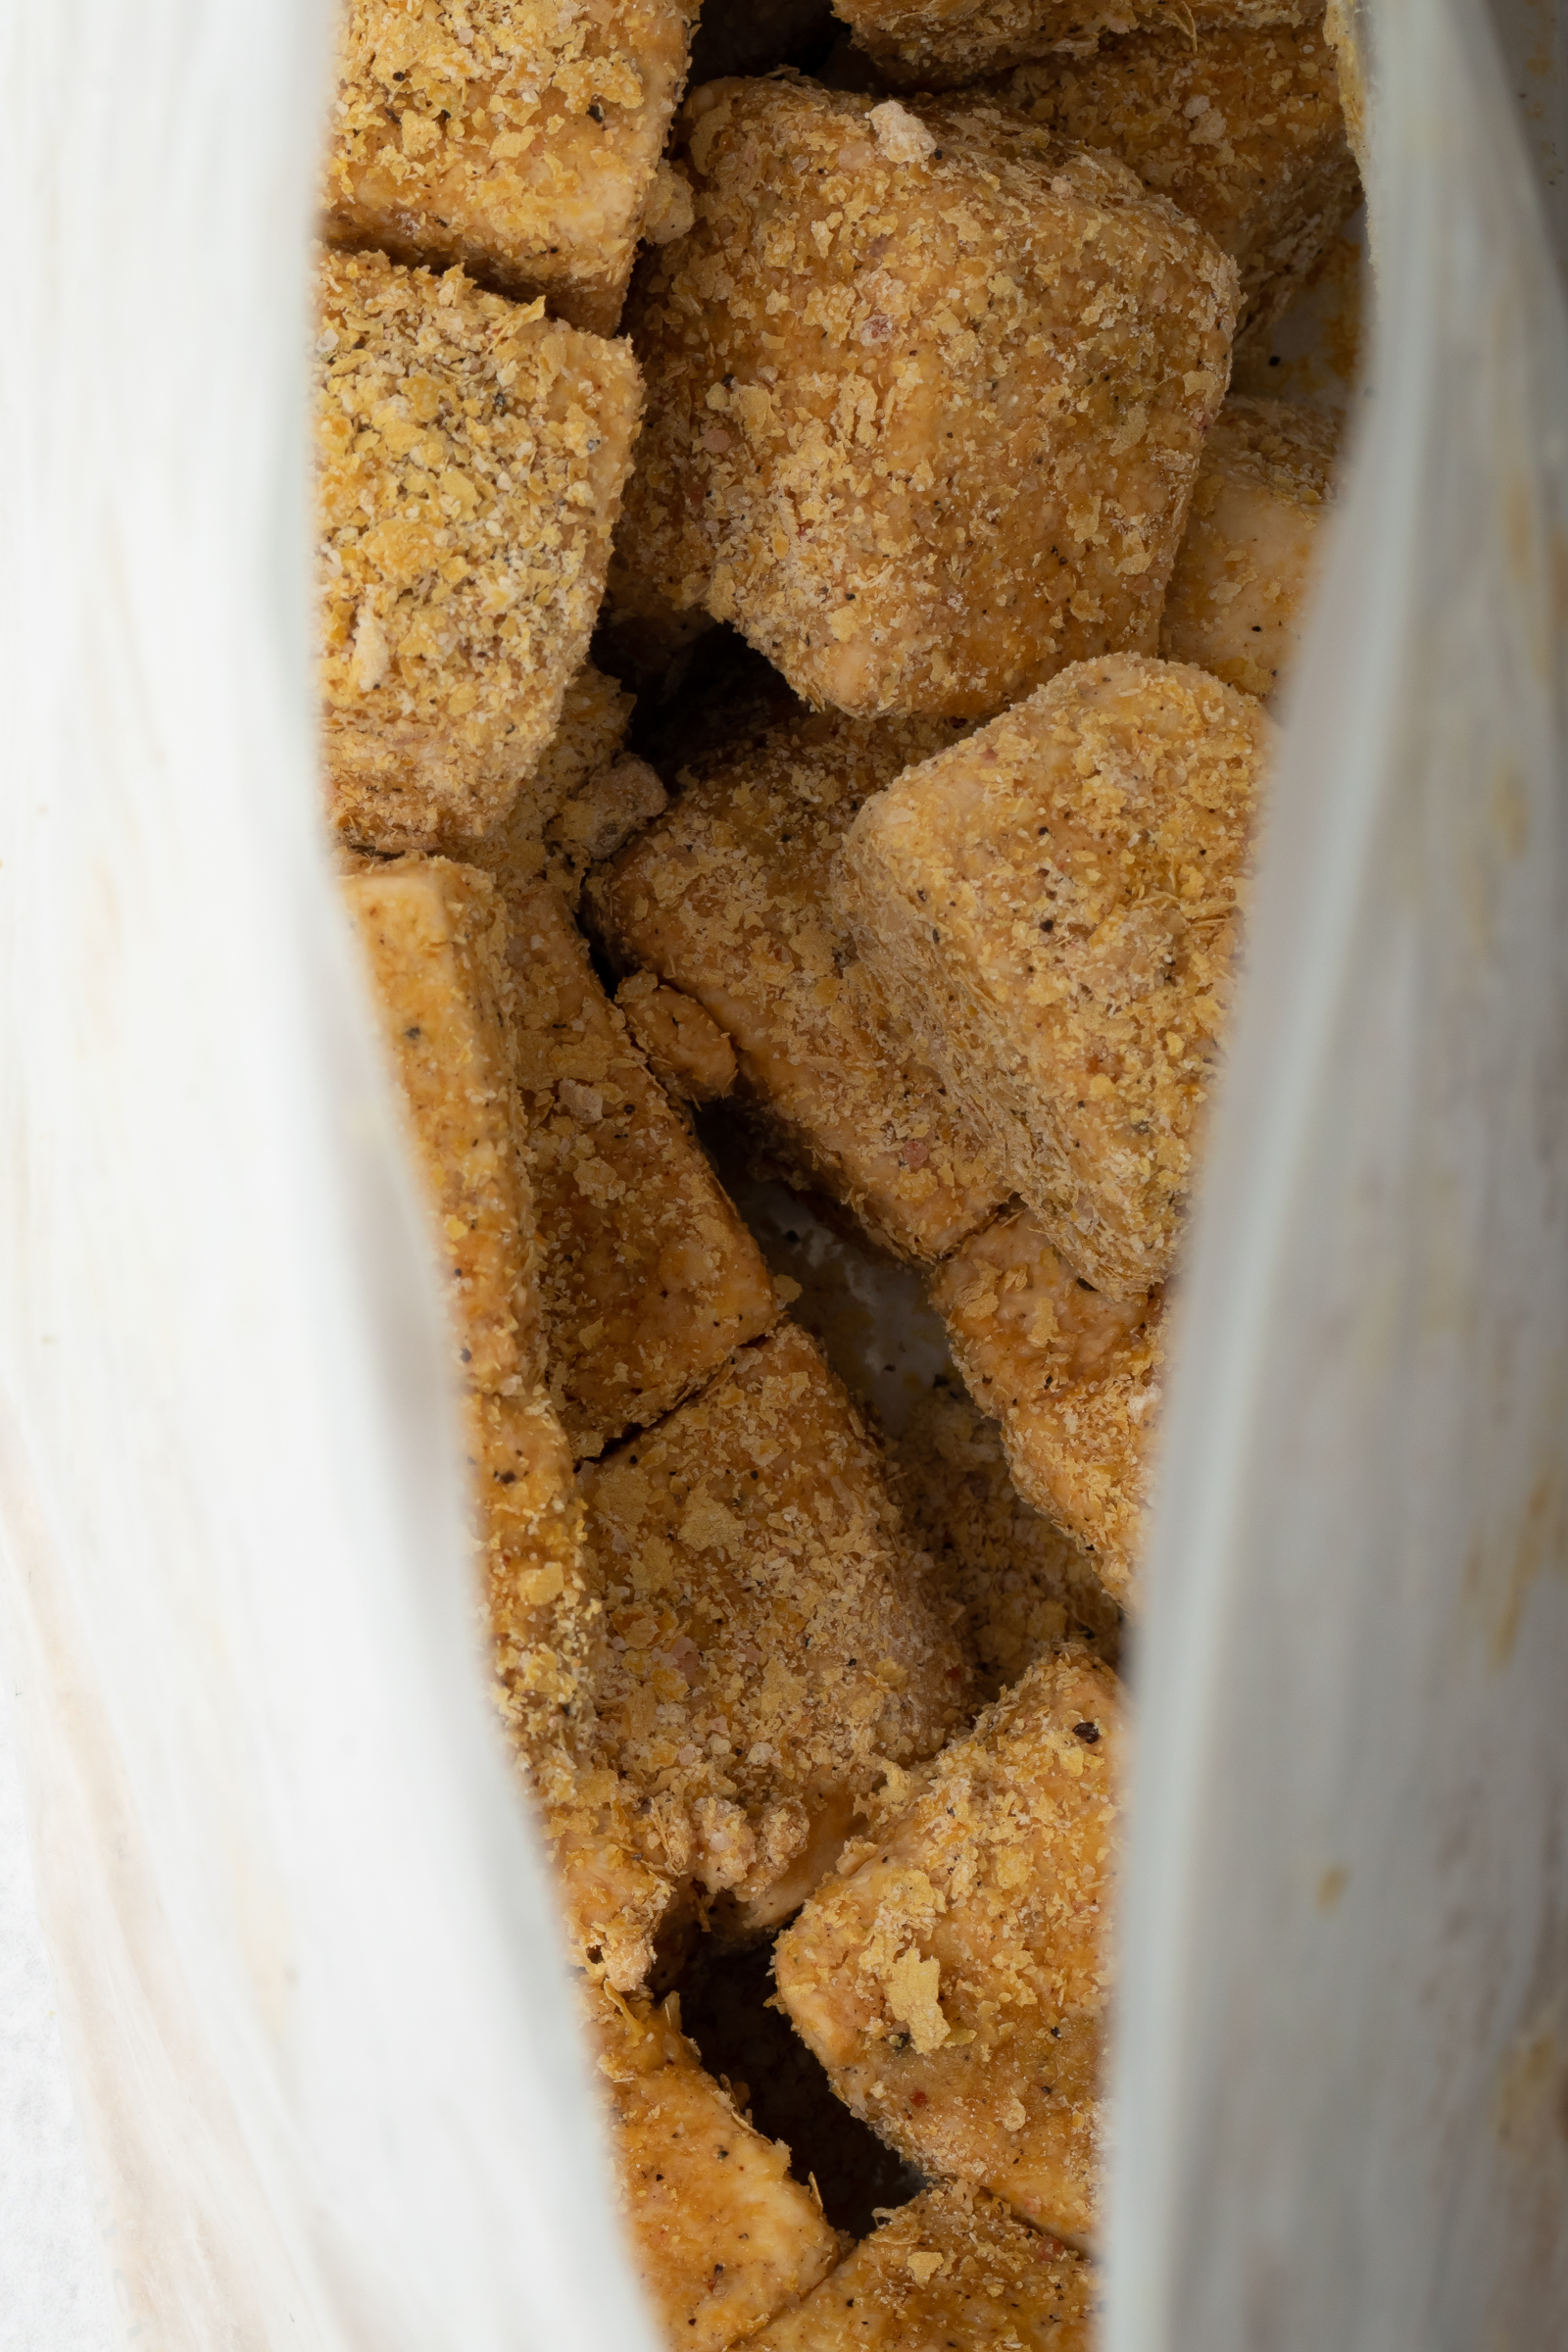
- In a gallon size reusable food storage bag (or another large bowl or container), mix together the nutritional yeast, arrowroot powder or cornstarch, and spices. I use the bag because I can just close it up and shake it.
- Add the tofu to the bag (shake off excess liquid as you do), seal the top, and shake it very well to coat the tofu completely. If using a bowl, gently toss the tofu in the breading until completely coated.
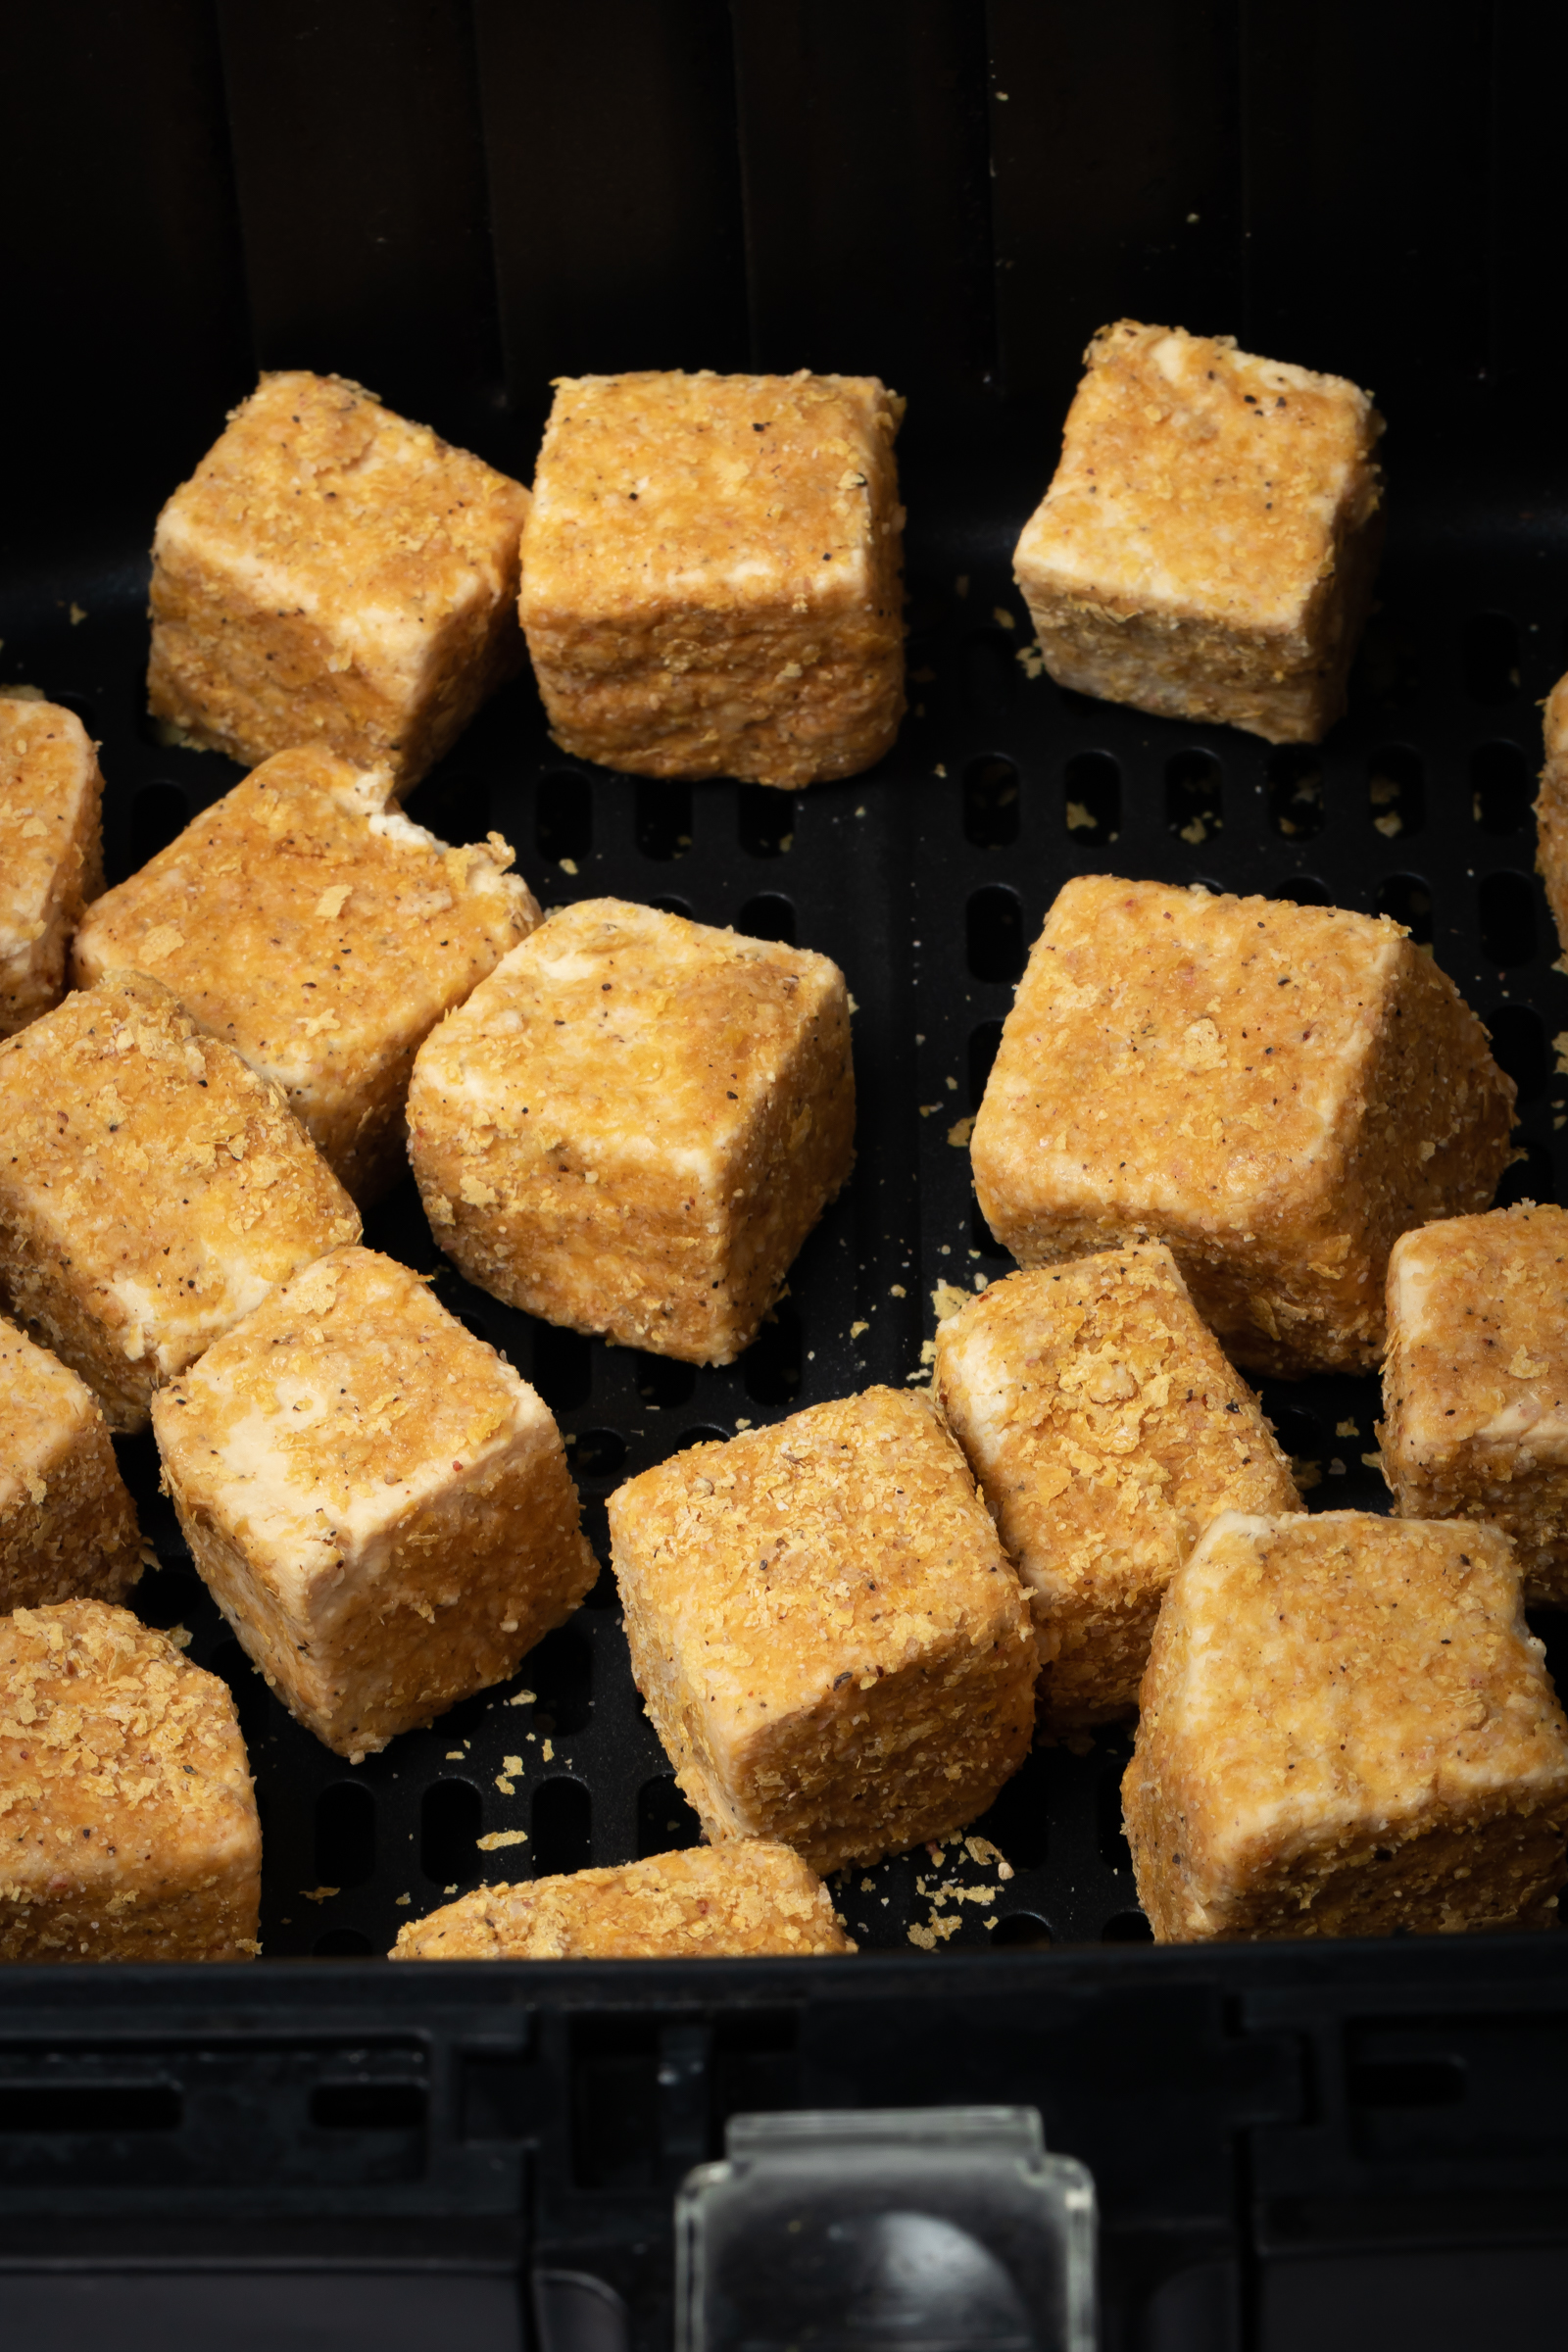
- Air Fryer Method: Add breaded tofu cubes to your air fryer in a single layer. Set it at 400 degrees Fahrenheit (or 205 degrees Celsius) for 20 minutes and shake the basket halfway through. Check the crispness. If you desire the tofu to be more crispy, cook for longer or you can give it a misting of avocado (or other) oil if you like and then cook it for a few more minutes. 20-22 minutes usually works perfectly for me.
- Oven Method: Preheat your oven to 425 degrees Fahrenheit (218 degrees Celsius) while you prep your tofu. Place breaded tofu cubes on a baking tray lined either with a silicone baking mat (I find this gets the tofu crisper) or parchment paper. Bake for 25-30 minutes, flipping the tofu and rotating the pan halfway through.
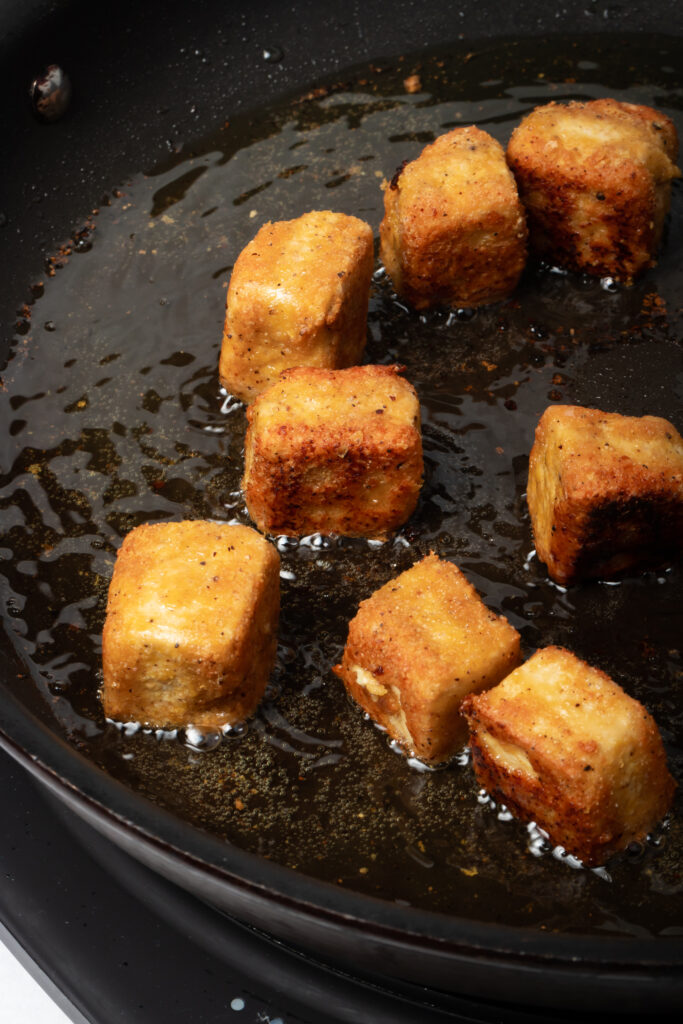
- Pan Frying Method: Heat a few tablespoons of a neutral, high heat oil (I use either avocado or grapeseed oil) in a large skillet (preferably non-stick I like this nonstick skillet from AllClad) over high heat. Heat until it begins to shimmer, usually about 30-60 seconds. Add half the breaded tofu cubes, giving them some good breathing room. Line a plate on the counter with paper towels. Cook the tofu until browned on each side. I prefer a medium dark brown, but you can cook to your preference. I prefer to flip my tofu with silicone tipped tongs. Once cooked, place each cube on the lined plate. Once you’re through cooking that batch, add the remaining cubes and cook them.
- Serve up your crispy tofu however you like and enjoy!
- Refrigerate leftovers for up to 4 days in an airtight container. I recommend reheating in the air fryer, pan, or oven to regain the crispy texture, although I have to say I really like the cold tofu… it’s not crisp anymore but it tastes really good anyway.
What to Eat with this Tofu
This crispy tofu goes with a LOT of things… but off the top of my head:
- Saucy Tahini Pasta
- Vegan Garlic Noodles
- Vegan Ranch Pasta Salad
- Cashew Pesto + Pasta
- Really anything you can think of, it’s such a versatile vegan protein.
More Tofu Recipes
If you’re looking for more recipes for tofu, I have a whole post dedicated to all my tofu recipes but here are my absolute favorites:
- Sticky Tofu
- Vegan Orange Chicken
- Tofu Adobo
- Puffed Tofu
- Sweet and Sour Tofu
- Vegan Beef and Broccoli
- Vegan Paella
Anything Else?
As always, I hope you love this recipe--I know I do, and Mr. Zardyplants does too. This our most-made dish because it’s so simple and goes with everything. Last night we had some with tahini pasta and tonight we’ll be having some in a kale salad.
This crispy tofu is:
- Versatile
- Flavorful
- Crispy (I’d hope!)
- Chewy
- Savory
- Satisfying
- Protein-packed
- And oh so delicious!
Let me know in the comments below if you make this recipe or tag me @Zardyplants on Instagram so I can see your beautiful recreations! If you tag me on IG, I will share your post in my stories :)
Also, one quick request: if you love how this recipe looks or tastes, please leave me a 5-star rating and a nice comment–ratings help more people find my recipes which helps me keep providing them! Thank you!
<3 Liz
Save this for later on Pinterest!


Easy Crispy Tofu (3 Ways!)
- Total Time: 20 minutes
- Yield: 3 cups 1x
- Diet: Vegan
Description
This Easy Crispy Tofu is arguably one of the best ways to enjoy tofu. Check out the three methods for the best crispy tofu ever!
Ingredients
- 16-ounce (454 grams) block of super firm tofu (vacuum sealed, see note 1 for other)
- 2 tablespoons reduced sodium soy sauce (use gluten-free tamari if needed)
- 2 tablespoons avocado oil (or other high heat oil), optional (see note 2 for oil-free)
- ¼ cup nutritional yeast (or substitute breadcrumbs)
- ¼ cup arrowroot powder or cornstarch
- 1 teaspoon garlic powder
- 1 teaspoon onion powder
- ¾ teaspoon sea salt, optional
- ½ teaspoon fresh cracked black pepper, optional
Instructions
- Prep tofu: If you did not buy super firm tofu (the kind that comes vacuum sealed), drain out all the water and press the block of tofu in either a tofu press or between two plates/cutting boards with a heavy weight on them for 20-30 minutes. Waterlogged tofu will not get very crispy. Cube your super firm or pressed tofu in 1 inch cubes.
- Mix wet ingredients with tofu: In a large wide bowl, add your tofu and pour the oil (if using) and soy sauce over it. Mix gently with a spatula.
- Make the dry mix: In a gallon size reusable food storage bag (or another large bowl or container), mix together the nutritional yeast, arrowroot powder or cornstarch, and spices. I use the bag because I can just close it up and shake it.
- Bread the tofu: Add the tofu to the bag (shake off excess liquid as you do), seal the top, and shake it very well to coat the tofu completely. If using a bowl, gently toss the tofu in the breading until completely coated.
- Air Fryer Method: Add breaded tofu cubes to your air fryer in a single layer. Set it at 400 degrees Fahrenheit (or 205 degrees Celsius) for 20 minutes and shake the basket halfway through. Check the crispness. If you desire the tofu to be more crispy, cook for longer or you can give it a misting of avocado (or other) oil if you like and then cook it for a few more minutes. 20-22 minutes usually works perfectly for me.
- Oven Method: Preheat your oven to 425 degrees Fahrenheit (218 degrees Celsius) while you prep your tofu. Place breaded tofu cubes on a baking tray lined either with a silicone baking mat (I find this gets the tofu crisper) or parchment paper. Bake for 25-30 minutes, flipping the tofu and rotating the pan halfway through.
- Pan Frying Method: Heat a few tablespoons of a neutral, high heat oil (I use either avocado or grapeseed oil) in a large skillet (preferably non-stick I like this nonstick skillet from AllClad) over high heat. Heat until it begins to shimmer, usually about 30-60 seconds. Add half the breaded tofu cubes, giving them some good breathing room. Line a plate on the counter with paper towels. Cook the tofu until browned on each side. I prefer a medium dark brown, but you can cook to your preference. I prefer to flip my tofu with silicone tipped tongs. Once cooked, place each cube on the lined plate. Once you’re through cooking that batch, add the remaining cubes and cook them.
- Serve: Serve up your crispy tofu however you like and enjoy! I like to serve mine with creamy tahini pasta but also basically anything from salads, potatoes, pastas, rice, or on its own.
- Chill: Refrigerate leftovers for up to 4 days in an airtight container. I recommend reheating in the air fryer, pan, or oven to regain the crispy texture, although I have to say I really like the cold tofu… it’s not crisp anymore but it tastes really good anyway.
Notes
- Note 1: Super firm tofu gets you the most crispy tofu for your buck. I’m talking about the kind in the vacuum-sealed plastic, not a tub full of water. If you only have firm or extra firm tofu (that comes in water), you can still make this deliciousness. Drain all the water from the package and then use a tofu press or two plates or cutting boards, paper towels, and a heavy weight (like books or a cast iron pan) to press the tofu for 20-30 minutes. Otherwise the tofu may turn out soggy--I speak from experience. I recommend the super firm tofu if you can find it--I can usually find it in my local supermarket, Trader Joe’s, Asian market, and even Costco.
- Note 2: The oil is optional, BUT it will give you super crispy tofu. You absolutely can obtain crispy tofu without the oil, and when I’m just cooking it to have outside of a recipe, I don’t use oil. But adding it really will make it that much crispier. You can use any neutral high heat oil--I like to use avocado oil.
- Note 3: The airfryer method is not the fastest method (pan frying is), but it’s my favorite for two reasons. It’s hands-off (I shake the basket once halfway through but otherwise I’m free to do other things) and it allows me to use less (or no) oil.
- Note 4: You can flavor the “breading” (my method is no-fuss though) with any spices you like, and add it to any sauce such as homemade vegan sweet and sour sauce or vegan teriyaki sauce, or store bought is fine too… I guess… Just kidding. But I do prefer homemade sauce. For the spices, add anything you like. Often I will add paprika or smoked paprika. For Asian-inspired dishes I will add ground ginger. If putting in a curry, you could add turmeric or curry powder. I find layering the flavor to be very helpful with whatever dish I’m making. If watching sodium, leave out the salt.
- Cook Time: 20 minutes
- Category: Entree
- Method: Baking
- Cuisine: Tofu


Evan
I am NOT a fan of tofu usually but I decided to try this recipe. The crunchy little bites are delicious, especially accompanied by a sriracha dip. (I would have posted a photo but I ate them before I thought of it) Thanks!
Susan K
This worked really well! The tofu was crisp and held up to sauce without getting soggy. My son ate half a block of tofu this way! Will definitely make again!
Beth
My favorite way to cook tofu!! love it in the air fryer. Thank you!
Kat
Delicious! Great flavour, saving to make again!
Dee-Dee
Very easy and one of the better crispy tofu recipes I have tried.