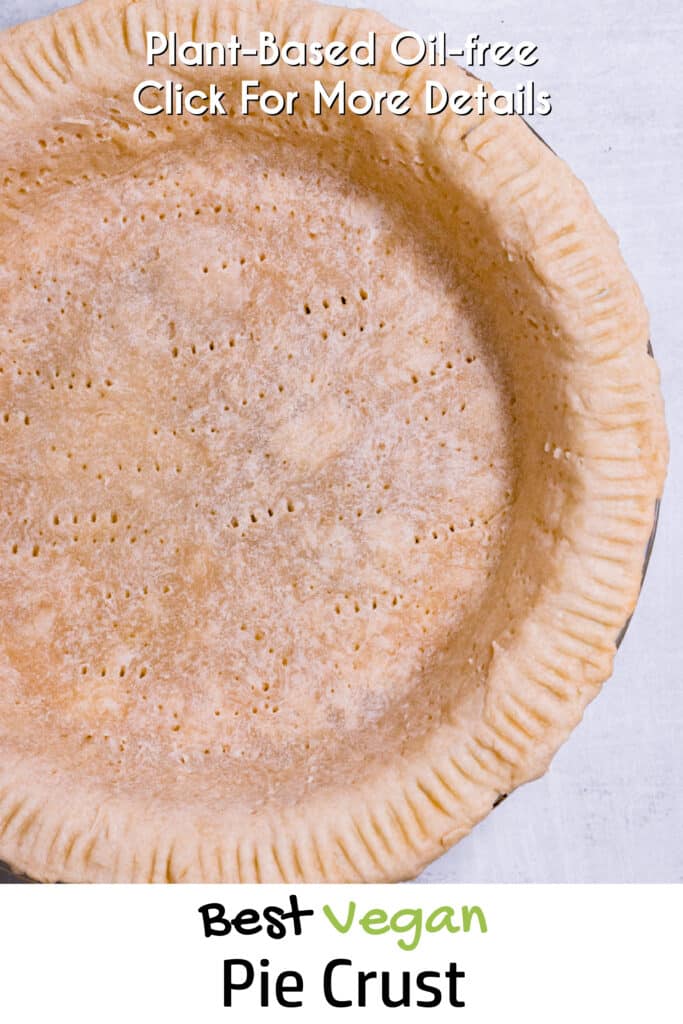
This traditional roll-out Easy Vegan Pie Crust is actually oil and butter-free, made from a simple swap and all the normal ingredients. It’s actually SO EASY you’ll want to make pies more often!

This post may contain affiliate links. See our disclosure policy for details.
Hey Internet, I gotta be honest here: I put off this recipe for a long time. Not because I didn’t want to make it, but… well yeah, I didn’t want to make it.
It seemed hard. No, it seemed impossible.
I’m not a person who rolls out a lot of dough. I did it with success for my vegan graham crackers, but otherwise it’s not a regular practice for me.
But I REALLY wanted to make a vegan pumpkin pie for you all so I came up with this recipe for a vegan pie crust.
This pie crust is completely delicious and surprisingly easy, so in that aspect I succeeded.
Does it look like it belongs in a magazine or was made by a professional chef? No, not at all. Many of you will probably make much nicer looking pies than this.
However, this pie crust is easy, and it does taste delicious, and it totally does the job just fine. And I can only get better from here!
I’ll definitely be making this pie crust again, and for other pies as well. I want to try and use for my vegan chocolate pecan pie recipe for sure, and now I want to make apple pie, and cranberry pie, and in the summer I can make berry pies…
Ooh, what about a vegan chicken pot pie with this crust?!
I’m getting ahead of myself here.
If you want an easy vegan pie crust that happens to be oil-free (can sub oil, read my substitutions section below), then just keep on reading.
Did I mention it only takes 15 minutes to throw together? That INCLUDES rolling it out (you can always refrigerate or freeze it before you roll it out).
Of course you’ll also probably want to blind bake the crust (bake the crust without filling so it stays firm), so I’ve included instructions for that as well.
Let’s dig in-- er, roll in!
What You’ll Need
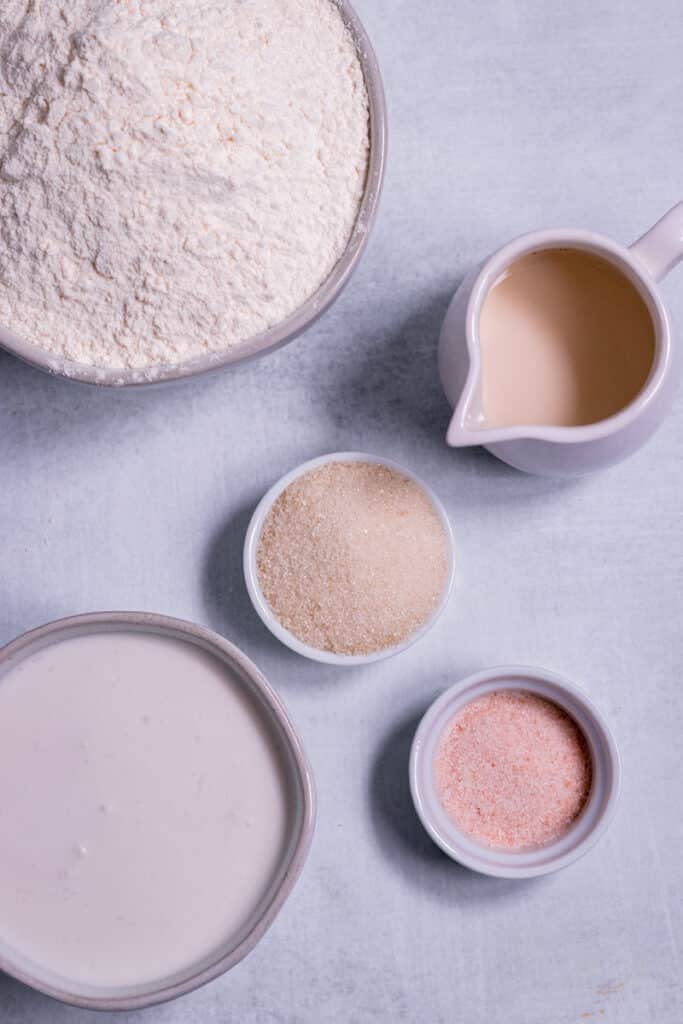
This is a fairly simple recipe. You’ll need some flour, a pinch of salt, and some non-dairy milk.
To substitute the oil, I used full fat canned coconut milk (I actually use coconut cream because you get more of the good stuff and less of the water) in addition to the non-dairy milk which helps to hydrate the dough and not make it too heavy.
You might be able to just use coconut milk and no non-dairy milk, but I haven’t tested it.
Because I was making this pie crust for a sweet pie, I added a bit of sugar. It doesn’t make the pie crust particularly sweet (since it only works out to a tablespoon and a half per crust), but I tried it without and with, and I liked the version with the sugar better.
However, you can definitely leave out the sugar for a savory crust!
And you really can’t taste the coconut at all. It just tastes like a delicious standard pie crust!
This recipe makes TWO pie crusts. That could be two pies or a top and a bottom to one enclosed pie.
If you just need the bottom, you can freeze the other ball of dough (wrap it tightly in plastic wrap, then freezer paper) for up to 3 months, or you can just halve the recipe if you don’t think you’ll use the dough in that time.

What Substitutions Can I Make?
Flour
I have only tested this recipe with unbleached All Purpose flour. I would highly recommend using this type of flour unless you have a gluten allergy.
Whole wheat flour might work. I would have more coconut milk on stand-by if you try this, as whole wheat flour tends to require more moisture.
If you’d like to try this with gluten-free flour, I’d recommend using a good quality all purpose gluten-free blend. I really like King Arthur Measure for Measure Gluten-Free Flour. I also really like Bob’s Red Mill 1:1 Gluten-Free Flour.
Again, you may need more coconut cream for these, so pay attention to the texture of your dough. It should be tacky, but not sticky. It should come together quite quickly, and pack together in a neat ball.
Coconut Milk
I don’t cook with oil, so I used coconut milk as the fat in this recipe. Pie crusts need fat, so I don’t know how this recipe would turn out if you used straight up low fat non-dairy milk.
If it works for you I’d love to hear about it!
Otherwise, you can substitute a neutral oil (like vegetable oil) or melted vegan butter for the coconut milk if you wish.
Sugar
As mentioned above, the sugar in the crust is absolutely optional. You should not need to substitute it with anything if you decide not to add it. You could use an unrefined sugar if you wish, like coconut sugar.
How to Properly Measure Flour
We want to measure our flour by weight, not by volume. When you scoop flour out of a bag or tin with a measuring cup, you're packing it in there and not necessarily getting the same amount each time.
What's better is to use a food scale with a tare function (allowing you to zero out the scale after you've put the bowl on it so your bowl isn't playing a factor in your equation).
Working in grams, put your bowl on the scale and zero it out. Scoop the flour into the bowl until you reach the desired measurement.
Tips for Making This Easy Vegan Pie Crust
- My number one tip? SIFT. YOUR. FLOUR! A flour sifter is not that expensive--you can also use a fine mesh strainer--and it doesn’t take but a few minutes. It makes a world of difference in keeping lumps out of your crust. You’re rolling out your crust fairly thin, so it’s ideal to have a smooth textured dough.
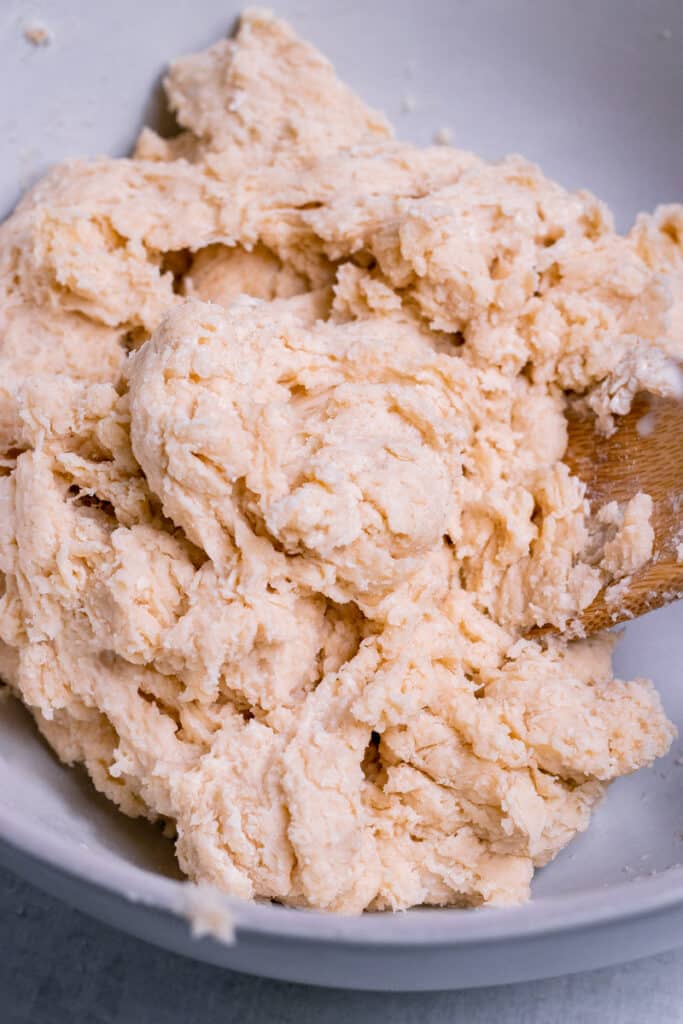
- So start by whisking your sifted flour with the salt and sugar (if desired).
- Make a well in the center with a wooden spoon or a spatula and add both the coconut milk and the non-dairy milk. Mix well until it comes mostly together. It should be lightly tacky, but not sticky. It won’t be firm yet and that’s OK.
- Line your work surface with wax paper. I was able to find vegan waxed paper (using soybean wax) at my local chain grocery store). Shiny side up. You may want to do two side by side layers, slightly overlapping to make a large enough crust depending on the size of your pie dish.
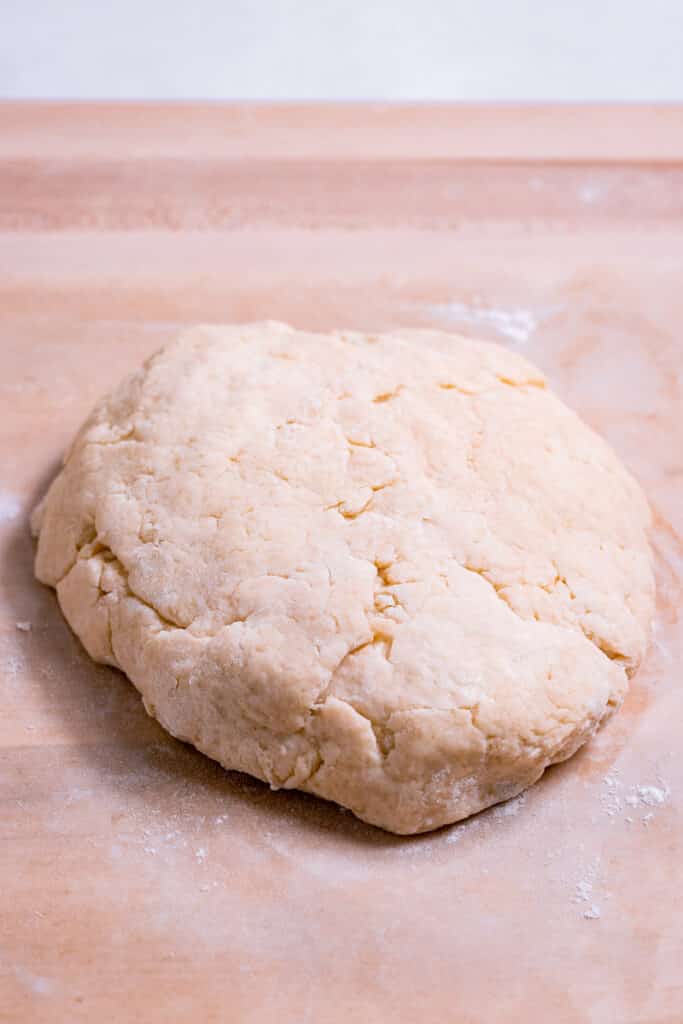
- Place your dough on there and cut it in half. I like to use my scale again to make sure I divide it perfectly in half (i.e. if my dough ball weights 800g, I make sure each piece is 400g).
- If you’re not going to use it right away, tightly wrap the other ball in cling wrap and set aside. (See instructions below for freezing.)
- For the ball you're going to roll out, place it on the shiny side of the wax paper, make it into a sphere and flatten it with the palm of your hand.
- Cover the top of the dough with another sheet (or sheets) of wax paper, this time shiny side down. You want to make sure nothing sticks.
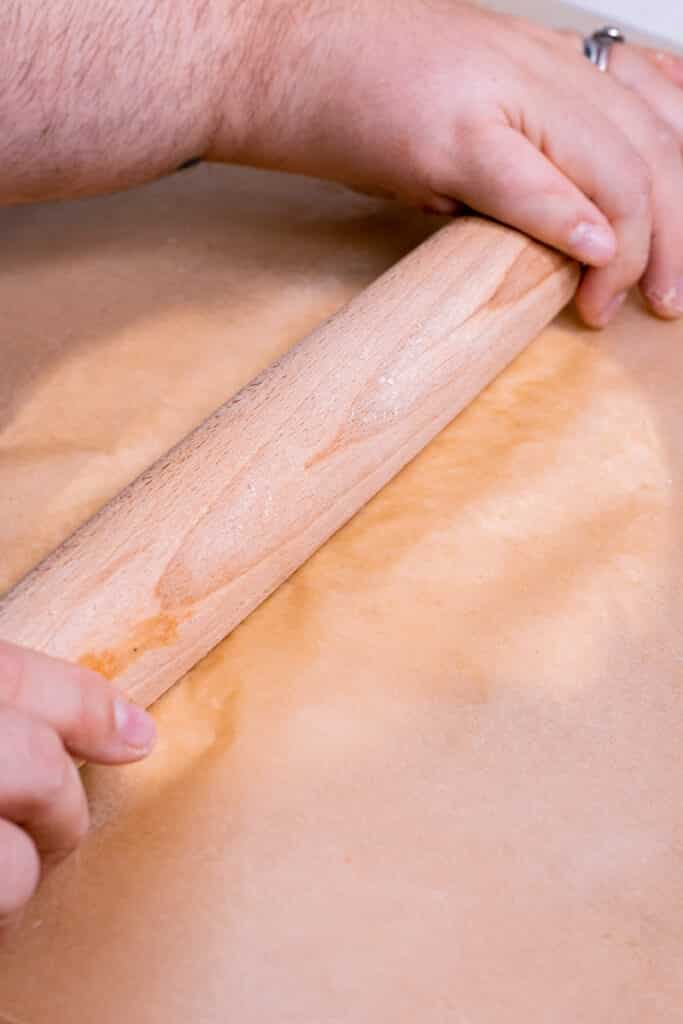
- Use a rolling pin to roll out the dough. Use the wax paper to turn the dough as you roll it out, trying to maintain a circular shape and an even thickness.
- Now we can transfer it into the pie dish. If you want your pie crust to stay nice and dry, it’s recommended that you don’t grease the dish. However, the pie is harder to get out of the dish if you don’t grease it, so your call. I personally did grease my pie dish.
- Flip the paper holding the pie crust into the pie dish carefully, pressing down with one hand while you peel off the paper with the other.
- Now, conform the inside of the crust to the nooks and crannies of your pie dish.
- If you have any thin spots, use excess dough (anything that overlaps the edge of your pie dish) to patch them. You may want to use a dab of cool water on your fingers to help seal the edges of the patch.
- Similarly, any thicker spots should be pressed out so you have a relatively even crust.
- For the edges, you can crimp, flute, or pinch the edges to look any way you please. I prefer a simple crimp, which is super easy to do with a fork. Simply press the tines of the fork all around the lip of the pie dish. There are lots of tutorials online if you prefer to flute, but due to the disability in my hand I am not able to do them very well.
- Now use your fork to poke holes all over your pie crust. This is so the crust doesn’t puff up when we bake it!
- Finally, we’ll want to chill the pie crust before we blind bake it, as this creates a stronger crust and keeps the pie shell from shrinking down the sides while baking. You’ll need to chill it at least an hour in the fridge (or only half an hour in the freezer), but you can refrigerate it up to 24 hours with no real issue, so it’s great if you’d like to prepare the crust one day and the filling the next.

Blind Baking the Pie Crust
When I first started reading about pie crust techniques, like, a year ago, I was super intimidated about blind baking it. That just seemed like a complicated thing that bakers do.
But it’s actually really simple and easy.
All you really need to do is bake the crust (cold from the fridge) for about 10-20 minutes in a 375 degree Fahrenheit (191 degrees Celsius) oven, but here’s a few tips for the best pie crust:
- In addition to the holes in the crust, use pie weights (you’ll need 2 packs) or dried beans (about 2 pounds) in a layer of parchment paper for the first half of the baking process. Then take them out and bake the bottom for the rest of it.
- Add warm filling to your warm crust and bake it right away. Turn down the oven to the heat you need for the pie but don’t let too much time pass in between the process.
- You only need to FULLY blind bake a pie crust if you’re making a no-bake pie. That’s because you’d need it to hold up to a potentially wet filling, and also just because raw flour is unsafe to eat.
- Partial blind baking is what I’m recommending here and this is what you do if your filling requires a shorter baking time, is wet like a custard or pumpkin pie, or if you want it extra crispy so it can hold up to something like an apple pie filling (coming soon!).
Troubleshooting the Pie Crust
Having issues? I had a lot, so I tested and retested, and felt like this was a great recipe. However, flour brands, coconut milk brands, pie dishes, temperatures, work surfaces, and even bakers all differ, so here’s a few ideas for troubleshooting any issues you might be having.
Dough is too sticky
Add a pinch of flour and mix well
Dough won’t come together / is powdery
Add a tablespoon of non-dairy milk
Dough stuck to sides of work surface
Did you use the shiny side of wax paper to keep this from happening? That’s the best way I can think of to stave off this issue.
If it’s still sticking, it’s probably the wrong consistency, so sprinkle little bits of flour while you pry it up with a bench scraper or metal spatula.
Dough folded in on itself while flipping
That happened to me once or twice. If you can easily unstick it, you’re in the clear.
But if it’s totally stuck, take it back off, re-roll and try again. It just takes a little practice.
Dough is too thin in areas and I ran out of extra from the edges
Take from your other ball of dough and chalk it up to varying sizes.
Increase the recipe next time (I usually do that by 25 - 50% if I’m having those sorts of issues. Better to have too much than too little.) knowing that your pie dish may be wider or taller than the ones I wrote this recipe for (quick note I used a standard 9.5” Pyrex glass pie dish).
Pie crust browned on the edges and still have to cook it again
If your pie crust is already well browned after you blind baked it, either your oven was too hot (ovens differ) or maybe the crust was too thin on the edges, not sure.
Either way, you can protect the edges from burning by creating a collar for your crust. Cut a ring of aluminum foil and cut a large hole in the center.
This will allow your pie to bake evenly while protecting your crust.
Pie came out well but pie crust was too thin on the bottom
Next time roll out your pie crust thicker.
Pie came out well but pie crust was too wet or flimsy on the bottom
This can happen especially if your pie filling is quite wet, like pumpkin pie or custard pie.
Blind bake your crust longer next time, or rather, blind bake it with weights for only 10 minutes but increase the baking time without the weights until the inside of the pie crust (the floor of the pie) is dry and beginning to harden).
Storing Extra Dough
If you have exactly half the recipe left over, you can use it as another pie crust in the future. If you dipped into this half for scraps, you can still save it for scraps when you make your next pie.
Make the dough into a neat ball and tightly wrap it in cling wrap. Then wrap it in freezer paper, note the date somewhere on the packaging, and freeze up to 3 months.
When you’re ready to use it, thaw it out and use as you would!
More Vegan Baking Recipes
Like baking from scratch? Me too! Even though you can buy pie crusts from the store, and it’s very convenient, it’s still kinda fun to make it from scratch. I think it also tastes much better.
Here are some other recipes for vegan baked goods that I’ve really enjoyed making!
- Vegan Challah Bread (a traditional Jewish braided bread that’s soft and quite easy)
- Pizza Dough (complete with instructions on making pizza)
- Vegan Matcha Pound Cake
- Vegan Graham Crackers which I used to make Vegan Smores!
- Apple Cake
- Vegan Coffee and Walnut Cake
- Banana Bread
- Lemon Blueberry Muffins
- Chocolate Banana Muffins
- Coconut Cake
Anything Else?
As always, I hope you love this easy vegan pie crust recipe–I know I do and so does Mr. Zardyplants. He REALLY enjoyed the pie I made for him using this crust.
Let me know in the comments below if you make this recipe or tag me @Zardyplants on Instagram so I can see your beautiful recreations! If you tag me on IG, I will share your post in my stories :)
Also, one quick request: if you love how this recipe looks or tastes, please leave me a 5-star rating and a nice comment–ratings help more people find my recipes which helps me keep providing them! Thank you!
<3 Liz
Save this for later on Pinterest!
Follow me on Social Media!
Follow my blog with Bloglovin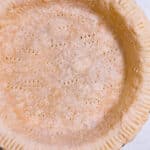
Easy Vegan Pie Crust (oil-free)
- Total Time: 1 hour, 35 minutes
- Yield: 2 9.5” pie crusts 1x
- Diet: Vegan
Description
This traditional roll-out Easy Vegan Pie Crust is actually oil and butter-free, made from a simple swap and all the normal ingredients.
Ingredients
- 550g unbleached AP flour (about 4 ⅜) (see note 1, measure properly for success)
- 1 ¼ tsp sea salt
- 3 tbsp sugar, optional
- 1 cup coconut cream (see note 2)
- ⅓ - ½ cup non-dairy milk (start with ⅓)
Instructions
- Sift flour: A flour sifter is not that expensive--you can also use a fine mesh strainer--and it doesn’t take but a few minutes. It makes a world of difference in keeping lumps out of your crust. You’re rolling out your crust fairly thin, so it’s ideal to have a smooth textured dough.
- Make the dough: Whisk sifted flour with the salt and sugar (if desired). Make a well in the center with a wooden spoon or a spatula and add both the coconut milk and the non-dairy milk. Mix well until it comes mostly together. It should be lightly tacky, but not sticky.
- Prep work surface: Line your work surface with wax paper. I was able to find vegan waxed paper (using soybean wax) at my local chain grocery store). Shiny side up. You may want to do two side by side layers, slightly overlapping to make a large enough crust depending on the size of your pie dish.
- Divide dough: Place your dough on there and cut it in half. I like to use my scale again to make sure I divide it perfectly in half (i.e. if my dough ball weights 800g, I make sure each piece is 400g). If you’re not going to use it right away, tightly wrap the other ball in cling wrap and set aside. For the ball you're going to roll out, place it on the shiny side of the wax paper, make it into a sphere and flatten it with the palm of your hand.
- Roll out the dough: Cover the top of the dough with another sheet (or sheets) of wax paper, this time shiny side down. You want to make sure nothing sticks. Use a rolling pin to roll out the dough. Use the wax paper to turn the dough as you roll it out, trying to maintain a circular shape and an even thickness.
- Transfer: Now we can transfer it into the pie dish. If you want your pie crust to stay nice and dry, it’s recommended that you don’t grease the dish. However, the pie is harder to get out of the dish if you don’t grease it, so your call. I personally did grease my pie dish. Flip the paper holding the pie crust into the pie dish carefully, pressing down with one hand while you peel off the paper with the other.
- Prep the shell: Now, conform the inside of the crust to the nooks and crannies of your pie dish. If you have any thin spots, use excess dough (anything that overlaps the edge of your pie dish) to patch them. Similarly, any thicker spots should be pressed out so you have a relatively even crust.
- Get fancy: For the edges, you can crimp, flute, or pinch the edges to look any way you please. I prefer a simple crimp, which is super easy to do with a fork. Simply press the tines of the fork all around the lip of the pie dish. There are lots of tutorials online if you prefer to flute, but due to the disability in my hand I am not able to do them very well.
- Poke holes: Now use your fork to poke holes all over your pie crust. This is so the crust doesn’t puff up when we bake it!
- Chill out: Chilling keeps the pie shell from shrinking down the sides while baking. You’ll need to chill it at least an hour in the fridge (or only half an hour in the freezer), but you can refrigerate it up to 24 hours with no real issue, so it’s great if you’d like to prepare the crust one day and the filling the next.
- Blind bake the crust: Bake the crust (cold from the fridge) for about 10-20 minutes in a 375 degree Fahrenheit (191 degrees Celsius) oven, but for the best pie crust, use pie weights (you’ll need 2 packs) or dried beans (about 2 pounds) in a layer of parchment paper for the first half of the baking process. Then take them out and bake the bottom for the rest of it. See more tips in the article above for troubleshooting and more.
- Make a pie: Now you’re ready to make a pie. If you’re making a no bake pie you’ll want to fully bake this crust till it’s golden brown but if you’re making a pie that you have to cook like my vegan pumpkin pie, try to add the filling while the crust is still warm for best results. And happy baking!
Notes
- Note 1A: I have only tested this recipe with unbleached All Purpose flour. I would highly recommend using this type of flour unless you have a gluten allergy. Whole wheat flour might work. If you’d like to try this with gluten-free flour, I’d recommend King Arthur Measure for Measure Gluten-Free Flour or Bob’s Red Mill 1:1 Gluten-Free Flour.
- Note 1B: Please properly measure your flour (I have a nice quick tutorial in the article above). Using cups is dangerous because it’s highly inaccurate and you may not have good results. A kitchen scale with a tare function is cheap and much more accurate. Weigh your flour.
- Note 2: I don’t cook with oil, so I used coconut cream as the fat in this recipe. Pie crusts need fat, so I don’t know how this recipe would turn out if you used straight up low fat non-dairy milk. If it works for you I’d love to hear about it! Otherwise, you can substitute a neutral oil (like vegetable oil) or melted vegan butter for the coconut cream/milk if you wish.
- Note 3: I have a troubleshooting section in the article above if you run into any issues.
- Prep Time: 15 minutes
- Cook Time: 20 minutes
- Category: Ingredient, Dessert
- Method: Baking
- Cuisine: American

Kate
Hi there! Is this made with coconut milk or coconut cream? The recipe says coconut cream, but note 2 says coconut milk. I want to make sure I use the proper ingredient. Thanks!
💚 Liz
Hi! You want coconut cream, but certain coconut milks work too. You basically want solid coconut fat. You can shake the cans at the store to get a sense of what the contents are. I use Whole Food's 365 brand frequently.