Soft yet chewy and bready, these delicious Vegan Bagels are incredibly delicious and so easy to recreate at home with minimal equipment. Toast and top your bagels with vegan cream cheese, avocado, or make it into a sandwich.

This post may contain affiliate links. See our disclosure policy for details.
Hey Internet, so as you may know, I recently published my Plant-Based Jewish Recipes e-book, and one of my favorite things from that book is homemade vegan bagels!
Why am I releasing this recipe on my blog for free, then? If I’m being honest, my hope is that it will entice you to purchase the book, but it’s also because this is just such an amazing recipe (not trying to sound arrogant) that I just really wanna share it with you, my awesome readers.
I seriously am grateful for all of you. Without you, I wouldn’t be here, and I just LOVE being here and sharing my recipes with you. It makes me absolutely giddy when you make my recipes and love them.
OK thanks for coming to my TED talk.
Time to talk about bagels.
These surprisingly easy vegan bagels are chewy, delicious, and perfect for breakfast or the base of a sandwich. The chewy texture is definitely unlike anything you could buy at a store. Flavor them how you like -- we’ve gone for Everything seasoning!
Isn’t the base recipe for bagels vegan already, you may ask? Yes, actually. Most plain and a few flavored bagels (everything style, poppy seed, salt, sometimes raisin (though those often have added butter or milk) are vegan, though store bought bagels sometimes add non-vegan ingredients like whey (milk) or certain preservatives.
But I’ve actually used coconut milk IN my dough to enrich it, an optional but AMAZING step that creates an almost brioche type of flavor in a bagel.
These homemade bagels are so much better than store bought (they don’t contain any preservatives like store bagels do!) and I honestly think you’ll never go back to those if you try my bagels.
My bagels are unlike any other, and you can easily double the recipe and freeze some for later. Bagels freeze wonderfully and make for a quick and easy breakfast.
What are New York style bagels and why do Jews (and New Yorkers) rave about them?
New York style bagels are chewy and firm, yet soft inside, with a flavorful, shiny, even crispy crust. No coffee shop bagel can compare, let alone a store-bought bagel *cough/snicker*.
I’m from the part of New York that most New Yorkers scough at: upstate. But I still love and appreciate a good New York style bagel! Must be my Jewish heritage.
Anyway, let’s dive into this amazing vegan bagel recipe (if I do say so myself).
What You’ll Need
So the first thing that you’ll need is bread flour or other high gluten flour. All purpose flour will not be able to produce a nice firm chewy bagel, though if you’re OK with a much softer and inferior (sorry not sorry) bagel, go right ahead and use AP flour.
Could you use whole wheat flour? Yes, I actually think you could, and it might taste pretty good. It might be not quite as deliciously chewy as a bread flour bagel, but it’s certainly worth a try, especially if you’re interested in eating more whole grains. You could also experiment with spelt flour.
I actually recommend you wait and try experimenting with the flour until AFTER you’ve made this recipe as written once or twice.
I’ve tested and retested this recipe to make it awesome for you all and I also think that it can be challenging to really know how you can alter a recipe without ever having made it. I speak from experience as a recipe developer (hi, you’re reading my blog, obviously).
Also, if you’ve never made bagels before, it’s a slight bit different than other breads like my vegan challah, in that we’re looking for quite a firm dough, so we’re doing things like purposefully working in more flour while kneading the dough.
Make my recipe as written, learn how the dough should feel, then experiment with flour type. You’ll know whether to add more liquid or more flour based on the feel of the dough rather than guesswork.
ANYWAY, sorry for that diatribe. A challenging part of having a recipe blog is having people alter your recipes and then be upset with you the blogger that it didn’t work.
Back to the recipe, I mentioned above that I added coconut milk into my recipe. This is an optional step but I recommend it because it makes a fabulously luscious and rich dough.
It’s not very much coconut milk (it works out to less than a tablespoon per bagel) but it does so much. And I promise it doesn’t make the bagels taste like coconut.
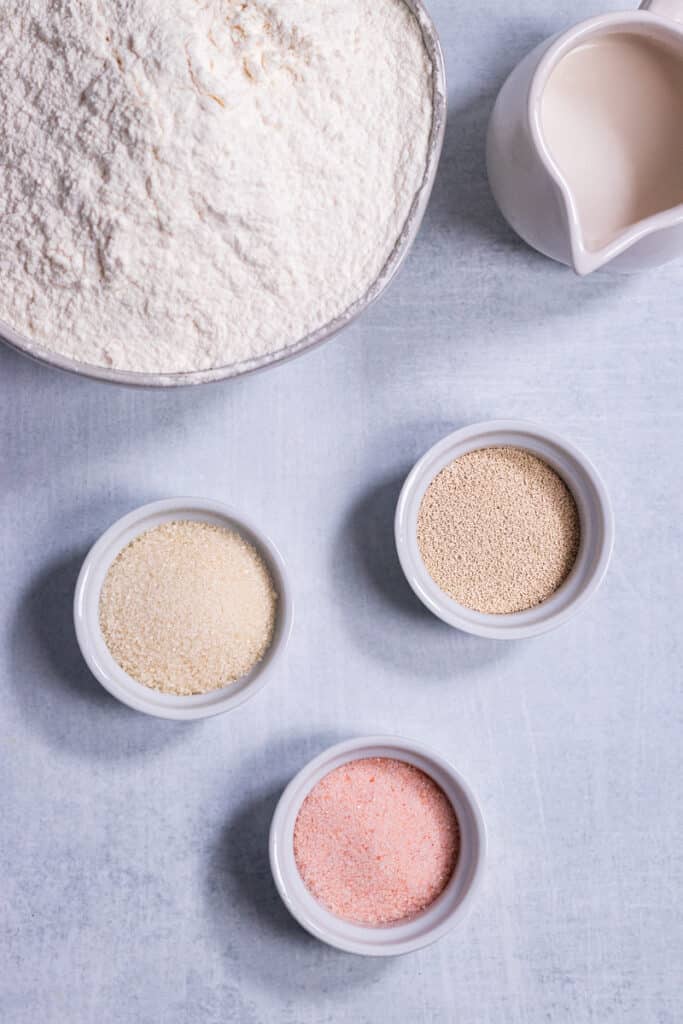
The rest of the ingredients are pretty straightforward: warm water, salt, active dry yeast, unsweetened non-dairy milk (this acts as an egg wash to brown the bagels and it comes in handy for adhering toppings), and a bit of organic cane sugar (this is for activating the dough). I say organic because some non-organic sugars can be filtered using animal bones, so if you’re vegan it would be important to make sure your sugar is vegan too.
Finally, the fun part: toppings! You can use any toppings you like. I LOVE everything bagel seasoning so that’s what I use. You can find it commercially at most grocery stores now, or you can make your own from poppy seeds, black & white sesame seeds, minced dried onion & garlic, and flaky or coarse sea salt.
Other toppings could be all poppy seeds, garlic, onion, flaky salt, a little black salt (to make it taste like an egg bagel), or you could go sweet and do cinnamon sugar (fold raisins into your dough if you like!).
Useful Equipment for Making Vegan Bagels
You don’t need much more than a bowl, a work surface, a large pot, a stove, and an oven to make good vegan bagels. This is all we had back in the olden days.
But to make vegan bagels more successfully and more efficiently, I’ve found a few items that make the process of from-scratch baking so much easier and enjoyable.
Food Scale
Perhaps the most useful item is a food scale. Between measuring your flour correctly and weighing the dough each time you cut it to keep things neat and even, a simple food scale with a tare function is your best friend. I believe mine cost $12 and is one of my favorite baking tools.
Stand Mixer
You don’t need a fancy Kitchenaid mixer if that’s out of your price range, but even a less expensive stand mixer that comes with a dough hook attachment will make your dough mixing much faster and easier. Additionally it comes in handy when making any type of dough, batter, frosting, or vegan whipped cream.
Dough Scraper
A dough scraper makes slicing your dough quick and easy. It’s also not sharp enough to damage your table or work surface. Scrapers are also useful when making other types of bread they may be more wet and hard to work with during the shaping and kneading process.
I have a few of these -- plastic, metal… most from my mom. She used to bake a lot so she had all these neat little tools to give me when I started baking.
For metal, I like this bench scraper because it helps me cut dough quickly, and is great for keeping my dough from sticking to my work surface.
For plastic, I like this kind of plastic dough scraper because it helps to spread large amounts of filling over dough, makes for easy clean up of your surface (I scrape my counter often while working with dough, as sometimes little bits of dough and wet flour get in the way.
Basting Brush
If you’d like to make a vegan egg wash to make your challah top golden brown and shiny, you’ll need a basting brush to evenly distribute the wash. I use my basting brush all the time when making marinades, so it’s a useful kitchen implement that’s cheap and doesn’t take up much space in the drawer.
Slotted Ladle
A slotted ladle is really great for adding and removing large items from boiling water. I use it in this recipe to add and remove my bagels from the boiling water. Tongs would just mangle my impressionable bagel babies, while the ladle just gently cradles them.
I also often use my slotted ladle for blanching and boiling vegetables. Very handy!
How to Properly Measure Flour
We want to measure our flour by weight, not by volume. When you scoop flour out of a bag or tin with a measuring cup, you're packing it in there and not necessarily getting the same amount each time.
What's better is to use a food scale with a tare function (allowing you to zero out the scale after you've put the bowl on it so your bowl isn't playing a factor in your equation).
Working in grams, put your bowl on the scale and zero it out. Scoop the flour into the bowl until you reach the desired measurement.
Tips for Making Vegan Bagels
This process is going to seem a little intense when you read it, but I find the actual bagel making process to be relaxing, fun, and relatively easy.
I’m going to guide you through every step, but please feel free to leave a comment down below if you have any questions and I’ll get back to you as soon as I can (I check comments regularly).
Step One: Make the Dough
Note: These instructions are for hand mixing--you can use a stand mixer fitted with a dough hook if you like; run at medium speed for 5-6 minutes until the dough becomes springy.
In a bowl or measuring cup with the indicated amount of warm water (should be 105°F - 115°F (or 41°C - 46°C); not hot enough to bother the skin on the inside of your wrist, but warm), add the yeast and sugar and stir gently for a few seconds. Leave it alone for 5 minutes and stir again until everything is dissolved.
In the 5 minutes it sits, it should become quite foamy. If it does not foam, you might need new yeast. Active dry yeast can become inactive if left for too long.
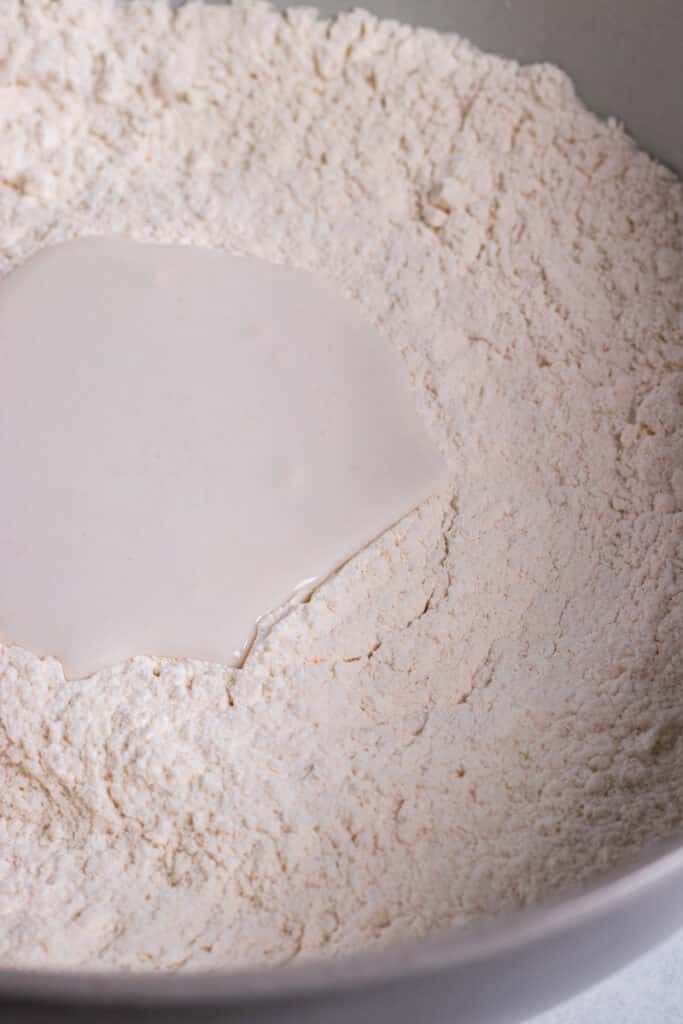
Whisk the salt into the flour in a large mixing bowl.
Make a well in the center and pour your yeast mixture and ⅓ cup of the coconut milk into the dough. You may need an additional few tablespoons (up to about ½ cup, I’ve found sometimes) depending on where you live, how accurately you measured, your stirring tool (wooden tools absorb moisture), etc. The dough should be firm, yet moist and not sticky.
On a well-floured (use the same bread flour you’re using for the dough) surface, knead the dough for around 10 minutes, sprinkling more flour as you knead (after it absorbs each layer of flour, I repeated once every minute or two), as this makes a firmer dough which results in a nice chewy and structured bagel. You’re looking for the dough to become smooth and elastic yet still quite firm and stiff (but not dry).
Start a small pot of water boiling.
Rise the Dough
Grease a large bowl with coconut cream (or oil if you like) and plop the dough in there, then flip it so both sides are coated.
Cover the bowl with a damp kitchen towel, place it in the oven on the middle rack, and place the pot of boiling water on the rack below it. Close the door and turn on the oven light.
Let it rise for 1 hour, until the dough has doubled in size. Do not let it prove for too long.
After an hour has elapsed, punch the dough down and allow it to rest for about 10 minutes.
Shape the Bagels
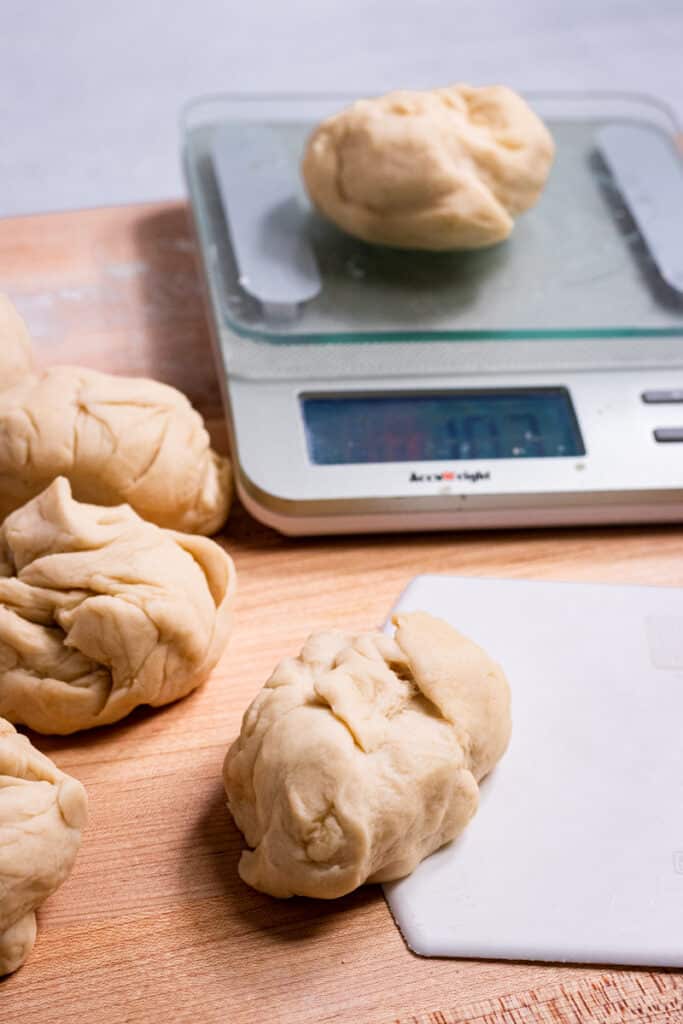
Divide the dough into 8 pieces.
I prefer to use a kitchen scale for this so all my bagels are about the same size. You can just plop the dough on the scale, divide the number of grams by 8, and cut them with a knife or bench scraper, adding little bits from other portions until you get 8 equal portions.
This step is not necessary--you can just eyeball it if you prefer.
Shape each piece into a ball and press it gently against a lightly floured surface, rolling it in a circular motion, almost pulling the dough into itself, until you have a perfect ball without much of a crease at the bottom.
Repeat this process until you have 8 nice round dough balls.
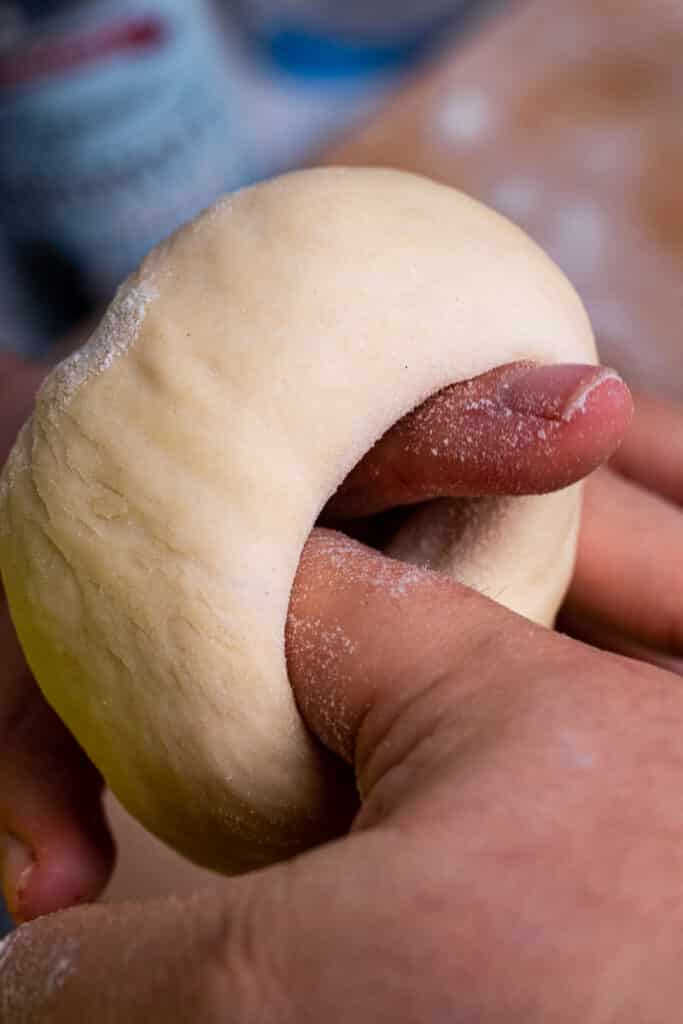
Coat your finger in flour and press into the center of each dough ball to form a ring. Stretch the hole till you get a nice open ring, They will spring back a little during the cooking process; your bagels will look like bagels and not weird loops.
Place each bagel on a silicone mat or parchment lined rimmed baking sheet, leaving a few inches space between each bagel. I used 2 cookie sheets for this. Cover them with a damp kitchen towel and rest for 10 minutes.
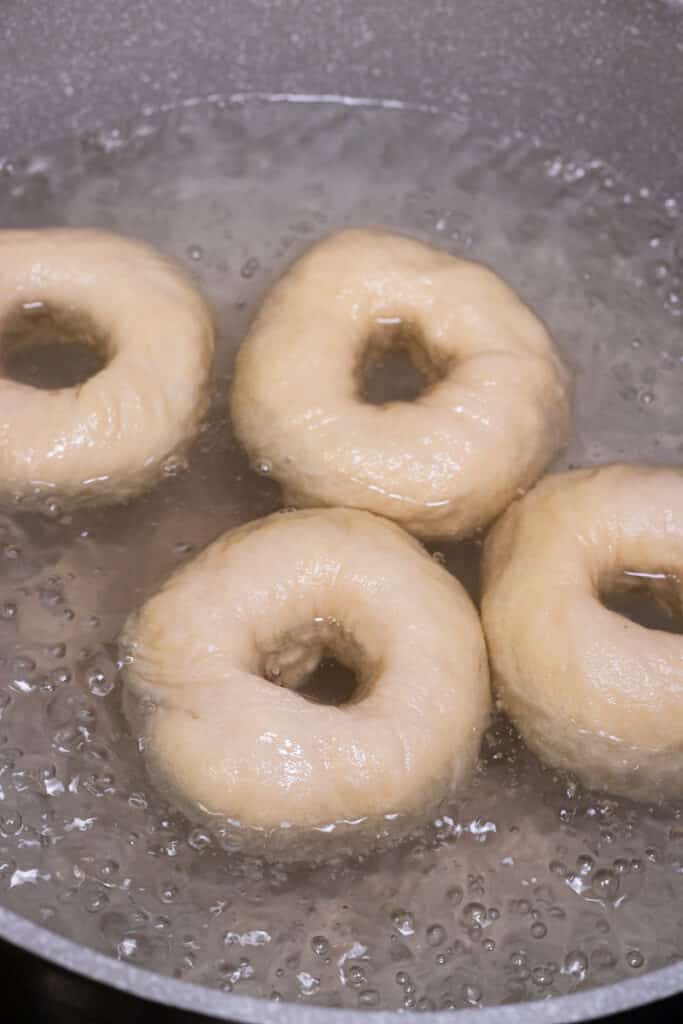
Boil the Bagels
This is an easy but crucial step for a shiny, beautiful, chewy bagel. Bring a large pot of water to a boil and preheat your oven to 425° Fahrenheit (220° Celsius).
Use a skimmer or a large slotted spoon to very gently lower each bagel into the pot. I did 3 bagels at a time.
You’ll want to boil these for about 1 minute and 10 seconds on one side, and between a minute to 2 minutes on the other. I did 2 minutes, because I like chewy New York bagels, but do less if you prefer softer bagels.
Your bagels are very impressionable (like little bagel children) at this point, any little knock can mar them. It doesn’t compromise the flavor or texture though, only the look. So be gentle if the appearance of the bagel is important to you.
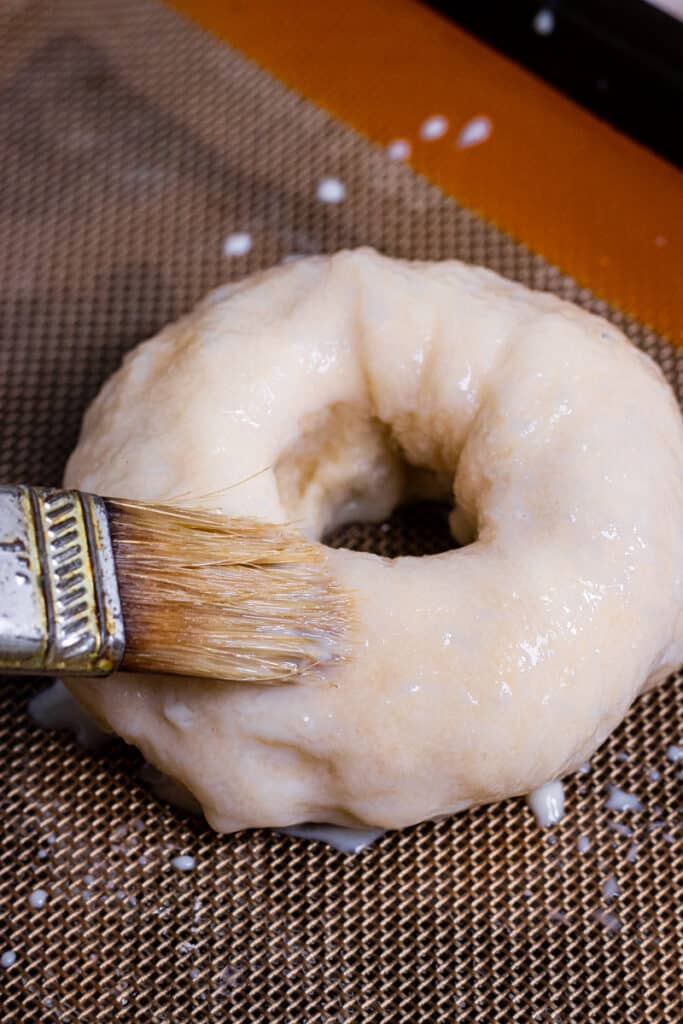
After removing the bagels from the boiling water, use a pastry brush to gently brush each bagel with unsweetened non-dairy milk and add your toppings if any. The non-dairy milk acts as an egg wash, making the tops of your bagels golden brown and a bit shiny when baked.
Bake the Bagels
Bake the bagels right on their trays, leaving a few inches space between each bagel. I used 2 cookie sheets for this.
Bake for 20-25 minutes, or until nicely browned. 23 minutes is perfect for my oven. I usually switch the trays halfway through since the lower rack of my oven is a different temp than the middle.
Let them cool for at least 30 minutes on a baking rack before slicing them with a serrated knife; the crumb will be better. Though nothing compares to fresh warm bagels.
Serve ‘Em and Store ‘Em
Top with a schmear ( vegan cream cheese) and vegan lox (smoked salmon), available in my Plant-Based Jewish Recipes e-book or whatever else you like, and enjoy!
Store leftover bagels up to 3 days in an airtight container (I always just throw them in my cake carrier!)
Bagels freeze exceptionally well; wrap in plastic wrap and then freezer paper. Freeze up to 3 months. Defrost, throw in the toaster oven, then slice with a serrated knife and enjoy!
More Vegan Baking Recipes
I have fallen in love with baking over the past two years, and though I am not good at baking everything yet, I am learning!
I found that the idea of baking my own bagels was way harder than actually baking them. Now I love making a few batches on Sunday mornings, and freeze a batch and a half (the other half gets eaten up in a few days) for my bagel-loving husband.
Here’s a few more awesome from-scratch baking recipes you can try!
- Vegan Challah
- Easy Pie Crust - try with my Vegan Pumpkin Pie
- Matcha Pound Cake
- Easy Thick Crust Pizza Dough
- Coconut Cake
- Vegan Chocolate Chip Scones
- Cranberry Chocolate Chip Jumbo Muffins
- Banana Bread
Want More Jewish Recipes?
I grew up eating a ton of awesome Jewish foods. However, I haven't had many of them since going vegan 3 years ago. So I've set out to veganize my favorites!
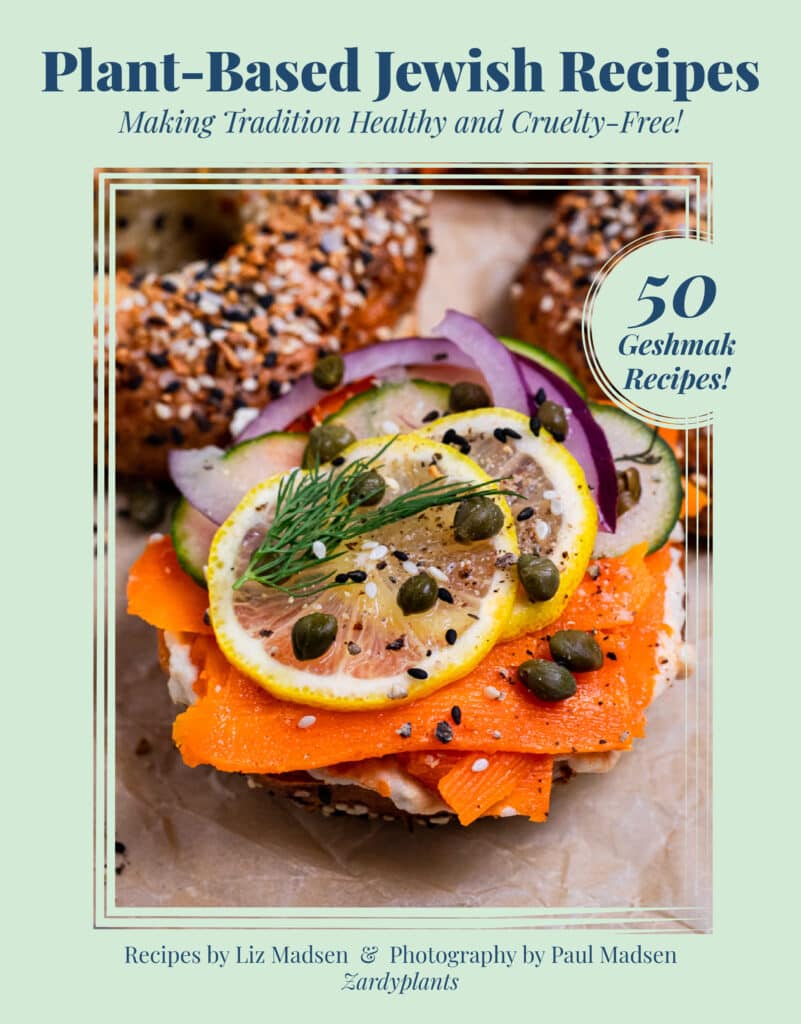
My Plant-Based Jewish Recipes e-book is now available for purchase and has 50 vegan Jewish recipes perfect for Chanukah, Passover, Rosh Hashanah and more.
Purchase and immediately receive your e-book that you can read digitally or print out and make tons of delicious Jewish comfort food recipes such as latkes, kugel, knishes, lox (!), black and white cookies, babka, and more! This book contains over 30 exclusive recipes that will never be released on the blog.
If that wasn’t enough to convince you I’ve got one more thing to tell you about this book. Over the next year or so, I’ll be releasing new versions of the book with new recipes for each major Jewish holiday (think Hamantaschen for Purim and flourless cake for Passover) and if you’ve already purchased my Plant-Based Jewish Recipes e-book, you’ll automatically get an updated version free of charge. Yup.
Click here to purchase or read more about the book.
Anything Else?
As always, I hope you love this recipe--I know I do, and Mr. Zardyplants does too.
These vegan bagels are:
- Soft but chewy
- Flavorful
- Tender with a crisp crust
- Bready
- Satisfying
- And perfect for breakfast prep, impressing guests or enjoying with the family!
Let me know in the comments below if you make this recipe or tag me @Zardyplants on Instagram so I can see your beautiful recreations! If you tag me on IG, I will share your post in my stories :)
Also, one quick request: if you love how this recipe looks or tastes, please leave me a 5-star rating and a nice comment–ratings help more people find my recipes which helps me keep providing them! Thank you!
<3 Liz
Save this for later on Pinterest!

Follow me on Social Media!
Follow my blog with Bloglovin
Vegan Bagels (New York Style)
- Total Time: 60 minutes
- Yield: 8 bagels 1x
- Diet: Vegan
Description
Soft yet chewy and bready, these delicious Vegan Bagels are incredibly delicious and so easy to recreate at home with minimal equipment.
Ingredients
- 3.5 - 4 cups (455g ish) bread flour (I recommend King Arthur Baking Company)
- 2 ¼ tsp (or 1 packet) active dry yeast
- 1 ½ tbsp organic cane sugar
- 2 tsp sea salt
- ½ cup warm water
- ⅓ cup - ½ cup canned coconut milk (this enriches the dough)
- 1-3 tablespoon unsweetened non-dairy milk, for a golden & shiny crust
- Any toppings for bagel crust (like Everything seasoning, poppy seeds, etc.)
Instructions
- Note: These instructions are for hand mixing--you can use a stand mixer fitted with a dough hook if you like; run at medium speed for 5-6 minutes until the dough becomes springy.
- Activate the yeast: In a bowl or measuring cup with the indicated amount of warm water (should be 105°F - 115°F (or 41°C - 46°C); not hot enough to bother the skin on the inside of your wrist, but warm), add the yeast and sugar and stir gently for a few seconds. Leave it alone for 5 minutes and stir again until everything is dissolved. In the 5 minutes it sits, it should become quite foamy. If it does not foam, you might need new yeast. Active dry yeast can become inactive if left for too long.
- Make the dough: Whisk the salt into the flour in a large mixing bowl. Make a well in the center and pour your yeast mixture and ⅓ cup of the coconut milk into the dough. You may need an additional few tablespoons (up to about ½ cup, I’ve found sometimes) depending on where you live, how accurately you measured, your stirring tool (wooden tools absorb moisture), etc. The dough should be firm, yet moist and not sticky.
- Knead the dough: On a well-floured (use the same bread flour you’re using for the dough) surface, knead the dough for around 10 minutes, sprinkling more flour as you knead (after it absorbs each layer of flour, I repeated once every minute or two), as this makes a firmer dough which results in a nice chewy and structured bagel. You’re looking for the dough to become smooth and elastic yet still quite firm and stiff (but not dry).
- Rise the dough: Boil a small pot of water. Grease a large bowl with coconut cream (or oil if you like) and plop the dough in there, then flip it so both sides are coated. Cover the bowl with a damp kitchen towel, place it in the oven on the middle rack, and place the pot of boiling water on the rack below it. Close the door and turn on the oven light. Let it rise for 1 hour, until the dough has doubled in size. Do not let it prove for too long.
- Rest the dough: After an hour has elapsed, punch the dough down and allow it to rest for about 10 minutes.
- Divide the dough: Divide the dough into 8 pieces. I prefer to use a kitchen scale for this so all my bagels are about the same size. You can just plop the dough on the scale, divide the number of grams by 8, and cut them with a knife or bench scraper, adding little bits from other portions until you get 8 equal portions. This step is not necessary--you can just eyeball it if you prefer.
- Shape the dough balls: Shape each piece into a ball and press it gently against a lightly floured surface, rolling it in a circular motion, almost pulling the dough into itself, until you have a perfect ball without much of a crease at the bottom. Repeat this process until you have 8 nice round dough balls.
- Make the balls into bagels: Coat your finger in flour and press into the center of each dough ball to form a ring. Stretch the hole till you get a nice open ring, They will spring back a little during the cooking process; your bagels will look like bagels and not weird loops.
- Rest the bagels: Place each bagel on a silicone mat or parchment lined rimmed baking sheet, leaving a few inches space between each bagel. I used 2 cookie sheets for this. Cover them with a damp kitchen towel and rest for 10 minutes.
- Boil the bagels: This is an easy but crucial step for a shiny, beautiful, chewy bagel. Bring a large pot of water to a boil and preheat your oven to 425° F (220° C). Use a skimmer or a large slotted spoon to very gently lower each bagel into the pot. I did 3 bagels at a time. You’ll want to boil these for about 1 minute and 10 seconds on one side, and between a minute to 2 minutes on the other. I did 2 minutes, because I like chewy New York bagels, but do less if you prefer softer bagels. Your bagels are very impressionable (like little bagel children) at this point, any little knock can mar them. It doesn’t compromise the flavor or texture though, only the look. So be gentle if the appearance of the bagel is important to you.
- Brush with non-dairy milk and add toppings: After removing the bagels from the boiling water, use a pastry brush to gently brush each bagel with unsweetened non-dairy milk and add your toppings if any. The non-dairy milk acts as an egg wash, making the tops of your bagels golden brown and a bit shiny when baked.
- Bake the bagels: Bake the bagels right on their trays, leaving a few inches space between each bagel. I used 2 cookie sheets for this. Bake for 20-25 minutes, or until nicely browned. 23 minutes is perfect for my oven. I usually switch the trays halfway through since the lower rack of my oven is a different temp than the middle.
- Cool the bagels: Let them cool for at least 30 minutes on a baking rack before slicing them with a serrated knife; the crumb will be better. Though nothing compares to fresh warm bagels.
- Serve: Top with a schmear ( vegan cream cheese) and vegan lox (smoked salmon), available in my Plant-Based Jewish Recipes e-book or whatever else you like, and enjoy!
- Store: Store leftover bagels up to 3 days in an airtight container (I always just throw them in my cake carrier!) Bagels freeze exceptionally well; wrap in plastic wrap and then freezer paper. Freeze up to 3 months. Defrost, throw in the toaster oven, then slice with a serrated knife and enjoy!
Notes
- Note 1: All purpose flour will not be able to produce a nice firm chewy bagel, though if you’re OK with a much softer and inferior (sorry not sorry) bagel, go right ahead and use AP flour.
- Note 2: Could you use whole wheat flour? Yes, I actually think you could, and it might taste pretty good. It might be not quite as deliciously chewy as a bread flour bagel, but it’s certainly worth a try, especially if you’re interested in eating more whole grains. You could also experiment with spelt flour. I actually recommend you wait and try experimenting with the flour until AFTER you’ve made this recipe as written once or twice.
- Note 3: I’ve tested and retested this recipe to make it awesome for you all and I also think that it can be challenging to really know how you can alter a recipe without ever having made it. I speak from experience as a recipe developer (hi, you’re reading my blog, obviously). Make my recipe as written, learn how the dough should feel, then experiment with flour type. You’ll know whether to add more liquid or more flour based on the feel of the dough rather than guesswork.
- Note 4: Experiment with toppings! You can use any toppings you like. I LOVE everything bagel seasoning so that’s what I use. Other toppings could be all poppy seeds, garlic, onion, flaky salt, a little black salt (to make it taste like an egg bagel), or you could go sweet and do cinnamon sugar (fold raisins into your dough if you like!).
- Prep Time: 40 minutes
- Cook Time: 20 minutes
- Category: Breakfast
- Method: Baking
- Cuisine: American, Jewish

clementine
Love! I was so happy that making these with gluten free flour worked! I used 4 cups of Bob's Red Mill 1:1 flour, added an additional 1.5 cups of water and 1/3 cup coconut milk as it mixed in my Kitchen Aid with the dough attachment. I was hesitant each step of the way because gluten free baking is always finicky in my kitchen. You have to be very gentle when molding but it worked!! I baked for 35 minutes in my oven , I notice gf baking always needs extra time. Ovens vary of course. I cant wait to try different mix ins like cinnamon raisin or blueberry! Totally recommend!
Brandy
These were super easy to make and tasted excellent. Thank you for the great recipe!
Sarah
These turned out perfect on our first attempt! Thanks for the wonderful recipe.
Amanda
sorry, I have have missed it, but at what temp to you bake them at?
💚 Liz
425° F (220° C)