Family-friendly and insanely easy, Vegan French Toast Sticks are what breakfast dreams are made of. Sliced bread? Nah, it’s way more entertaining as batons that you can dunk and swish in syrup--fun for kids and the young at heart!

This post may contain affiliate links. See our disclosure policy for details.
Hey Internet, it’s been a hot minute since I shared a breakfast recipe with you all, and I’m excited to be sharing this one with you today. It’s easy, quick, and insanely delicious: vegan French toast sticks!
It's also kid-friendly, which is a big win for parents looking for a easy but delicious breakfast to serve the family. Check out my list of vegan kid-friendly recipes or my list of 50+ vegan snacks for kids!
Most French toast, that seems to go by a variety of names including Poor Knights of Windsor (??), is bread that is soaked in egg and milk, then fried. Nowadays it is often rolled in sugar or cinnamon sugar afterward.
This veganized version of French toast is made with a magical substance called chickpea flour. When cooked with liquid, it resembles an eggy texture and flavor--I even make vegan omelettes with it.
For richness, the chickpea flour (also known as garbanzo bean flour or gram flour) is combined with canned coconut milk and it makes the perfect batter for the toast.
French toast, whether cut into sticks or not, is super easy to make and a comforting breakfast for the entire family. It’s also easily customizable and you can make it as fancy (think fruit, coconut whip, and fresh mint) or as simple as you’d like!
You could even make like Lorelei Gilmore and shake them up in a bag with maple syrup to eat them on the go! Not that I’d recommend that, there’s just a Gilmore Girls-ism for all occasions. Cue eye roll from Mr. Zardyplants.
ANYWAY… let’s just get into this recipe before I make any more bad jokes.
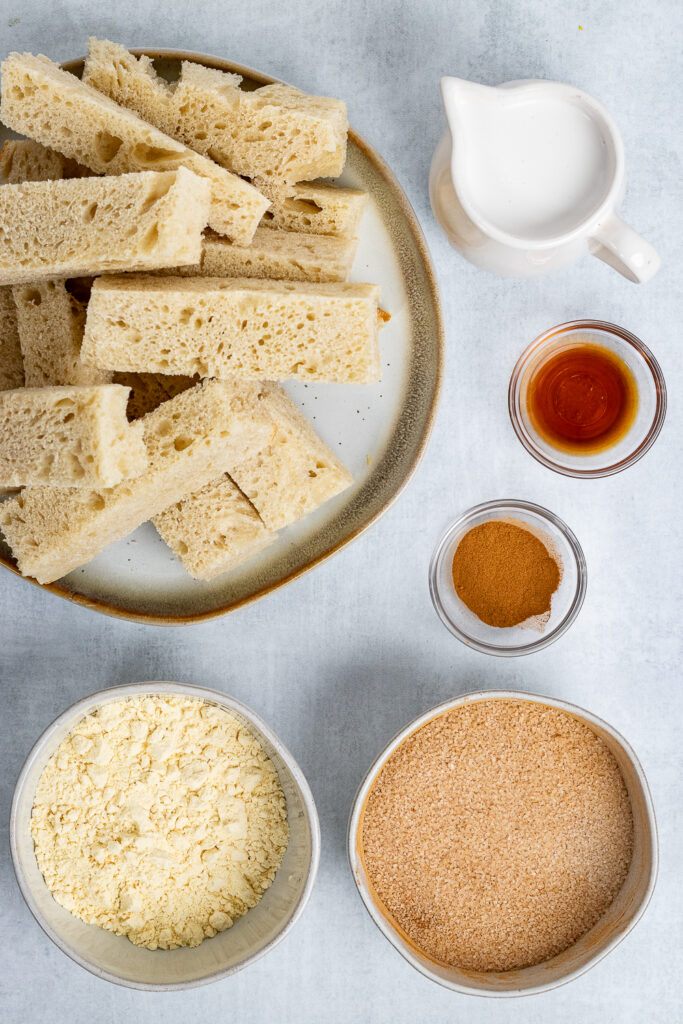
What You’ll Need
So let’s talk bread. The kind of bread that works best for this is firm, thickly sliced bread. I recommend a block loaf to maximize batons you can get out of it.
However, if you want to use sliced sandwich bread, you absolutely can. The slices are a little thinner so the finished sticks may be fragile or somewhat less stiff, but still perfectly delicious.
I even made French toast out of leftover homemade vegan Challah and that was INSANELY delicious.
But like I said, use any bread you like. If you are gluten-free, use gluten-free bread and the rest of the recipe is good.
Moving on, let’s talk the other obvious ingredient: chickpea flour, AKA garbanzo bean flour or gram flour.
This is a protein-packed grain-free flour that seems to get eggy when cooked with liquid. It will give you a thick lightly spongy coating on the sticks, making them just like French toast.
Other flours should work, but they won’t produce that same eggy texture.
When I say eggy, it doesn’t taste incredibly egg-like, just has some egg-ish qualities. If you’d like it to taste more like eggs, add a pinch of black salt to the batter.
Speaking of batter, the liquid I recommend mixing with chickpea flour is canned coconut milk. This is fattier than regular carton non-dairy milk and produces a much richer French toast batter.
The recipe WILL work just fine with any other non-dairy milk such as almond or soy milk, it just will not be as rich.
I added vanilla extract and a pinch of cinnamon to flavor the batter itself.
Finally, it’s optional, but I like to roll my french toast sticks (or dredge the slices) in cinnamon sugar after. You can make your own cinnamon sugar by mixing a pinch of cinnamon with any kind of sugar--raw sugar, granulated, or even coconut sugar for an unrefined option.
And, of course, dunk your sticks in a good quality maple syrup--I prefer grade A organic maple syrup.
A Note on Equipment
You can use a pan to make French toast, but I find it is faster and easier with a griddle. I particularly like this Cuisinart 5-in-1 Griddler and I’ll tell you why:
- You can open it all the way and have double the griddle surface
- The other side of the griddle pans have the grill lines so you can make a panini or grilled vegetables
- There are waffle plates you can change out and make easy waffles.
- It’s not super expensive
- It heats really evenly which is great because sometimes when you have a large pan on a small burner on the stove, it doesn’t really heat evenly)
- There’s more surface area than a pan
- It’s not heavy so it stores easily and doesn’t take up a whole lot of space
The only thing I didn’t like about this griddler is that the waffle plates are an extra cost--I think they should have come with it. But everything in the list above makes it definitely worth it for me, and honestly I think it was a great purchase (that I made with my own money).

How to Make Vegan French Toast Sticks
Whether you want to make sticks or slices, you can follow this recipe. Just don’t cut the bread first :)
And, you can cut the crusts off or leave them on. We’ve tried it both ways and it’s delicious either way so it comes down to personal preference.
So first, you’ll need your bread to be either stale or toasted. I never think ahead enough to dry out my bread, so what I do is cut my bread into batons, lay it out on a baking tray, and bake the bread for about 8 minutes in a 375 degree Fahrenheit (190 degrees Celsius) oven.
If you’re using a griddle, heat it now to about 400 degrees Fahrenheit (205 degrees Celsius). If you’re just using a pan, I’d heat the stove to medium and use a nonstick skillet.
After your bread is done and when it is cool enough to the touch, you’re ready to make your batter.
Dip each bread baton or slice into the batter mixture and make sure to coat all sides, but let the excess drip off.

Place it on your hot griddle or pan and cook for about 3 minutes on each side. Unless I’m photographing them, I don’t bother cooking on all 4 sides--2 is usually enough for me.
The batter will firm up. When you’re ready to flip each time, use a spatula to carefully flip each piece. You might be tempted to use your fingers, but sometimes the batter will stick a little and might peel off the bread.
I like using this little silicone cookie spatula to get in between each piece on my griddle.
When done, set them on a plate until you’re ready to start rolling them in the cinnamon sugar.
Add the cinnamon sugar to a plate or shallow, wide bowl.
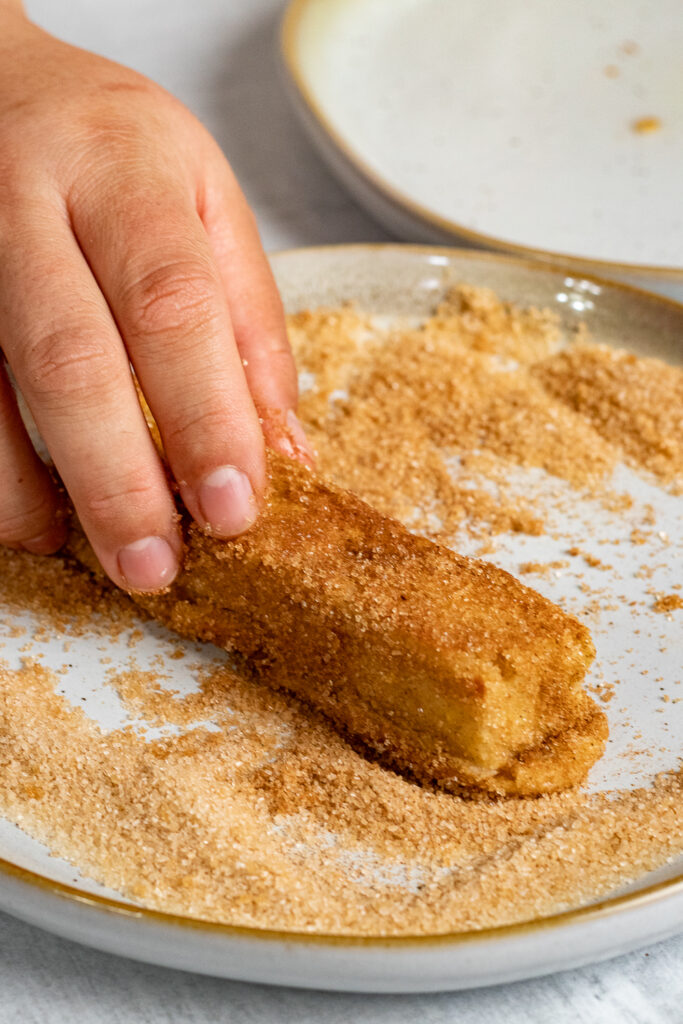
Now, take a spray bottle of water and finely mist all sides of the baton or slice, one at a time. I only spritz each side twice.
Roll it in the sugar and place it back on the plate you took it from or a new plate, whatever’s easiest. Repeat until all batons or slices have been coated.
Dunk in maple syrup or stack on a plate with some fruit, coconut whip, and fresh mint. Then drizzle that maple syrup all over the place.
Troubleshooting French Toast
Having issues? Hopefully this will help. If you have any questions I didn’t cover, feel free to contact me or DM me on Instagram.
Why Is My French Toast Sticking to the Pan?
First of all, are you using a non-stick pan? I wouldn’t recommend using any other pan than a nonstick one or a nonstick griddle. There are plenty of safe nonstick pans out there nowadays, like ceramic nonstick, Greenpan, Scanpan, and the nonstick B1 series from All Clad which is what I use.
If you’re not preheating your pan, the batter could adhere to the pan. It’s better to preheat the pan for a few minutes before you add anything to it. If you’re using a griddle, preheat until the indicator light turns green (check your manual for specific instructions to your griddle).
Sometimes the lack of fat in a recipe can make things stick. That’s why I recommend using full fat coconut milk in this recipe as opposed to the more watery carton milks from the refrigerator section.
If you’re STILL having issues, trying greasing your pan with a little coconut cream or spray oil if you’re cool with that, but neither I nor my recipe testers have ever had an issue.
The Cinnamon Sugar Won’t Stick to My French Toast
Have you wet it enough? You need to get enough water onto each cooked piece to allow the cinnamon sugar to stick when you roll it in the mixture.
My French Toast is Falling Apart
Sometimes if your bread slices are too thin, they weren’t dried out enough before you begin, they weren’t cooked long enough on the griddle, or you soaked them too much with the water, they can be soft or fall apart. Here are some tips to ensure that doesn’t happen:
Thinly sliced sandwich bread may just be too weak to use in this recipe. I prefer to get my own bread from the store (or bake it myself, in the case of my challah) and slice it in thick slices, about an inch thick.
Make sure to dry out your bread completely before attempting to batter it. Either leave the sliced batons out on the counter all night (spread out on a plate or baking tray) to dry out or bake them in the oven until they’re dried out enough that they start to look like toast. Instead of rip or tear, they should break or crumble if you pull or twist them.
You’ll need to cook them long enough for them to firm up after being dunked in the batter. They should be dry to the touch on all sides when you flip them.
When you spray them with the spray bottle to adhere the cinnamon sugar, only spray once or twice per side. If you find the cinnamon sugar does not adhere, give it another spray.
More Delicious Vegan Breakfasts
Whether you’re a sweet or savory breakfast kinda person, I’ve gotcha covered.
And if you don’t like breakfast, we can’t be friends.
Just kidding! Make these for lunch or dinner or dessert, heck I don’t care, I just want to feed people. I’m like a Bubbe, except a bit younger. Just a bit.
ANYWAY here are some awesome vegan breakfast recipes:
Sweet
- Apple Pie Baked Oatmeal
- Chocolate Chip Scones
- Lemon Blueberry Muffins
- Matcha Pound Cake
- Coconut Cacao Granola
- Gluten-Free Banana Bread
- Gluten-Free Chocolate Banana Muffins
- Chia Pudding 5 Ways
Savory
- Tofu Eggs Benedict
- Tofu Scramble
- Cheesy Grits with Crispy Chickpeas and Garlicky Collard Greens
- Buddha Bowl with Sweet Potatoes
- Air-fried Breakfast Potatoes
Anything Else?
As always, I hope you love this breakfast recipe–I know I do, and Mr. Zardyplants does too.
These vegan French toast sticks are:
- Soft
- Sweet
- Satisfying
- And great for kids AND adults (and kids-at-heart, like me)!
Let me know in the comments below if you make this recipe or tag me @Zardyplants on Instagram so I can see your beautiful recreations! If you tag me on IG, I will share your post in my stories :)
Also, one quick request: if you love how this recipe looks or tastes, please leave me a 5-star rating and a nice comment–ratings help more people find my recipes which helps me keep providing them! Thank you!
<3 Liz
Save this for later on Pinterest!

Follow me on Social Media!
Follow my blog with Bloglovin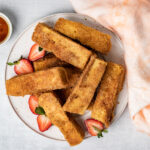
Vegan French Toast Sticks
- Total Time: 20 minutes
- Yield: 16 pieces 1x
- Diet: Vegan
Description
Family-friendly and insanely easy, Vegan French Toast Sticks are what breakfast dreams are made of. Fun for kids and the young at heart!
Ingredients
- 16 batons (or about 8 slices) stale (or toasted bread, see note 1)
- Maple syrup for serving, optional
Batter
- 1 cup canned coconut milk (see note 2)
- ½ cup chickpea flour, AKA garbanzo or gram flour (see note 3)
- ½ tsp vanilla extract
- ½ tsp cinnamon
Coating (optional)
- ⅓ cup raw sugar/cane sugar/coconut sugar (any will work)
- ½ - 1 full teaspoon cinnamon
Instructions
- If you’re using a griddle, heat it now to about 400 degrees Fahrenheit (205 degrees Celsius). If you’re just using a pan, I’d heat the stove to medium and use a nonstick skillet.
- Make the batter: In a wide, low bowl, whisk together the coconut milk, chickpea flour, vanilla extract, and a half teaspoon of cinnamon.
- Batter up: Dip each bread baton or slice into the batter mixture and make sure to coat all sides, but let the excess drip off.
- Cook the French toast: Place it on your hot griddle or pan and cook for about 3 minutes on each side. Unless I’m photographing them, I don’t bother cooking on all 4 sides--2 is usually enough for me. The batter will firm up. When you’re ready to flip each time, use a spatula to carefully flip each piece. You might be tempted to use your fingers, but sometimes the batter will stick a little and might peel off the bread. I like using this little silicone cookie spatula to get in between each piece on my griddle.
- Dredge them in Cinnamon Sugar: When done, set them on a plate until you’re ready to start rolling them in the cinnamon sugar. Add the cinnamon sugar to a plate or shallow, wide bowl. Now, take a spray bottle of water and finely mist all sides of the baton or slice, one at a time. I only spritz each side twice. Roll it in the sugar and place it back on the plate you took it from or a new plate, whatever’s easiest. Repeat until all batons or slices have been coated.
- Serve: Dunk in maple syrup or stack on a plate with some fruit, coconut whip, and fresh mint. Then drizzle that maple syrup all over the place.
- Store: Refrigerate leftovers in an airtight container for up to 5 days. Reheat in an air fryer, toaster oven, pan, or the oven, preferably. They might get soggy in the microwave. They can be frozen, too! Reheat instructions for frozen French toast sticks are the same.
Notes
- Note 1: You’ll need your bread to be either stale or toasted. I never think ahead enough to dry out my bread, so what I do is cut my bread into batons, lay it out on a baking tray, and bake the bread for about 8 minutes in a 375 degree Fahrenheit (190 degrees Celsius) oven.
- Note 2: The liquid I recommend mixing with chickpea flour is canned coconut milk. This is fattier than regular carton non-dairy milk and produces a much richer French toast batter. The recipe WILL work just fine with any other non-dairy milk such as almond or soy milk, it just will not be as rich.
- Note 3: Chickpea flour/garbanzo bean flour/gram flour is a protein-packed grain-free flour that seems to get eggy when cooked with liquid. It will give you a thick lightly spongy coating on the sticks, making them just like French toast. Other flours should work, but they won’t produce that same eggy texture.
- Prep Time: 5 minutes
- Cook Time: 15 minutes
- Category: Breakfast
- Method: Stove top
- Cuisine: American

Dani
I absolutely enjoyed this!
McKay
We love these! We've already made them twice by simply using toasted bread. Per kid request, we included powdered sugar as a coating, which was also tasty. Thank you for this awesome recipe!
ALo
Do you think these could be baked instead of pan fried?
💚 Liz
Hi! Yes you can should be able to bake them. I would try using a silicone baking mat or parchment paper to keep them from sticking, and maybe bake at 375. I’m not sure how long, maybe 10 minutes then flip them and see how they look!
Christine
The best french toast sticks! So easy and my kids devour them! Can I freeze them?
💚 Liz
Yes! Just use a freeze safe bag or container.