These vegan AND gluten-free English muffins are surprisingly not difficult to make and are much cheaper and delicious than the kind you'd buy at the grocery store.
It can be hard to find gluten-free AND vegan breads in the store, am I right? Almost impossible to find ones that are also oil-free.
I have been working on these delicious little guys for a while now and I have to tell you, they were certainly worth the effort.
Gluten-free baking can be a struggle for sure. If you're not gluten-free, you can absolutely make these with regular flour (keep reading for notes on substitutions). But I know that a lot of my readers are seeking gluten-free recipes.
While this is not my first foray into bread, it's one of my first into gluten-free bread (baking-wise, anyway). It was easy to make them taste good, but the texture was another story.
The first batch was too tough, so that took a bit to correct. Then the texture was great but the dough just wasn't doing what I wanted it to do, and my muffins turned out looking like ugly, misshapen bread flowers (the irony did not escape me).
But I persisted, since I love English muffins and wanted to make a delightfully craggy (if you've ever enjoyed an English muffin before, you'll know I'm referring to the rough, somewhat uneven chewy texture) yet supple and delicious bread.
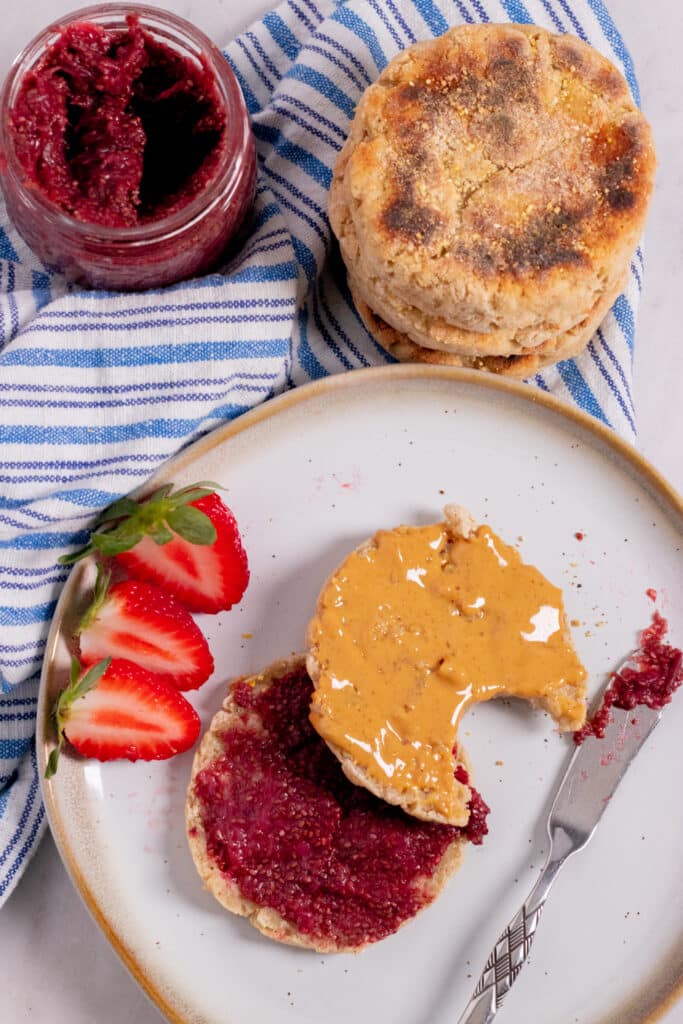
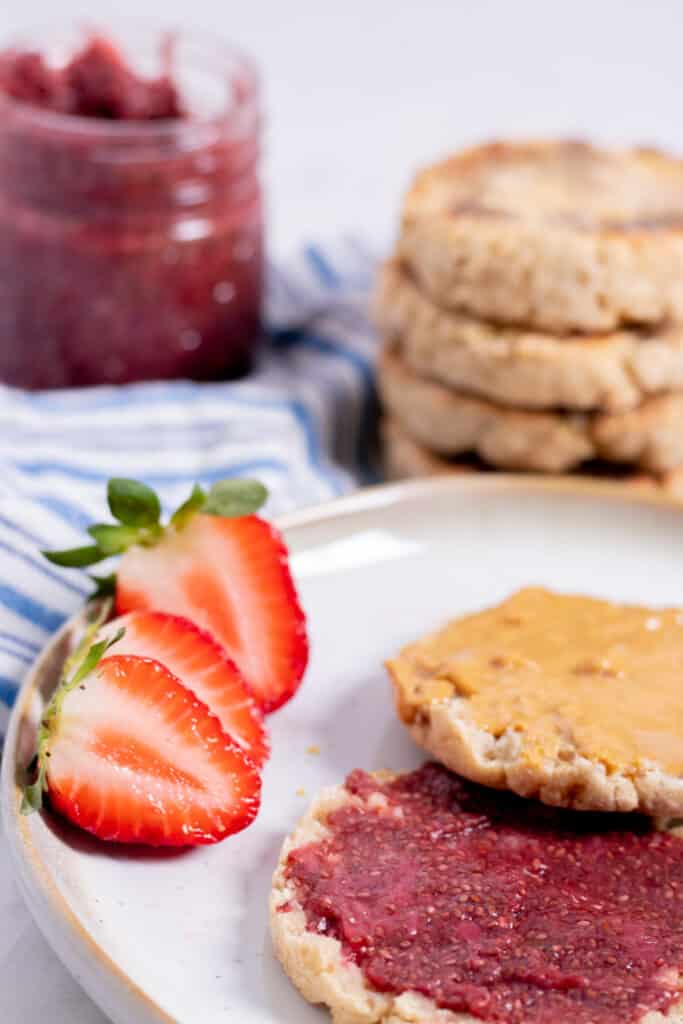
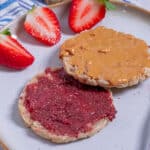
The result, I think you'll find, is awesome toasted with any kind of topping such as homemade vegan strawberry jam, creamy peanut or almond butter, avocado, or even as the all-important base of vegan eggs benedict (coming soon!)!
If you'd like to learn how to make my homemade English muffins, just keep on reading.
What You'll Need to Make English Muffins: The Basics
So let's start with the flour. If you are making these gluten-free as the recipe is written, I'd recommend using an all purpose gluten-free flour.
I always use Bob's Red Mill 1:1 Gluten-free Flour. While this post isn't sponsored, I'm obsessed with their brand.
This flour in particular is a great, versatile blend that I've used for cookies, muffins, dessert bread, and more.
However, due to the lack of oil and gluten in this recipe, it can be hard to get your English muffins to be soft like bread, so I added some extra xanthan gum.
Xantham gum is great for replacing elasticity and the texture of gluten. The extra xanthan gum in this recipe helps the English muffins have a softer, fluffier texture.
In contrast, I used psyllium husk to help give the muffins a bit more of the bread-like structure and texture that gluten provides. Psyllium husk is a form of fiber that you'll actually find in many over the counter fiber supplements. It's made from plants and totally safe, despite its strange name.
Note that if you decide to use regular all purpose flour, you do not need to add xanthan gum or psyllium husk to this recipe as the gluten will do all of these things. But for people who are avoiding gluten for whatever reason, these two ingredients help replace the texture you're missing.
Other Ingredients
Now let's move onto other ingredients.
You'll need some instant yeast. I like Fleischmann Rapid Rise instant yeast -- it's what I find in the supermarket and it's always worked well for me. If you only have regular yeast, you'll need to rise the bread for much longer. Many people find that their bread tastes better this way, but I'm far too impatient.
You can use any nondairy milk in this recipe, but just make sure it's the "original flavor" (not vanilla…) and unsweetened.
Salt, sugar, and warm water are all fairly common baking ingredients. If you're worried about the sugar, it's a very small amount of organic cane sugar--only 1 tablespoon for the whole recipe and it helps to activate the yeast.
Apple cider vinegar helps to leaven the bread, so I'd highly recommend using it. I always keep a huge bottle of it on hand since I use it almost everything I make!
The acid also gives the bread a really nice very light tang that I've found common in English muffins. It's very subtle.
Since we're skipping the oil in this recipe, you'll need a little bit of coconut cream. We've talked about coconut cream before--it's coconut milk’s thicker cousin.
You can find coconut cream online or in the international section of your grocery store.
Finally, since these are English muffins, you'll need some corn grits to sprinkle on the tops and the bottoms of your muffins before you cook them. This is optional, but it does help them to not stick, it adds a nice flavor and texture, and it's kinda authentic.
However, if you cannot have corn, you can use gluten-free breadcrumbs, a dusting of flour, or even almond meal or something like that.
Now let's talk about the techniques involved in making these babies.
How to Make Gluten-Free English Muffins
This recipe takes a little bit of time (mostly inactive to let the bread rise) but it's not difficult. I'd say it's a great recipe for those who consider themselves beginners in bread making. If you've never baked bread, this is a good place to start.
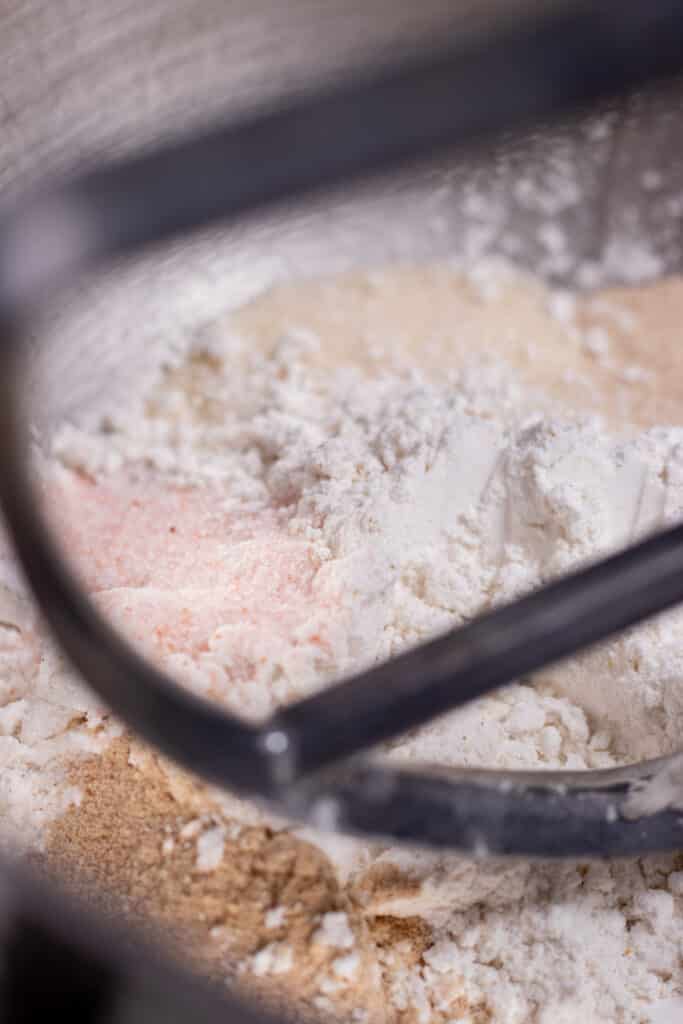
The first thing you're going to do is mix the dry ingredients together, then add in the wet and mix for 5 minutes on a medium speed. I used the paddle attachment on my mixer.
I highly recommend getting a stand mixer if you intend to bake bread. It's also great for any kind of baking, and some mixers like mine come with many other attachments that can do things like spiralize veggies, pasta roller & extruder, ravioli maker, etc.
However, this can be done all by hand, with a strong spatula and some muscle. Wooden spoons can soak up some moisture in the dough as you're mixing. For simplicity and to stick to the recipe, use a silicone or plastic spatula.
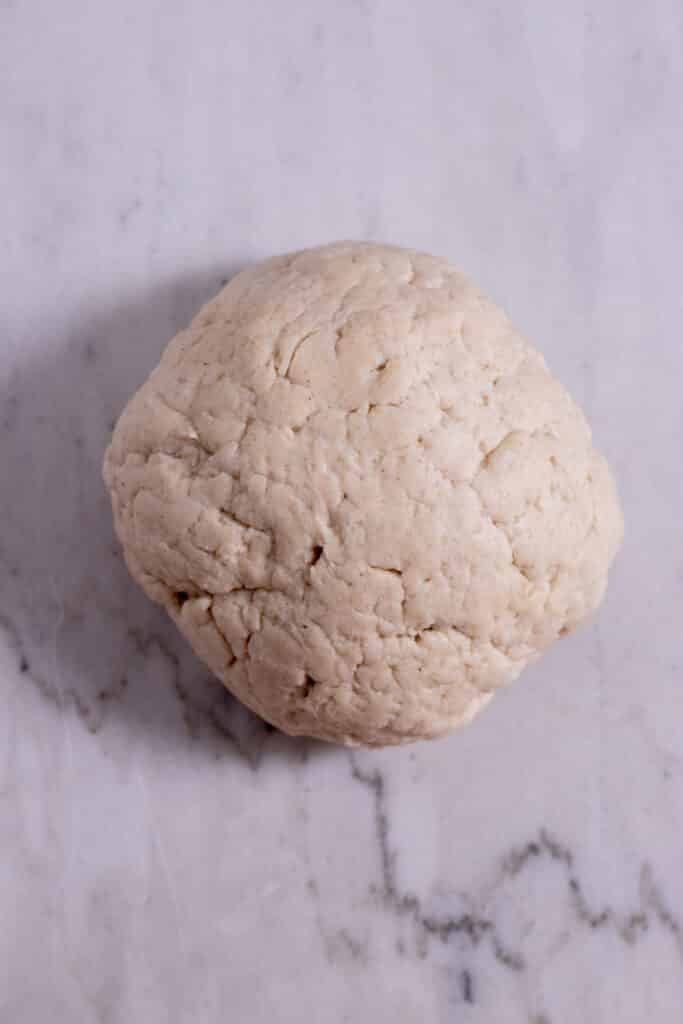
Anyway. after mixing the dough you should have a somewhat tacky soft ball of tough. It should not be so sticky that it sticks to the bowl or your counter. If it is dry, crumbly, or rough, you may need to mix in some more warm water.
Rising the Dough
Ball the dough together in a bowl (you can leave it in the mixing bowl or transfer it to a smaller bowl if you like) and cover the bowl with a clean kitchen towel or saran wrap.
Place the dough in a warm-ish area to rise for 1 hour. I like to just place it in my oven with the oven light on. No heat, just the light.
Unlike gluten breads, you will not see the dough double in size. What the rising does for gluten-free dough is condition it to make it softer.
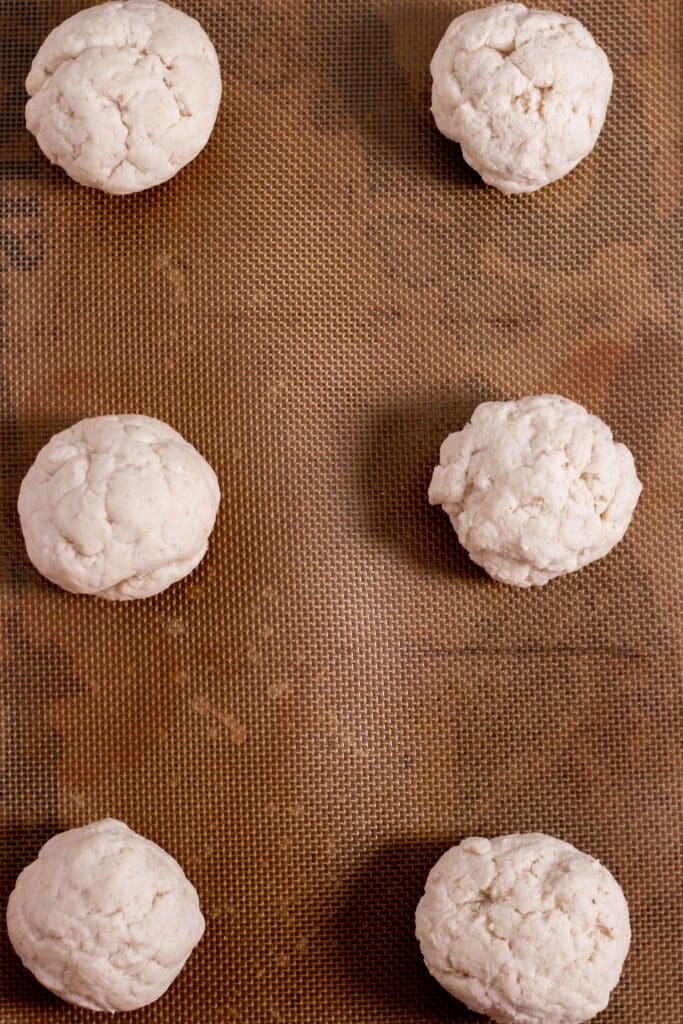
After the first rise, you'll want to divide your dough in to 6 even pieces. Lightly knead each piece on a counter or table (wood can dry out the dough), 3-5 times before shaping into a ball.
I use a plastic baking scraper to cut my dough (mostly to save my counters) but it REALLY comes in hand in baking.
Place your dough balls on a lined baking sheet (I always use a silicone mat), cover again, and proof for another hour.
Cooking the English Muffins
Now preheat your oven to 350 degrees F (or 177 degrees C). You don't have to cook these on the stove first, but it helps brown both sides before baking.
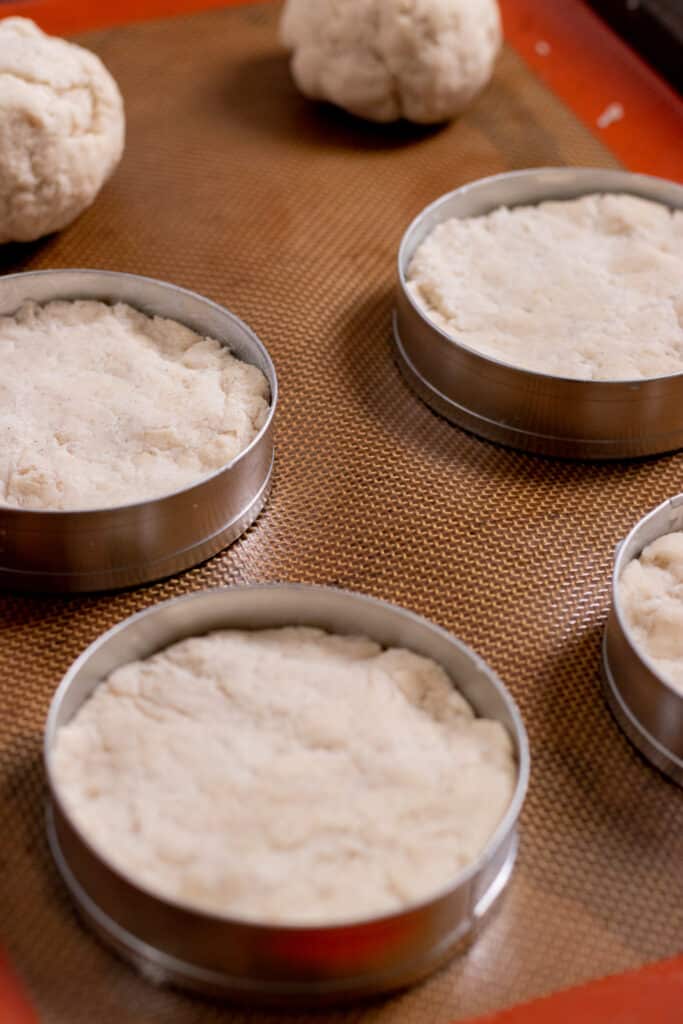
At this point, if you'd like to ensure perfectly round English muffins, I'd recommend using these English muffin rings. They're inexpensive and also useful for pancakes!
To keep your dough from sticking, lightly grease the inside of the rings with leftover coconut cream. Place the ball of dough inside one of the rings on a flat surface like your silicone mat lined pan.
Flatten the ball with the palm of your hand until it fills the edge of the rings. Smooth gently with your fingers.
Heat a skillet or griddle over medium low heat. Sprinkle the tops and bottoms of the muffins with cornmeal, breadcrumbs, extra flour, or skip it, then place them on the pan or griddle.
If you're worried about sticking, use a little coconut cream to grease the pan, but I didn't have any issues.
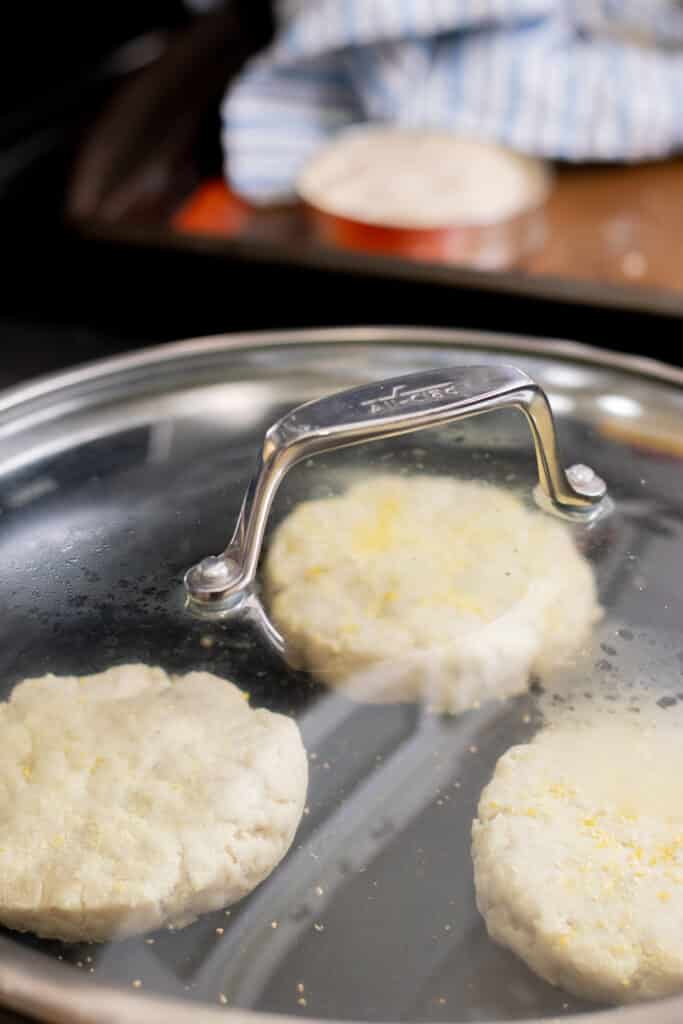
Anywho, cover the pan or the griddle if you can. Cook for about 5-6 minutes on each side, depending on how hot your burner or griddle gets. you're looking for a medium brown on each side.
Then transfer your muffins to the lined baking pan and bake for about 10-20 minutes. You will need to cut into one to test it (you know, for science), since it kinda depends on how much they got cooked on the inside during the stove top round and how hot your oven is.
After making these once or twice you'll have it customized for your individual stove and oven, so you won't need to do so much testing and checking. I'd write down notes on how you do it the first time (I usually just print out a recipe, make my own notes on it, and put it in a 3-ring binder), and refer to them after that.
Once I started making these, I became addicted and spoiled by the homemade flavor and have started making them regularly. They're one of my husband's favorite breakfast foods.
How to Serve These Muffins
I highly recommend spreading some kind of delicious spread on the English muffins, but what you choose to add is up to you and the possibilities are endless! A few ideas:
- Homemade Jam
- Smashed avocado
- Hummus
- Peanut or Almond Butter
- Stretchy, melty vegan mozzarella -- you could make a mini pizza!
- Vegan mayo and sandwich toppings like veggies and tempeh bacon
- You could even use these as the base for a really fun vegan eggs benedict recipe I have coming soon!
A Few Final Notes
This recipe makes 6 English muffins that are about ½ inch thick. If you would like thicker English muffins, simply double the recipe (you may also need to increase the bake time).
Since gluten-free baked goods are more prone to drying out, I'd recommend storing these in an airtight container for up to 5 days. If worried about them going stale, you could also try freezing them and defrosting in a toaster.
If you are fine to eat gluten, you can use regular all purpose flour in this recipe. You won't need to use the xanthan gum or psyllium husk.
If you would like to use whole wheat flour for a healthier muffin, you can absolutely do that as well. You just may need to add extra warm water since whole wheat flour tends to eat up moisture a little more. Just add warm water a tablespoon at a time until the dough feels tacky, not dry.
As always, I hope you love this recipe!
Let me know in the comments below if you make it, tag me @Zardyplants on Instagram so I can see your beautiful recreations! If you tag me on IG, I will share your post in my stories :)
Also, one quick request: if you love how this recipe looks or tastes, please leave me a 5-star rating and a nice comment–ratings help more people find my recipes which helps me keep providing them! Thank you!
<3 LIZ
Follow me on Social Media!
Vegan Gluten-Free English Muffins from Scratch
- Total Time: 2 hours, 40 minutes
- Yield: 6 muffins 1x
Description
Easy, gluten-free vegan English muffins from scratch! If you've never made bread before, this recipe is a great place to start. Option to make gluten or gluten-free English muffins.
Vegan, Gluten-free, Oil-free, Nut-free, Soy-free
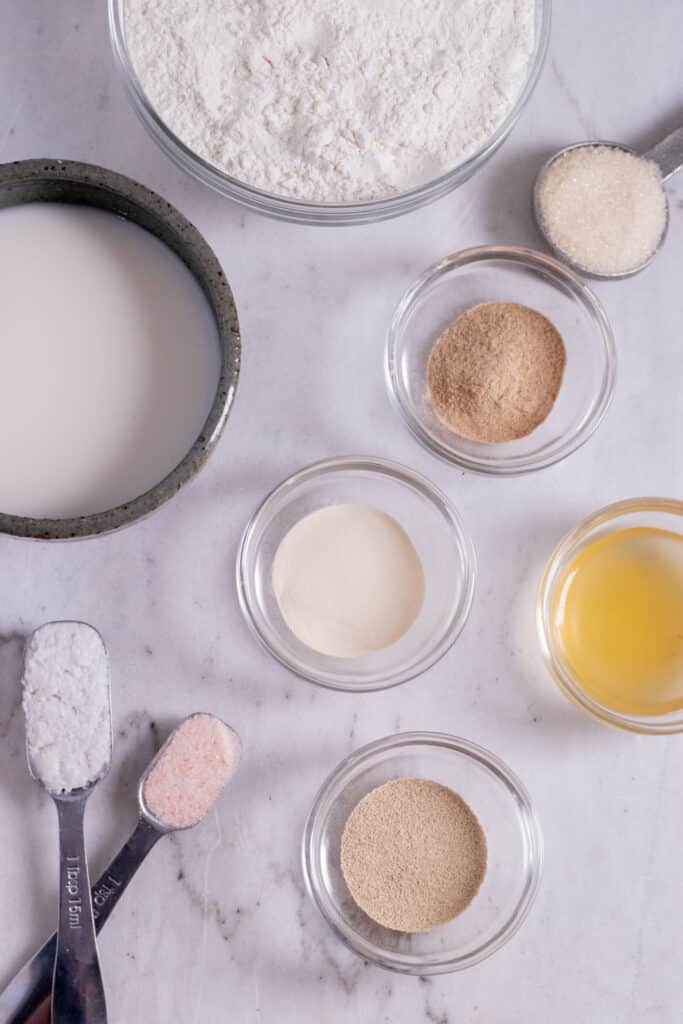
Ingredients
- 2-¼ cups all purpose gluten-free flour (the one I use is linked)
- ¼ ounce or 1 packet instant yeast
- 1 tsp salt
- 1 tbsp organic cane sugar
- 1.5 tsp psyllium husk
- 2 tsp xanthan gum
- ¾ cup unsweetened nondairy milk (I used almond)
- 1.5 tbsp apple cider vinegar
- 1 - 4 tablespoon warm water (add as needed to make dough lightly tacky)
- 1 tbsp softened coconut cream + a little more for greasing if desired
- Corn grits (around ⅓ cup), optional
Instructions
- Using a stand mixer or a strong silicone or plastic spoon, mix the dry ingredients, then add the wet ingredients (add the water a little at a time while mixing) and mix 5 minutes at medium speed.
- After mixing the dough you should have a somewhat tacky soft ball of tough. It should not be so sticky that it sticks to the bowl or your counter. If it is dry, crumbly, or rough, you may need to mix in some more warm water.
- Ball the dough together in a bowl (you can leave it in the mixing bowl or transfer it to a smaller bowl if you like) and cover the bowl with a clean kitchen towel or saran wrap.
- Place the dough in a warm-ish area to rise for 1 hour. My house is a little chilly this time of year, so I like to just place it in my oven with the oven light on.
- After the rise, you'll want to divide your dough in to 6 even pieces. Lightly knead each piece on a counter or table (try not to use a wood board, because again this can dry out the dough), about 3-5 times before shaping into a ball.
- Now preheat your oven to 350 degrees F (or 177 degrees C).
- If using English muffin rings (see article above): To keep your dough from sticking, lightly grease the inside of the rings with leftover coconut cream. Place the ball of dough inside one of the rings on a flat surface like your silicone mat lined pan and flatten the ball with the palm of your hand until it fills the edge of the rings.
- Heat a skillet or griddle over medium low heat. Sprinkle the tops and bottoms of the muffins with cornmeal, breadcrumbs, extra flour, or skip it, then place them on the pan or griddle.
- Cover the pan or the griddle if you can and cook for about 5-6 minutes on each side, depending on how hot your burner or griddle gets. you're looking for a medium brown on each side.
- Then transfer your muffins to the lined baking pan and bake for about 10-20 minutes. You will need to cut into one to test it (you know, for science).
- Slice the muffins in half and serve toasted with jam, nut butter, avocado, hummus, etc. -- the sky's the limit! Enjoy!
- Store leftovers in an airtight container for up to 5 days or freeze up to 6 months (defrost in toaster or toaster oven).
Notes
- NOTE 1:To soften the coconut cream, microwave it for maybe 5 seconds. You don't need to melt it completely, just make it soft enough to mix. If you overheat it, it can start to separate.
- NOTE 2:If you are fine to eat gluten, you can use regular all purpose flour in this recipe. You won't need to use the xanthan gum or psyllium husk.
- NOTE 3:If you would like to use whole wheat flour for a healthier muffin, you can absolutely do that as well, you just may need to add extra warm water since whole wheat flour tends to eat up moisture a little more. Just add warm water a tablespoon at a time until the dough feels tacky, not dry.
- Prep Time: 2 hours, 10 minutes
- Cook Time: 30 minutes
- Category: Breakfast
- Method: Oven, Baking
- Cuisine: American, English

Kellie
Hi! So im making these right now and I think you missed a step in the actual directions between step 5 and 6. In th blog you put a 2nd rise but the recipe it doesn't say to rise twice. I am doing a 2nd rise so im hoping thats right.
Thank you for doing a gluten and egg(dairy) free recipe. I've just started having to go egg free and my husband is gluten free so im hoping these come out good.
💚 Liz
Thank you for letting us know! Let us know how the batch turned out with the second rise! Hope you and your husband enjoy.