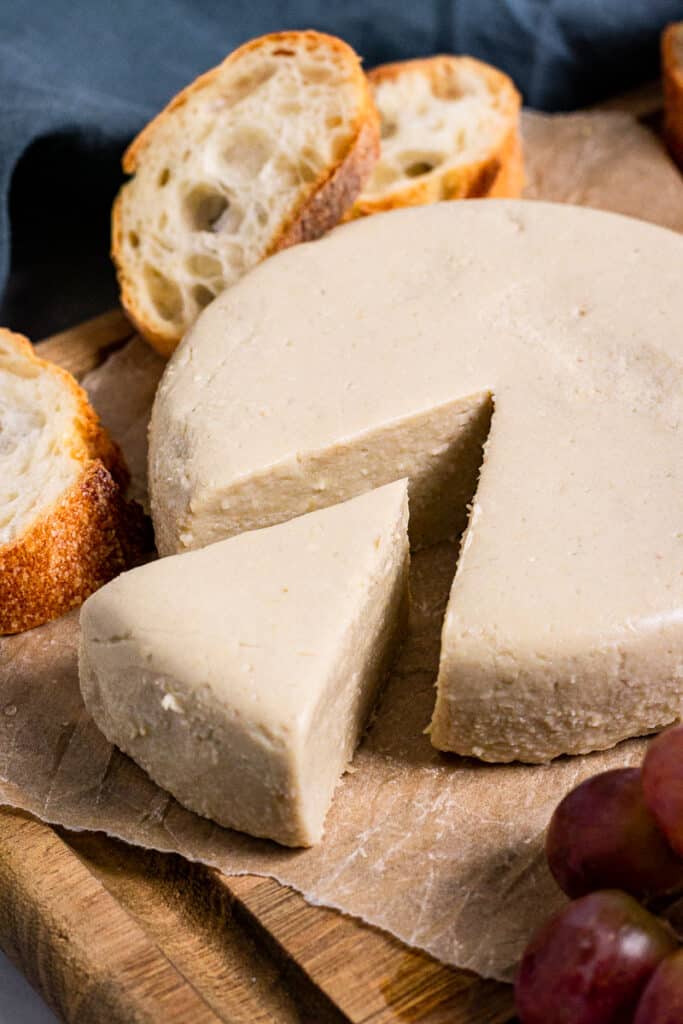
Rich, creamy, and smooth, this delicious Vegan Camembert is a fantastic fancy yet easy nut-free vegan cheese perfect for any vegan charcuterie board or snack. Prep this vegan Camembert recipe in just 10 minutes and let chill for an out-of-this-world flavor experience.
This post may contain affiliate links. See our disclosure policy for details.
Hey Internet, remember when I published my vegan Brie? Well, you all seemed to love it but I had several people ask how they could adapt the recipe to taste like Camembert.
So, I made some vegan Camembert and oh my, was that a good decision. We ate so much of this during the testing, but it’s OK, because this vegan cheese is actually pretty healthy!
Nut-free and totally delicious (I’ve got some suggestions, btw, if you do want to use cashews), this non-fermented vegan cheese recipe is super easy to make.
Camembert is a creamy cultured cheese from a village called Camembert in the Normandy region of France. There is a cheese museum in the center of the Camembert village.
Evidently it was created by a local farmer named Marie Harel in the late 18th century. This later received the seal of approval from Napoleon III.
Camembert and Brie have a lot of similarities: both made in a similar fashion, both soft and creamy cheeses and both hailing from France. But while Brie is a bit more fruity and light, Camembert is slightly drier, with a more rich and earthy taste. Both are absolutely delicious.
Seeing as both of my vegan French cheeses are not cultured, I won’t pretend they’re traditional or authentic, but they are delicious and REALLY easy to make.
These cheeses are perfect with fruit, crackers, or if you want to be really French, slices of a baguette. You can toast them if you like.
Alright, I mentioned it was simple to make this cheese--just 10 minutes of prep and then throw it in the fridge! Let’s get to it.
What You’ll Need
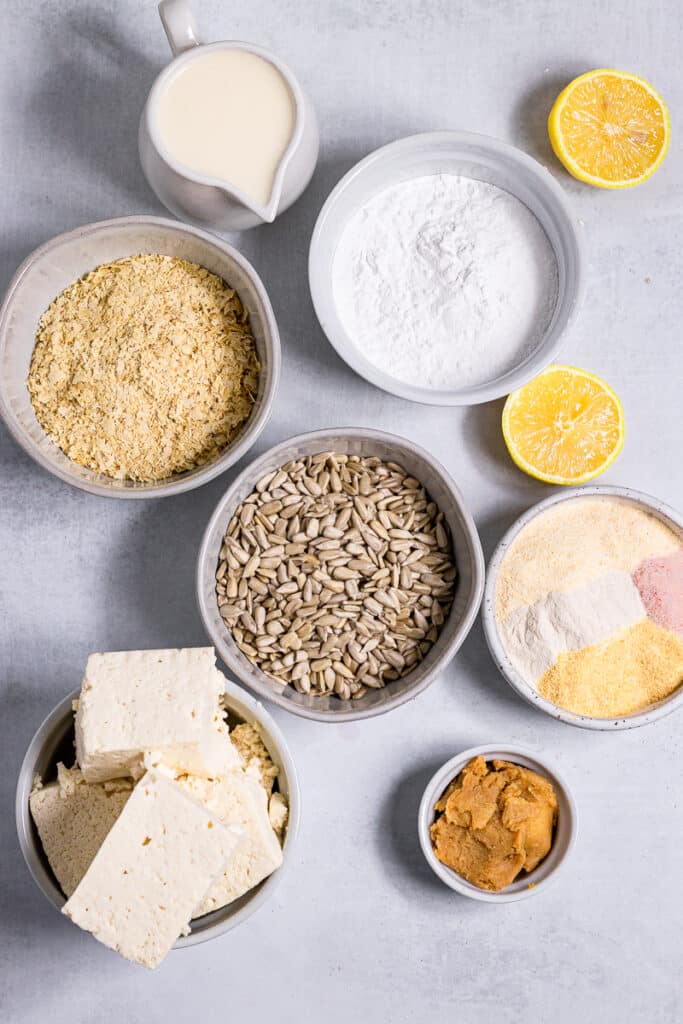
So as you now know, all of my vegan cheeses use tofu as a base. I like to do this because it’s a.) cheaper than cashews, b.) nut-free and many of you have told me you appreciate that for one reason or another, usually involving a tree-nut allergy, and c.) it’s still high in protein but lower in fat.
That last part, the fat part, is actually very relevant in this recipe, as Camembert is quite a fatty cheese and I ended up deciding to add fat to this recipe in the form of sunflower seeds to get the right mouthfeel. Please see the substitutions section for more details.
I used firm tofu as I do for everything. It has nothing to do with the fact that I get it in a 4-pack at Costco, saving me money. No, nothing like that.
Extra firm will work but you might need a little more liquid to get it to blend. Similarly, medium or soft tofu should work but use less liquid. I am not sure how to modify the recipe for silken tofu--maybe no liquid.
I blended this with raw sunflower seeds to create a rich tasting base cheese, and then added things to flavor it.
The Camembert flavor was somewhat challenging to figure out. It came down to a combination of white/yellow (mild) miso paste, unfortified nutritional yeast (unfortified keeps this cheese from turning bright yellow), onion powder, garlic powder, a touch of salt, and some lemon juice for that tangy taste.
You’ll need some unsweetened non-dairy milk to get everything to blend. My favorite for this is soy milk but any will work. Just make sure you don’t accidentally get vanilla flavored -- ask me how I know.
Last but not least, as they’re actually two of the most important ingredients, we have tapioca starch (or tapioca flour, same thing) and agar powder, also known as agar agar.
These two things together help create a delightful, buttery smooth and creamy, even melty texture.
PLEASE NOTE THAT AGAR FLAKES ARE DIFFERENT FROM AGAR POWDER. IF YOU HAVE AGAR FLAKES YOU WILL NEED MUCH MORE THAN THE MEASUREMENT THAT IS WRITTEN FOR AGAR POWDER.
It looks like roughly 3 times the amount of flakes are needed if substituting, but they can also be rougher so you need to boil them before use.
Try to use the agar powder if you can instead. You only need a small amount, but you’ll be able to make SO MANY BATCHES, plus it can be used for other things like gelatin replacement.
What Substitutions Can I Make?
Tofu
As mentioned above, firm tofu is what I used, but medium and soft tofu will work with less liquid added and extra firm tofu will work with slightly more liquid added. You’re looking for a thick pancake batter consistency.
Cashews: To make vegan cashew Camembert, I would use 1.5 cups soaked cashews. If you have a powerful blender (like a Vitamix or Blendtec, you only need to soak the cashews for 10-15 minutes in hot water. If not, soak them for an hour in boiling water or overnight in room temperature water.
Sunflower Seeds
I used raw sunflower seeds to give my vegan Camembert the mouthfeel of the dairy version.
If you want this cheese to be lower fat, the recipe WILL work without the sunflower seeds. I tested it with unsweetened soy milk the first two tries. Reduce the amount of non-dairy milk by ⅓ cup or so if you do this (just make sure you still have a thicker pancake batter consistency).
Miso Paste
Miso paste is kind of a funky, very umami (salty/savory) flavor that is unique. It’s actually fermented soybean paste, and a staple in many Asian countries’ cuisine and culinary history.
It ended up that the more miso I used, the more like Camembert it tasted.
There are many kinds of miso paste--for this recipe, I highly recommend yellow or white miso paste, otherwise known as mild miso. This is also the substance that can be dissolved in hot water (don’t boil it though, or you’ll kill many of the nutrients) to create miso soup!
If you are avoiding soy, I have used chickpea miso before and it tastes pretty similar.
Lemon Juice
If you don’t have access to fresh lemons or bottled lemon juice, you can try a neutral vinegar like white vinegar, white wine vinegar, rice vinegar, or even apple cider vinegar! But I thought the tangy lemon was the perfect element in this recipe, so that’s what I used.
Salt
The little pinch of salt I did include does indeed add more sodium and it can be omitted, but it will taste slightly less authentic, as cheese in general is very salty, dairy or non.
Any salt will work. I use Himalayan pink salt because I like the flavor, but sea salt or any other salt will work, though I hate the taste of table salt as it tastes “too salty” to me, though I’m aware of how strange that sounds.
Tapioca Starch / Flour (Same thing)
Tapioca starch enables me to make stretchy vegan cheeses, like my super popular melty vegan mozzarella. It cannot be directly substituted with anything… but luckily I’ve seen it in health food stores, chain grocery stores, online health food stores like Thrive Market, Amazon, etc.
If you only want to use the agar powder, you can, but the cheese may be somewhat less soft and creamy, that classic Camembert texture.
Agar Powder
Finally, agar powder is the seaweed derivative that enables this cheese to firm up in the mould (the container we store it in). Agar powder is also known as agar agar, but beware of the flakes. You will need 3 times the amount of flakes for this recipe if you are substituting the flakes for the powder, and you may need to cook the batch longer to soften the flakes (though they will soften somewhat in the blender).
You could try using kappa carrageenan if you have that, as well, but I used agar specifically to create a softer textured cheese, not a hard cheese like my vegan cheddar.
Tips for Making Vegan Camembert
Making this cheese is actually very easy and simple to do, as many of my vegan cheese recipes are. All we’re going to do is blend everything up, cook it until it has all come together, and refrigerate it until it has solidified.
So first, gather all your ingredients and place everything--except the agar powder and the tapioca starch--in the blender. You’ll see why in a moment.
BTW, you only need to drain--not press--the tofu. Break it up into a couple pieces to make the blending process quicker.
TOFU TIP: This is a DOUBLE BATCH, meaning it makes 2 cheese wheels. You can easily halve the recipe to make only one wheel of cheese. You can store extra tofu in an airtight container with water and keep it in the fridge for up to 5 days after removing it from the pack.
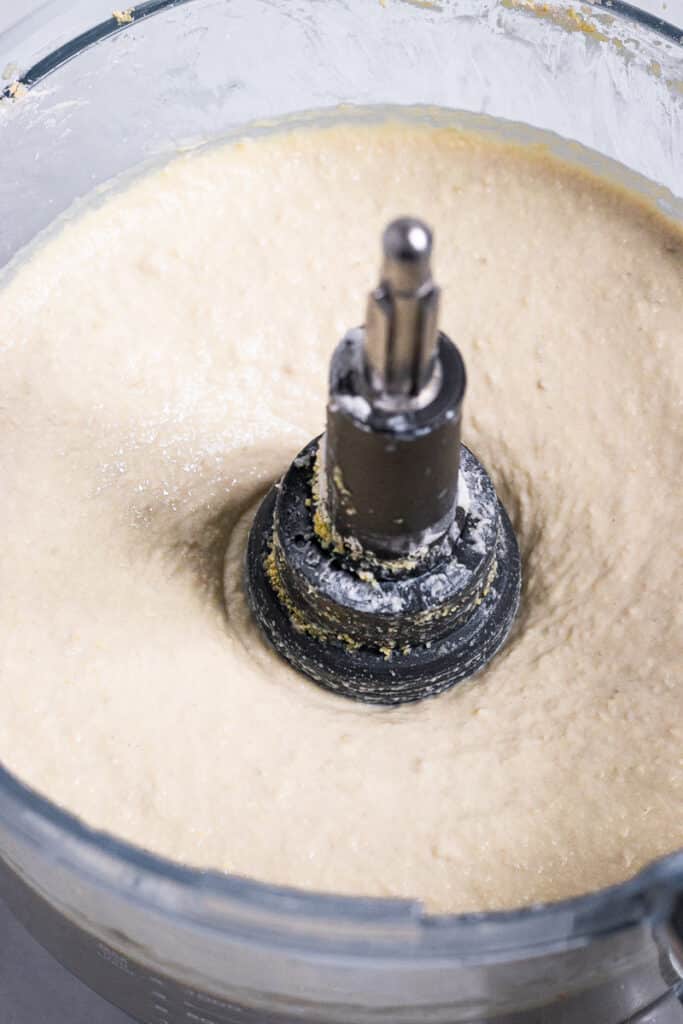
OK, now that you have most of your ingredients in the blender or food processor, blend it all up until smooth and taste it. That’s right, taste it.
Make sure you like the flavor, because it’s pretty much going to taste that way once it’s solidified.
Now is the time to add more lemon, more onion powder or garlic powder, more miso paste, more salt--anything you think it needs.
Blend it all up again and taste it again if you made any changes. Ready?
Just add the agar and tapioca and blend until smooth again, then pour the contents of the blender into a small to medium non-stick saucepan. Make sure to use a spatula to get all that cheesy goodness out of the blender!
Cooking the Cheese
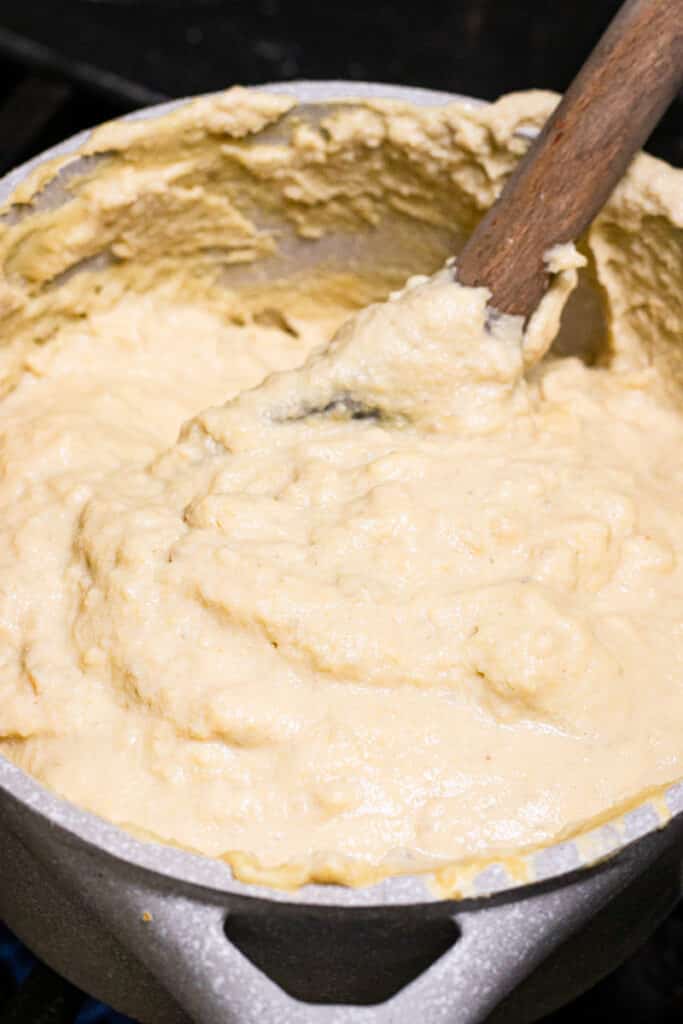
To cook the cheese, heat the pan over medium high heat until it starts to curdle. This should take around 5-6 minutes.
Stir it constantly with a strong spatula or wooden spoon. Turn the heat down to medium for the last few minutes of cooking, which is now--once it starts to curdle it will only be a few minutes before the cheese is ready to go in the mould.
As your stir, the curdled cheese will transform into a somewhat glossy, thick, homogeneous consistency. It will start to pull away from the pan very noticeably.
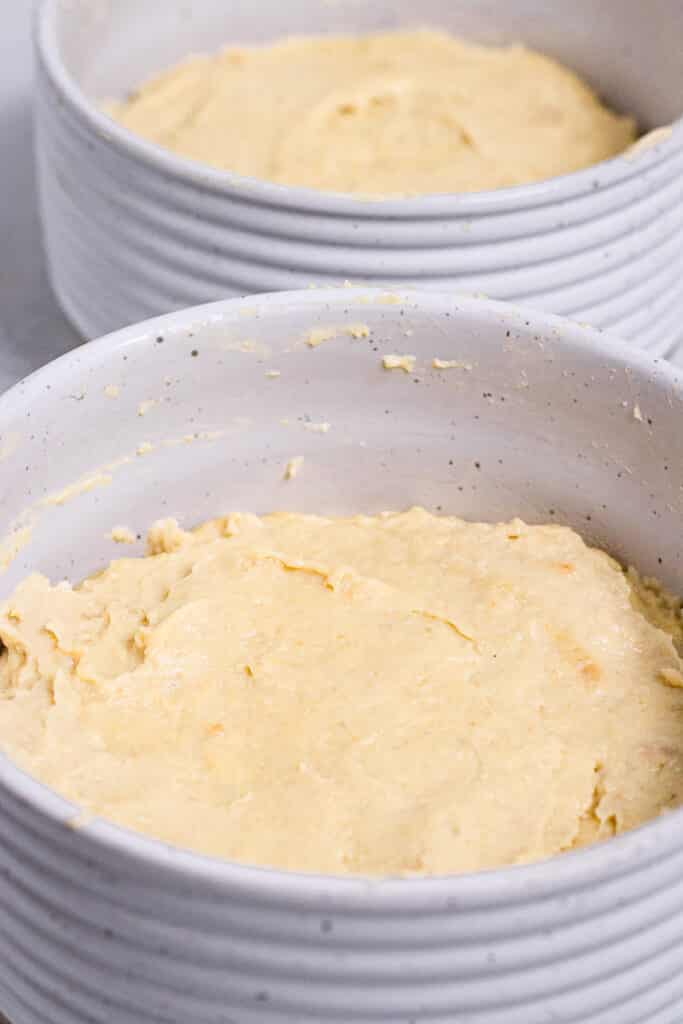
Pour the cheese into the container you’re refrigerating it in. Keep in mind that the container you refrigerate it in will be the shape of your completed cheese.
I used a round ceramic container I found at Ross, a discount store in the United States. These microwave bowls seem similar.
I have tested the cheese in both glass and ceramic containers and have had no issues, but have not tried it in a plastic container so I cannot speak to that circumstance.
I should mention you can absolutely use the cheese like this. It’s safe to eat--so if you’d like to just throw it into pasta, you absolutely can.
But if you want to be able to slice it like Camembert, put a lid or a cover on the container for at least 6-8 hours--I’ve always done it overnight.
Releasing the Cheese
Run a butter knife carefully around the inside wall of the container. Flip the container upside down and pat or tap it carefully onto a board or plate to release the cheese.
If you are having trouble, use the butter knife to gently pry underneath the cheese to get it to release, but in all my times testing this recipe, I’ve never had an issue removing it from the container.
Serve with slices of a French baguette, crackers, fruit, or anything else you like! We particularly loved the combination of the bread, vegan camembert, and red grapes.
More Nut-Free Vegan Cheese Recipes
I don’t blame you. Vegan cheese is awesome! Did you know I have a whole section on vegan cheese on my site?!
I even made a whole list of my favorite nut-free vegan cheese recipes!
Here’s a few of them:
Nut-Free Vegan Cheddar Cheese - This one’s a fan favorite as well!
Vegan Brie - Also now a fan favorite!
Soy-free Nut-free Vegan Cheese Sauce
Queso (part of a nacho fries recipe, but you could just scroll down to the sauce section!)
I have a thing for vegan cheese and I come out with new recipes all the time. If you’d like to sign up for my free newsletter so you don’t miss any cheese recipes, please fill out the below form!
And if you're looking for more tofu dishes, check out this post I made with all my best tofu recipes.
Anything Else?
As always, I hope you love this recipe--I know I do, and Mr. Zardyplants does too. He kept trying to eat it while we were photographing it! Luckily it makes 2 wheels lol.
This vegan Camembert is:
- Fancy
- Rich
- Buttery
- Cheesy
- Creamy
- Tangy
- Salty
- Satisfying
- And great in any dish or just as a side to bring to a holiday or dinner party--even meat eaters will enjoy it! It makes the perfect addition to any cheese or charcuterie board, too.
Let me know in the comments below if you make this recipe or tag me @Zardyplants on Instagram so I can see your beautiful recreations! If you tag me on IG, I will share your post in my stories :)
Also, one quick request: if you love how this recipe looks or tastes, please leave me a 5-star rating and a nice comment–ratings help more people find my recipes which helps me keep providing them! Thank you!
<3 Liz
Save this for later on Pinterest!
Follow me on Social Media!
Follow my blog with Bloglovin
Vegan Camembert
- Total Time: 10 minutes
- Yield: 4 cups 1x
- Diet: Vegan
Description
Rich, creamy, and smooth, this delicious Vegan Camembert is a fancy yet easy nut-free vegan cheese perfect for a snack or appetizer.
Ingredients
- 16 oz (396g) block of firm tofu, drained but not pressed (see note 3)
- 1 ¼ cups unsweetened non-dairy milk, or a bit more if needed
- ⅔ cup raw sunflower seeds (see note 4)
- Juice of 1 medium lemon (or 1.5 small lemons), to taste
- ½ cup unfortified nutritional yeast (fortified makes it more yellow, but will still taste good)
- 2 ½ tbsp onion powder, to taste
- 2 ½ tbsp garlic powder, to taste
- 2 tbsp yellow or white miso paste (use chickpea miso if soy-free, ensure it is GF if needed)
- 1 tsp salt, to taste
- 1 tbsp agar powder (SEE NOTE 5 ABOUT AGAR FLAKES!)
- 6 tbsp tapioca starch/flour (see note 6)
Instructions
- Blend: So first, gather all your ingredients and place everything--except the agar powder (link) and the tapioca starch (link)--in the blender or food processor. You’ll see why in a moment. BTW, you only need to drain--not press--the tofu. Break it up into a couple pieces to make the blending process quicker. Blend it all up until smooth and taste it. Make sure you like the flavor, because it’s pretty much going to taste that way once it’s solidified. Now is the time to add more lemon, more onion powder or garlic powder, more miso paste, more salt--anything you think it needs. Blend it all up again and taste it again if you made any changes.
- Now add the agar and tapioca and blend until smooth again, then pour the contents of the blender into a small to medium non-stick saucepan. Make sure to use a spatula to get all that cheesy goodness out of the blender!
- Cook: To cook the cheese, heat the pan over medium high heat until it starts to curdle. This should take around 5-6 minutes. Stir it constantly with a strong spatula or wooden spoon. Turn the heat down to medium for the last few minutes of cooking, which is now--once it starts to curdle it will only be a few minutes before the cheese is ready to go in the mould. As your stir, the curdled cheese will transform into a somewhat glossy, thick, homogeneous consistency. It will start to pull away from the pan very noticeably.
- Pour the cheese into the container you’re refrigerating it in. Keep in mind that the container you refrigerate it in will be the shape of your completed cheese. I used a round ceramic container I found at Ross, a discount store in the United States. I have tested the cheese in both glass and ceramic containers and have had no issues, but have not tried it in a plastic container so I cannot speak to that circumstance. I should mention you can absolutely use the cheese like this. It’s safe to eat--so if you’d like to just throw it into pasta, you absolutely can.
- Refrigerate: If you want to be able to slice it like Camembert, put a lid or a cover on the container for at least 6-8 hours--I’ve always done it overnight.
- Release: Run a butter knife carefully around the inside wall of the container. Flip the container upside down and pat or tap it carefully onto a board or plate to release the cheese. If you are having trouble, use the butter knife to gently pry underneath the cheese to get it to release, but in all my times testing this recipe, I’ve never had an issue removing it from the container.
- Serve: Serve with slices of a French baguette, crackers, fruit, or anything else you like! I particularly loved the combination of the bread, vegan camembert, and red grapes.
- Store: Refrigerate leftovers in an airtight container in the refrigerator for up to 5 days. A great way to use up the cheese is in sandwiches or over pasta!
Notes
- Note 1: Prep and cook time estimates do not include refrigeration time.
- Note 2: This is a DOUBLE BATCH, meaning it makes 2 cheese wheels. You can easily halve the recipe to make only one wheel of cheese. You can store extra tofu in an airtight container with water and keep it in the fridge for up to 5 days after removing it from the pack.
- Note 3: As mentioned above, firm tofu is what I used, but medium and soft tofu will work with less liquid added and extra firm tofu will work with slightly more liquid added. You’re looking for a thick pancake batter consistency. To make vegan cashew Camembert, I would use 1.5 cups soaked cashews. If you have a powerful blender (like a Vitamix or Blendtec, you only need to soak the cashews for 10-15 minutes in hot water. If not, soak them for an hour in boiling water or overnight in room temperature water.
- Note 4: I used raw sunflower seeds to give my vegan Camembert the mouthfeel of the dairy version. If you’re substituting cashews for the tofu, you probably don’t need the sunflower seeds. If you want this cheese to be lower fat, the recipe WILL work without the sunflower seeds. I tested it with unsweetened soy milk the first two tries. Reduce the amount of non-dairy milk by ⅓ cup or so if you do this (just make sure you still have a thicker pancake batter consistency).
- Note 5: Agar powder is the seaweed derivative that enables this cheese to firm up. Agar powder is also known as agar agar, but beware of the flakes. You will need 3 times the amount of flakes for this recipe if you are substituting the flakes for the powder, and you may need to cook the batch longer to soften the flakes (though they will soften somewhat in the blender). You could try using kappa carrageenan if you have that, as well, but I used agar specifically to create a softer textured cheese, not a hard cheese like my vegan cheddar.
- Note 6: Tapioca starch enables me to make stretchy vegan cheeses, like my super popular melty vegan mozzarella. It cannot be directly substituted with anything… but luckily I’ve seen it in health food stores, chain grocery stores, online health food stores like Thrive Market, Amazon, etc. If you only want to use the agar powder, you can, but the cheese may be somewhat less soft and creamy, that classic Camembert texture.
- Prep Time: 3 minutes
- Cook Time: 7 minutes
- Category: appetizer, snack
- Method: Blender, stove
- Cuisine: French
Keywords: Vegan, Gluten-Free, Oil-Free, Nut-Free, Sugar-Free, vegan cheese, nut-free vegan cheese, vegan camembert


Esther Saperstein
This cheez is astonishing. If you hadn't told me it was vegan, I wouldn't have known!
★★★★★
Esther Saperstein
Delicious, spreads beautifully, has the mouth-feel of the real thing.
★★★★★
Judith L Blotnick
What a great idea to still enjoy "cheese" without dairy and
excess fat! This is both yummy and healthy. Love it.
★★★★★
Monique
Great recipe. Love the flavor. Easy to make. Thank you, Liz.
★★★★★
Mary Anne Kennedy
I’m always looking for new ideas in food prep. These recipes are delicious and look enticing
★★★★★
Linda C
I love delicious snacks that are also packed with nutrition. Can’t wait to serve this when we can start entertaining again!
★★★★★
Sheila Hollihan-Elliot
Wow - LOVE this -- I'm gradually becoming more vegan but this allows me to still treat myself to some favorite tastes - and I especially love the touches of humor as well as the sense that she really knows and keeps me from silly mistakes - like agar flakes vs agar powder -- Thank you SO MUCH! PS - I just signed up for your newsletter :)
★★★★★
Becky
I was very excited to try this as I am dairy free and really miss cheese, but I would have to say I didn't experience anything resembling camembert cheese in flavor. I did like it, and will enjoy it with crackers so thank you for a good high protein spread!
★★★