Meaty, salty, and savory, this delicious Vegan Salami is easy to make at home without any fancy equipment. It makes the perfect addition to any sandwich, vegan charcuterie board, pizza, or just a delicious snack with crackers.

This post may contain affiliate links. See our disclosure policy for details.
Hey Internet, since my vegan pepperoni turned out so good, I wanted to try my hand at vegan salami too.
I actually was a very picky eater growing up but I LOVED salami.
Sandwich salami or the fancy dry cured ones that you enjoy during the holidays--it didn’t matter. I loved the salty, savory, and slightly tangy taste that salami is known for.
Fast forward to being vegan and I’d tried a couple store-bought cold cuts claiming to be salami--but the flavor just wasn’t very close to me. I generally like vegan cold cuts, but salami just wasn’t… cutting it. Sorry.
So I decided to try creating one using a similar method to the pepperoni that performed so well. I made some seitan, spiced it heavily and cooked it… And it was pretty good.
But it took some tweaking. So then, I remembered how delicious my vegan corned beef turned out and wondered if some of those ingredients would help me create the salami flavor I was looking for.
And by gosh, they did! I ran around the house (doesn’t take long, hah) screaming “IT WORKS, IT WORKS!” like a mad scientist.
It’s actually really easy to make too. Actually many of you have made my vegan pepperoni and this is the same method, so I’m confident you can make this too.
Let’s talk about some of those ingredients so we can really achieve the salami flavor.

What You’ll Need
- A medium beet: Around the size of a baseball… I promise, you won’t taste it! Plus, beets are a great source of dietary fiber, iron, folate, manganese, vitamin C, and potassium. How’s that for a plant based salami? You don’t absolutely need to peel it, but I did to make the product a little smoother. I recommend this vegetable peeler which makes all tasks super easy. I also wore some food prep gloves to protect my hands, and cut the beet on a plastic cutting board I didn’t care about. Cut off the root area, and cut into small-ish chunks so your food processor can chop it up quickly.
- Olive oil: While this vegan salami CAN be made oil-free and will still taste good, I wanted it to to be rich and delicious like salami so I did add some olive oil. Substitute tahini or more tomato paste and some vegetable broth (3 tablespoons each).
- Tomato paste: This concentrated tomato puree will both color and flavor our seitan, so it’s necessary. It adds a rich, lightly sweet, but great flavor to the final product but it’s not overwhelming.
- Red wine vinegar: Adds some necessary almost Italian type flavor. Apple cider vinegar will also work, but I would not use balsamic as that’s a different flavor profile.
- Kalamata olives and brine: To get that real salami tang, I use something a little strange: kalamata olives and their brine. This does NOT make the seitan taste like olives, but rather just gives it an extra kick of flavor. The fat in the olives also helps the texture and mouthfeel of the seitan. Don’t worry, the food processor will blend up the olives so your seitan won’t be chunky. If you’re a person who hates olives, you won’t really taste it in the salami.
- Firm tofu: Adds both a more tender texture to the seitan—also makes it a whole protein. If you can’t have soy, you can substitute ½ cup of beans, preferably kidney beans.
- Miso paste: A salty and umami way of flavoring our seitan without just adding soy sauce. Add more salt if you don’t have this or can’t have soy.
- Nutritional yeast: Affectionately termed ‘nooch’ by vegans, nutritional yeast is an important ingredient because of the savory depth of flavor it adds. It’s not super recognizable though, so don’t worry if you’re not a big fan of it. If you don’t want to buy a whole container, check the bulk bins at your local health food store.
- Fresh cracked black pepper: Salami is peppery, so don’t skip this unless you have a strong aversion to it.
- Fennel seed, oregano, and garlic powder: Helps add that sausage-like flavor, almost like pork.
- Sea salt: This recipe is a mock version of a cured meat, which is usually cured with salt so we have to use a fair amount of salt to mimic the flavors. Use the amount indicated (1 tablespoon) of sea salt, or if using table salt, decrease to 1 ½ teaspoons since the grains of table salt are finer, making it “saltier.”
- Vital wheat gluten: This is what makes it seitan. Vital wheat gluten is made from the protein of wheat. It’s essentially a flour that we’ll mix into the blended mixture to make a “dough” so we can roll our mixture into seitan salami logs for steaming. I would not recommend substituting bread flour--even though it has higher protein content than regular flour, it can still turn out more like bread and less like seitan mock meat.
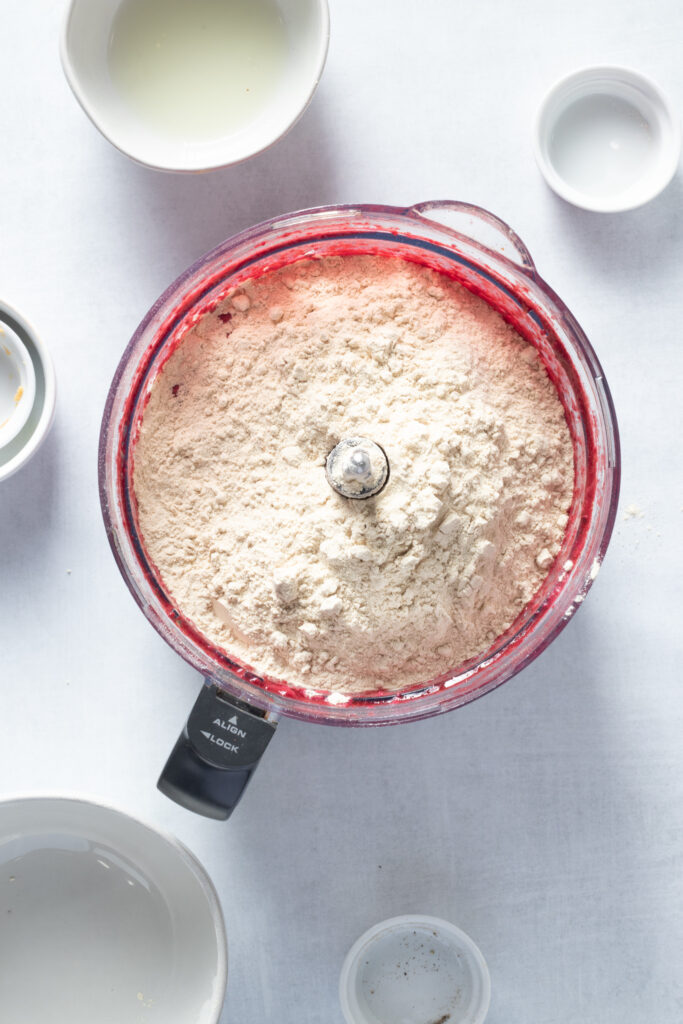
How to Make Vegan Salami
- Note: You’ll need a food processor for this recipe, what a perfect excuse to invest in one if you haven’t already! If you don’t have one, I recommend a Cuisinart food processor or if you cook a LOT, my baby is the Breville Sous Chef 12 Cup and it is AMAZING. I’ve also heard good things about Ninja, though my prior experience was not amazing. You can use a blender if you need to. If that is the case, do everything except add the vital wheat gluten, and transfer the mixture to a large bowl, then add the vital wheat gluten with a strong spoon (it may get stained from the beets if it’s porous, ask me how I know). Mix by hand once it gets too hard to stir until the vital wheat gluten is fully incorporated.
- Another note: You’ll also need a steamer pot or a pot fitted with a steamer basket. Make sure your pot has a lid, or you can purchase a universal lid.
- Add the chopped beet, olive oil, tomato paste, red wine vinegar, olives, and brine to a food processor fitted with an S-blade and blend until super smooth.
- Add the firm tofu, miso paste, nutritional yeast, black pepper, fennel seed, and sea salt and blend until smooth again.
- Now add the vital wheat gluten and mix until just combined.
- Add 1-2 inches of water to the base of your steamer pot and start it to boil.
- Remove the mixture from the food processor and place in a large bowl. If the dough seems wet or way too soft (it should be somewhat firm but not hard), sprinkle on some more vital wheat gluten (3 tablespoons at a time) and work it into the dough without over kneading it.
- Divide the mixture in 4 pieces. If you’d like to be exact, weigh the mixture on a food scale and divide exactly in 4 pieces. It’ll be fine if you don’t, though, just eyeball it.
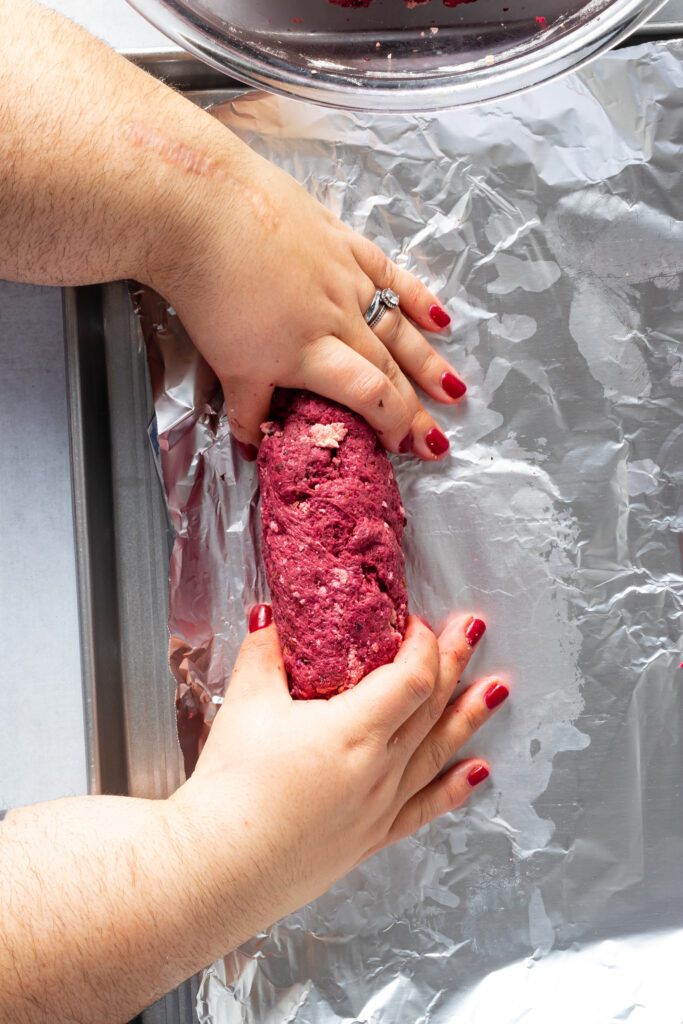

- On a large piece of aluminum foil (I recommend the extra wide heavy duty aluminum foil), take your first ball of vegan salami and compact it together really tightly with your hands on all sides. Then begin to roll it between your hands or with your hands on top of it on the foil until you get a large log, approximately 3 inches thick. Roll until it looks even, it should be around 6-8 inches long.
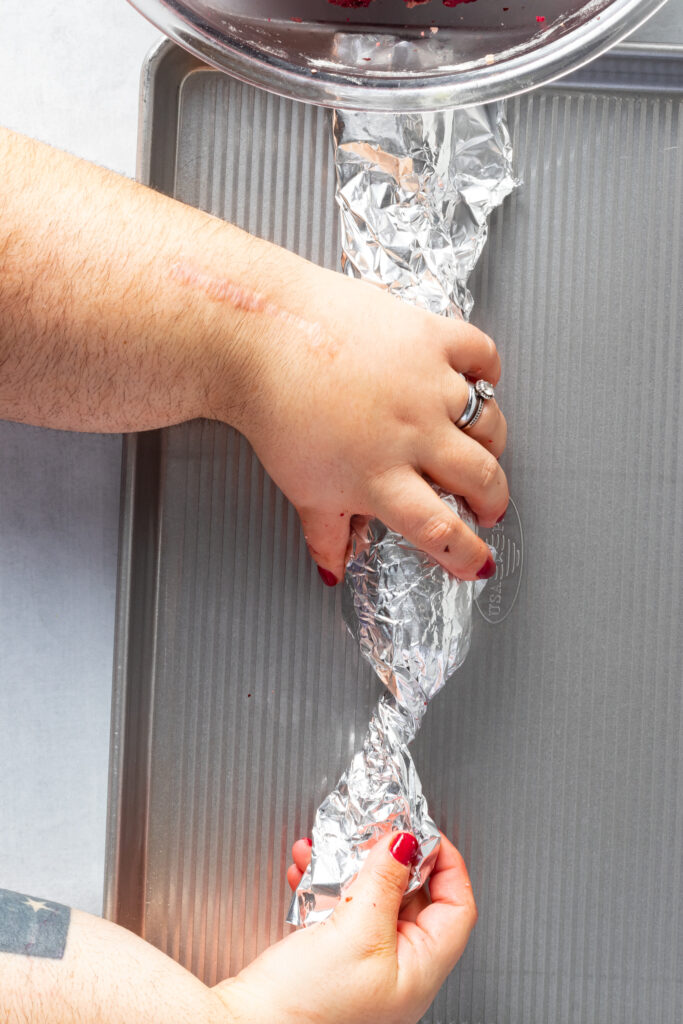
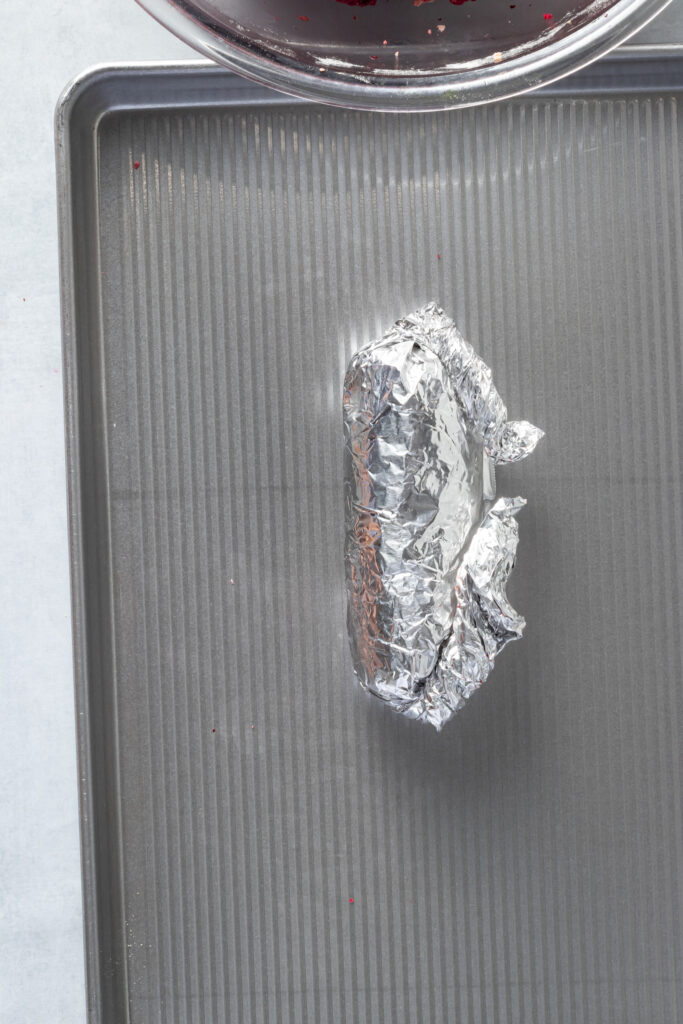
- Now wrap it by rolling it up in the foil, smoothing the sides as you go. Roll fairly tightly, but don’t be overly concerned about it. Now take the edges and twist them, kind of like a piece of hard candy. Fold the ends in so they stay and repeat this step with the remaining seitan.
- Once the water in your steamer pot is boiling, add the wrapped salami to the steamer insert and put on a lid. Steam on high heat for 35 minutes.
- When the timer is up, remove the lid and the pot from heat. Let stand for 10-20 minutes, then refrigerate the salami (still wrapped) until cool, at least 4 hours. It is fully edible before it’s chilled, but it will be softer. Cooling the vegan salami fully will allow it to firm up. The rolled parcels will become a little inflated and very firm--this is normal. Just unwrap carefully, discard the foil, and slice the salami preferably with a serrated knife.
- I highly recommend serving this salami with fancy cheese like my vegan brie, vegan camembert, or vegan cheddar and some crackers. You could even feature it in a vegan charcuterie board (coming soon!).
- Refrigerate leftovers for up to 4 days in an airtight container. You may freeze the wrapped seitan salami in the foil and in a plastic bag for up to 3 months. If already opened/cut, wrap in plastic or foil and place in a freezer safe bag or container and freeze for up to 3 months.
More Seitan Recipes
I’m loving experimenting with seitan and vital wheat gluten. It’s fun to see what I can come up with, and that high protein, delicious meals don’t need to contain animal products. If you’re interested in increasing your protein intake, check out my vegan high protein meals.
Here are some seitan recipes I’m loving right now:
Vegan Philly Cheesesteaks (these happen to be the most popular recipe on my blog!)
- Vegan Sausage
- Instant Pot Seitan (the basic beefy recipe for any application)
- Vegan Drumsticks
- Vegan Corned Beef
- Seitan Chicken Nuggets
- Vegan Pepperoni
- Vegan Schnitzel
- Seitan Turkey
- Vegan Pastrami
- Vegan Gyros
- Seitan Chicken
Anything Else?
As always, I hope you love this recipe–I know I do, and Mr. Zardyplants does too. I definitely got the coveted reaction from him when he first tried it: eyes closed and “Mmmmpppphhhh” while chewing. I just love that.
This vegan salami is:
- FLAVORFUL
- Tender
- Rich
- Salty
- A little tangy
- Moist (sorry)
- Chewy
- Tender
- Juicy
- Meaty (but without the cruelty!)
- Satisfying
- And perfect for a vegan sandwich, charcuterie board, pizza, or even just a snack!
Let me know in the comments below if you make this recipe or tag me @Zardyplants on Instagram so I can see your beautiful recreations! If you tag me on IG, I will share your post in my stories :)
Also, one quick request: if you love how this recipe looks or tastes, please leave me a 5-star rating and a nice comment–ratings help more people find my recipes which helps me keep providing them! Thank you!
<3 Liz
Save this for later on Pinterest!


Vegan Salami
- Total Time: 50 minutes
- Yield: 4 1x
- Diet: Vegan
Description
This delicious Vegan Salami is easy to make at home without any fancy equipment. It makes the perfect for a sandwich, or charcuterie board!
Ingredients
- 1 medium beet, peeled and diced (see note 1)
- 6 tablespoons olive oil (see note 2)
- 4 tablespoons tomato paste
- 4 tablespoons red wine vinegar (see note 3)
- ½ cup pitted kalamata olives (see note 4)
- ⅓ cup brine from kalamata olives
- 4 ounces firm tofu (¼ of a 1 pound block) (or sub ½ cup canned kidney beans)
- 2 tablespoons white or yellow miso paste (see note 5)
- ⅓ cup nutritional yeast
- 1 tablespoon fresh cracked black pepper
- 1 tablespoon fennel (grind if desired)
- 1 tablespoon dried oregano
- 2 teaspoons garlic powder
- 1 tablespoon sea salt (see note 6)
- 3 ¼ cups vital wheat gluten
Optional
- ¼ cup of crumbled tofu from the remainder of the block--work this in to create the speckled fat look. Doesn’t add anything to the flavor or texture.
Instructions
- Note: You’ll need a food processor for this recipe, what a perfect excuse to invest in one if you haven’t already! If you don’t have one, I recommend a Cuisinart food processor or if you cook a LOT, my baby is the Breville Sous Chef 12 Cup and it is AMAZING. I’ve also heard good things about Ninja, though my prior experience was not amazing. You can use a blender if you need to. If that is the case, do everything except add the vital wheat gluten, and transfer the mixture to a large bowl, then add the vital wheat gluten with a strong spoon (it may get stained from the beets if it’s porous, ask me how I know). Mix by hand once it gets too hard to stir until the vital wheat gluten is fully incorporated.
- Another note: You’ll also need a steamer pot or a pot fitted with a steamer basket. Make sure your pot has a lid, or you can purchase a universal lid.
- Blend the beet: Add the chopped beet, olive oil, tomato paste, red wine vinegar, olives, and brine to a food processor fitted with an S-blade and blend until super smooth.
- Add the rest of the ingredients except vital wheat gluten: Add the firm tofu, miso paste, nutritional yeast, black pepper, fennel seed, and sea salt and blend until smooth again.
- Add vital wheat gluten: Now add the vital wheat gluten and mix until just combined.
- Prepare steamer pot: Add 1-2 inches of water to the base of your steamer pot and start it to boil.
- Check the dough: Remove the mixture from the food processor and place in a large bowl. If the dough seems wet or way too soft (it should be somewhat firm but not hard), sprinkle on some more vital wheat gluten (3 tablespoons at a time) and work it into the dough without over kneading it.
- Divide the dough: Divide the mixture in 4 pieces. If you’d like to be exact, weigh the mixture on a food scale and divide exactly in 4 pieces. It’ll be fine if you don’t, though, just eyeball it.
- Form the vegan salami: On a large piece of aluminum foil (I recommend the extra wide heavy duty aluminum foil), take your first ball of seitan salami and compact it together really tightly with your hands on all sides. Then begin to roll it between your hands or with your hands on top of it on the foil until you get a large log, approximately 3 inches thick. Roll until it looks even, it should be around 6-8 inches long.
- Wrap it up: Now wrap it by rolling it up in the foil, smoothing the sides as you go. Roll fairly tightly, but don’t be overly concerned about it. Now take the edges and twist them, kind of like a piece of hard candy. Fold the ends in so they stay and repeat this step with the remaining seitan.
- Steam: Once the water in your steamer pot is boiling, add the wrapped salami to the steamer insert and put on a lid. Steam on high heat for 35 minutes.
- Chill: When the timer is up, remove the lid and the pot from heat. Let stand for 10-20 minutes, then refrigerate the salami (still wrapped) until cool, at least 4 hours. It is fully edible before it’s chilled, but it will be softer. Cooling the vegan salami fully will allow it to firm up. The rolled parcels will become a little inflated and very firm--this is normal. Just unwrap carefully, discard the foil, and slice the salami preferably with a serrated knife.
- Serve: I highly recommend serving this salami with fancy cheese like my vegan brie, vegan camembert, or vegan cheddar and some crackers. You could even feature it in a vegan charcuterie board (coming soon!).
- Store: Refrigerate leftovers for up to 4 days in an airtight container. You may freeze the wrapped seitan salami in the foil and in a plastic bag for up to 3 months. If already opened/cut, wrap in plastic or foil and place in a freezer safe bag or container and freeze for up to 3 months.
Notes
- Note 1: Around the size of a baseball... I promise, you won’t taste it! You don’t absolutely need to peel it, but I did to make the product a little smoother. I recommend this vegetable peeler which makes all tasks super easy. I also wore some food prep gloves to protect my hands, and cut the beet on a plastic cutting board I didn’t care about. Cut off the root area, and cut into small-ish chunks so your food processor can chop it up quickly.
- Note 2: While this vegan salami CAN be made oil-free and will still taste good, I wanted it to to be rich and delicious like salami so I did add some olive oil. Substitute tahini or more tomato paste and some vegetable broth (3 tablespoons each).
- Note 3: Red wine vinegar adds some necessary almost Italian type flavor. Apple cider vinegar will also work, but I would not use balsamic as that’s a different flavor profile.
- Note 4: To get that real salami tang, I use something a little strange: kalamata olives and their brine. This does NOT make the seitan taste like olives, but rather just gives it an extra kick of flavor. The fat in the olives also helps the texture and mouthfeel of the seitan. Don’t worry, the food processor will blend up the olives so your seitan won’t be chunky. If you’re a person who hates olives, you won’t really taste it in the salami.
- Note 5: White or yellow miso paste is a great salty and umami way of flavoring our seitan without just adding soy sauce. Add more salt if you don’t have this or can’t have soy.
- Note 6: This recipe is a mock version of a cured meat, which is usually cured with salt so we have to use a fair amount of salt to mimic the flavors. Use the amount indicated (1 tablespoon) of sea salt, or if using table salt, decrease to 1 ½ teaspoons since the grains of table salt are finer, making it “saltier.”
- Prep Time: 15 minutes
- Cook Time: 35 minutes
- Category: Ingredient, Snack
- Method: Baking
- Cuisine: American, Deli
Keywords: Vegan, Nut-Free, Sugar-Free, Vegan Salami, Vegan Deli Meat



Sue
These are delicious! Thanks for the recipe.
★★★★★